en
IMPORTANT

The Owner's Manual for this vehicle contains warnings, instructions and other information you must read and fully understand before safely riding or performing maintenance on this vehicle. Always follow the warnings and instructions in Owner's Manual.

Click the link above for the Table Of Contents, or download a full PDF of the Owner Manual in the Owner Support area of Polaris.com.

Ride Command User’s Guide for RZR, RANGER and GENERAL Off Road Vehicles

P/N 9939949

i Ride Command User’s Guide


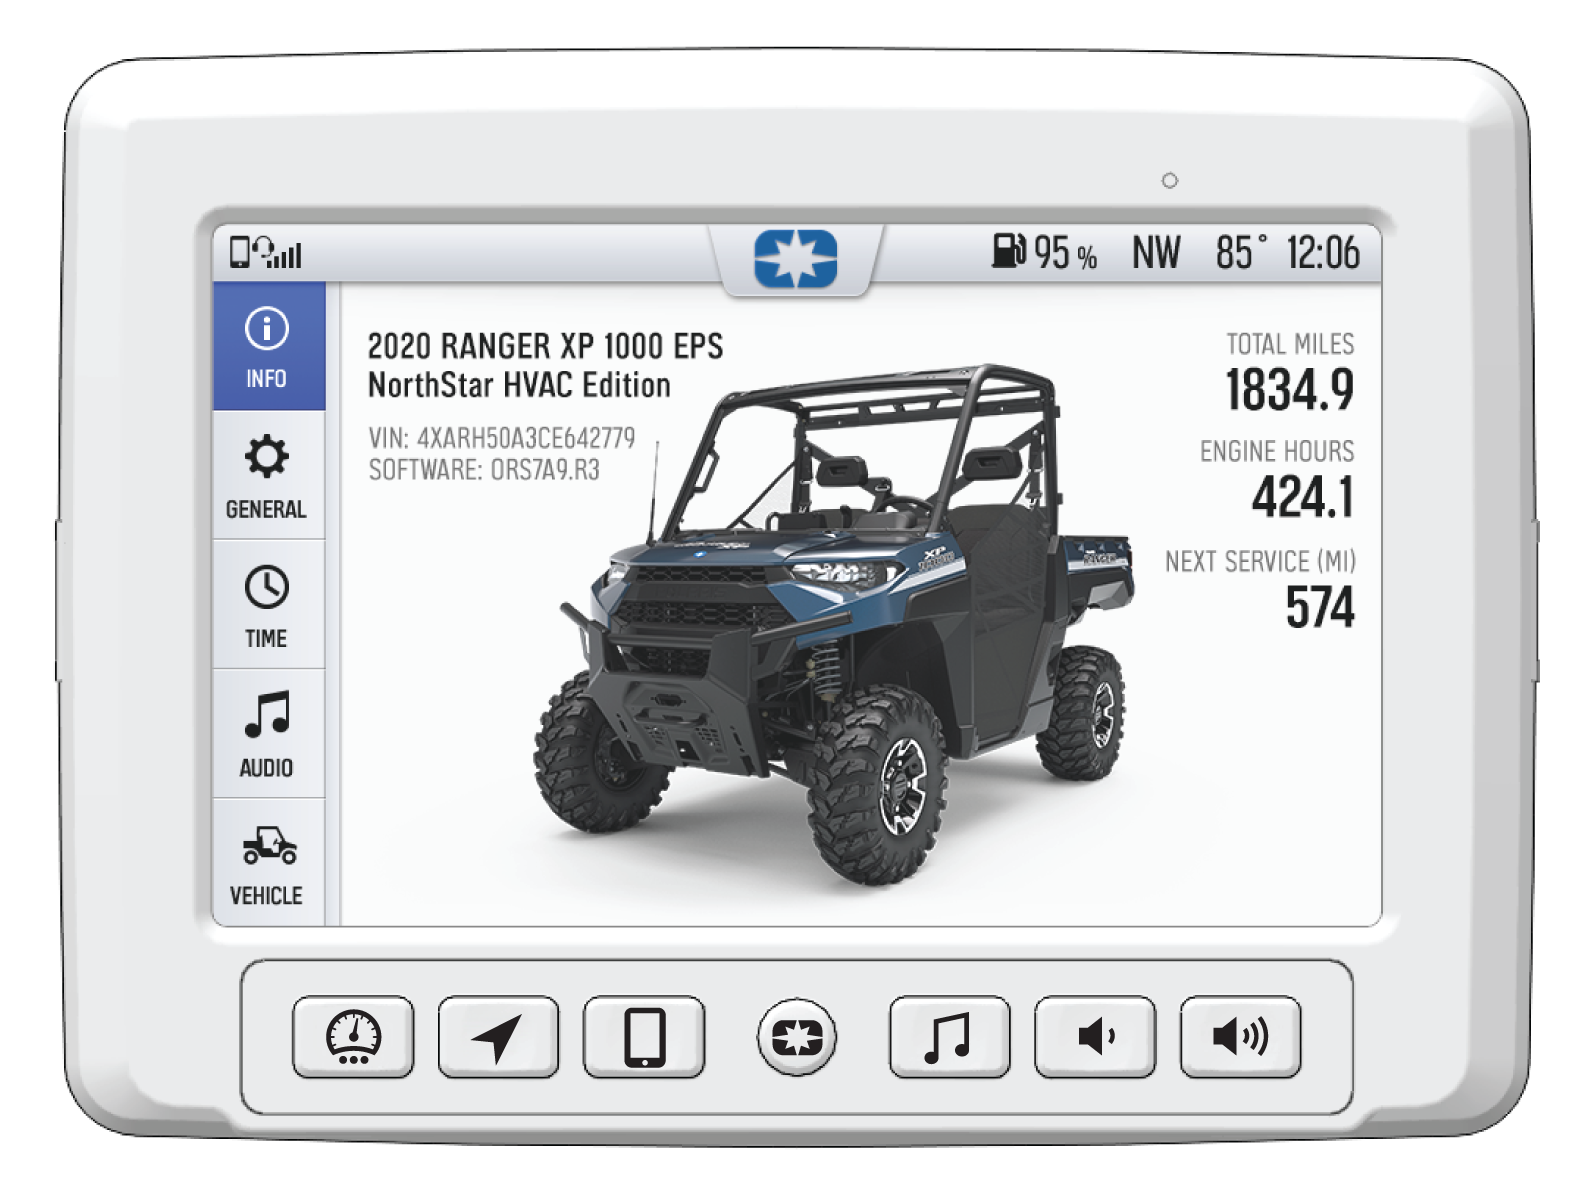
RIDE COMMAND User’s Guide

For RANGER, RZR, and GENERAL Off-Road Vehicles


WARNING

Operating, servicing, and maintaining a passenger vehicle or off-road vehicle can expose you to chemicals including engine exhaust, carbon monoxide, phthalates, and lead, which are known to the State of California to cause cancer and birth defects or other reproductive harm. To minimize exposure, avoid breathing exhaust, do not idle the engine except as necessary, service your vehicle in a well-ventilated area and wear gloves or wash your hands frequently when servicing your vehicle.

For more information go to www.P65Warnings.ca.gov/passenger-vehicle.

Trademarks

Unless noted, trademarks are the property of Polaris, Inc.

Ride Command® is a registered trademark of Polaris, Inc. iPhone® and iPod® are registered trademarks of Apple Inc. The Bluetooth® word mark and logos are registered trademarks owned by Bluetooth SIG, Inc.

Copyright Information

Copyright 2020 Polaris Inc. All information contained within this publication is based on the latest product information at the time of publication. Due to constant improvements in the design and quality of production components, some minor discrepancies may result between the actual vehicle and the information presented in this publication. Depictions and/or procedures in this publication are intended for reference use only. No liability can be accepted for omissions or inaccuracies. Any reprinting or reuse of the depictions and/or procedures contained within, whether whole or in part, is expressly prohibited.

The original instructions for this vehicle are in English. Other languages are provided as translations of the original instructions.

Printing

Printed in U.S.A.

RIDE COMMAND User Guide

ii Welcome

Thank you for purchasing a POLARIS vehicle, and welcome to our world-wide family of POLARIS enthusiasts. Be sure to visit us online at www.polaris.com for the latest news, new product introductions, upcoming events, career opportunities and more.

Here at POLARIS we proudly produce an exciting line of utility and recreational products. We believe POLARIS sets a standard of excellence for all utility and recreational vehicles manufactured in the world today. Many years of experience have gone into the engineering, design, and development of your POLARIS vehicle, making it the finest machine we’ve ever produced.

For safe and enjoyable operation of your vehicle, be sure to follow the instructions and recommendations in this owner’s manual. Your manual contains instructions for minor maintenance, but information about major repairs is outlined in the POLARIS Service Manual and can be performed by a factory certified Master Service Dealer (MSD) technician.

Your POLARIS dealer knows your vehicle best and is interested in your total satisfaction. Your POLARIS dealership can perform all of your service needs during and after the warranty period.

For the most up-to-date owner’s manual visit
https://www.polaris.com/en-us/owners-manuals.

iii Safety Symbols and Signal Words

The following signal words and symbols appear throughout this manual and on your vehicle. Your safety is involved when these words and symbols are used. Become familiar with their meanings before reading the manual.

DANGER

DANGER indicates a hazardous situation which, if not avoided, WILL result in death or serious injury.

WARNING

WARNING indicates a hazardous situation which, if not avoided, COULD result in death or serious injury.

CAUTION

CAUTION indicates a hazardous situation which, if not avoided, COULD result in minor to moderate injury.

NOTICE

NOTICE provides key information by clarifying instructions.

IMPORTANT

IMPORTANT provides key reminders during disassembly, assembly, and inspection of components.

The Prohibition Safety Sign indicates an action NOT to take in order to avoid a hazard.

The Mandatory Action Sign indicates an action that NEEDS to be taken to avoid a hazard.

Table Of Contents

Chapter 1: Introduction

1.1.1: Overview

Thank you for purchasing a RIDE COMMAND Display, and welcome to the Polaris RIDE COMMAND App. This intuitive display gives you access to your vehicle’s custom information and a variety of features.

For a safe and enjoyable riding experience with your new Display, please read your vehicle’s owner’s manual and this Display owner’s manual. If you should need additional assistance with Display operation or software updates, please see your Polaris dealer or visit polaris.com/ridecommand.

For the latest information about your RIDE COMMAND Display, including software updates, please visit ridecommand.polaris.com.

WARNING
Do not enter information while operating your vehicle. Failure to pay attention to operating your vehicle could result in loss of control, injury, or death. You assume all risks associated with using this device. Read your User Guide. Always ride with the latest maps and trails data from https://ridecommand.polaris.com/en-us/update.

1.1.2: Before you Ride

Before riding with your new display, do the following:

  • Read this section and the Ride Command User Guide in their entirety.

  • Familiarize yourself with the features and operations of the display while the vehicle is stationary.

  • Download the Polaris RIDE COMMAND App from the Apple® App Store® or Google Play® store and create your personalized account.

  • Check your display to ensure you have the appropriate maps and trails visible for your area. To change or update maps/trails see Update Maps.

  • Check https://www.polaris.com/en-us/owners-manuals/ for the latest updates to the owner’s manual.

NOTICE
Trails change often, and the trail data file is only considered valid for 90 days after the release date. Please keep your trail data up to date. Download the latest trails at https://ridecommand.polaris.com/display
NOTICE
Using the display for an extended period of time while the vehicle’s engine is off can drain the battery.

1.1.3: Device Operating Requirements

Phone functionality is dependent on the capabilities of your cell phone.

NOTICE
Some cell phones or operating systems will not work as shown in this manual.

1.1.4: Device Compliance Statements

USA Radio Compliance

This vehicle contains the following radio equipment or components that contain radio equipment:

COMPONENT

COMPONENT ID

MANUFACTURER

9200 Series Display

RC-7

Polaris Industries Inc.

This device complies with part 15 of the FCC Rules. Operation is subject to the following two conditions: (1) This device may not cause harmful interference, and (2) this device must accept any interference received, including interference that may cause undesired operation.

CAUTION

Changes or modifications not expressly approved by the party responsible for compliance could void the user’s authority to operate the equipment.

Canada Radio Compliance

This vehicle contains the following radio equipment or components that contain radio equipment:

COMPONENT

COMPONENT ID

MANUFACTURER

9200 Series Display

RC-7

Polaris Industries Inc.

This device contains license-exempt transmitter(s)/receiver(s) that comply with Innovation, Science and Economic Development Canada’s license-exempt RSS(s). Operation is subject to the following two conditions:

  1. This device may not cause interference.

  2. This device must accept any interference, including interference that may cause undesired operation of the device.

IMPORTANT
For applications that use vehicle-to-vehicle (V2V) communication, radio transmitter IC 5966A-P001 has been approved by Innovation, Science and Economic Development Canada (ISED) to operate with Polaris antenna (part number 4018713) with gain of 3 dBi. Any antenna that has a gain greater than 3 dBi is prohibited for use with this device.

European Union (EU) Radio Compliance

This vehicle contains the following radio equipment or components that contain radio equipment:

Component 9200 Series Display
Component ID RC-7
Manufacturer Polaris Industries Inc.
*Transmitting Frequency 2402 - 2480 MHz
Max RF Transmitting PWR 0.2432 W
*Other transmitting radio frequencies may exist outside of EU markets.

Hereby, Polaris Industries Inc. declares that the above radio equipment is in compliance with Directive 2014/53/EU.

The full text of the EU declaration of conformity is available at the following internet address:

https://www.polaris.com/en-us/radio-conformity/

Chapter 2: Getting Started

2.2.1: Overview

  • 1 Ride Command Buttons

  • 2 Driveline Mode

  • 3 Widgets

  • 4 Settings

  • 5 Icon Bar

  • 6 Gauge View Mode

  • 7 Speedometer/Tachometer

  • 8 Gear Status

2.2.2: Ride Command Buttons

Button Description Function
Menu Button Press the Menu button to access the settings. To reboot the display, press and hold for 5 seconds.
Gauge Screen Button Press the Gauge Screen button to select from available screens.
Map Button Press the Map button to access the map, manage your rides and waypoints, and to see your friends on the map with Group Ride.
Phone Button Press the Phone button to access your Bluetooth® connected phone, including recent calls, contacts, dialer, and messages.
Audio Button Press the Audio button to access the Radio, Weather, USB, and connected Bluetooth® music interface
Volume Decrease Button Press the Volume Decrease button to decrease the volume. Press and hold to mute volume.
Volume Increase Button Press the Volume Increase button to increase the volume.

2.2.3: Driveline Mode

Indicator Description Function
2WD When the switch is on 2WD, the front drive is disengaged so the vehicle is in two-wheel drive. Both rear wheels drive at the same speed.
AWD When in All-Wheel Drive, the front drive is engaged with the front differential in the open state. The open state allows the front wheels to spin at different speeds for improved turning ability. If switched to AWD while vehicle speed is over 25 kph (15.5 mph) or engine speed is over 4000 rpm, AWD will not engage until both vehicle and engine speeds are below these specified values.
AWD Lock When in All-Wheel Drive Lock, the front drive is engaged with the front differential in the locked state. The locked state drives all wheels at the same speed which will increase steering effort and changes the handling characteristics from the AWD mode. If switched to AWD Lock while vehicle speed is over 25 kph (15.5 mph) or accelerator pedal is pressed, AWD Lock will not engage until vehicle speed is under the specified value and the accelerator pedal is not pressed.

2.2.4: Settings

From the setting menu you can view vehicle information, manage Bluetooth® devices, update display software, and more.

To access the Setting menu, press the Menu button 1.

You can also navigate to the settings menu by pressing the POLARIS logo at the top of the display screen 2. This will open the Control Panel. From the Control Panel, select the settings tab, then press the All Settings button located in the lower right corner of the display screen.

2.2.5: Gauge View Mode

Press 1 to toggle between the two available gauge view modes, Analog and Digital.

While in the digital gauge view mode, press 2 to invert the MPH and RPM units.

2.2.6: Icon Bar

Icon Description Function
1 Headset Displays icon if headset is connected
2 Signal Strength Displays current cell signal strength
3 Wireless Internet Signal Strength (if equipped) Displays current wireless internet signal strength (if equipped)
4 Fuel Level Displays current fuel capacity percentage
5 Vehicle Direction Displays vehicle direction
6 Ambient Temperature Displays ambient temperature
7 Clock Displays current time

Chapter 3: Features and Controls

3.3.1: Menu/Power

Press the Menu/Power button once to access the Badge Panel. The Badge Panel provides quick and easy access to key display features, for more information on the Badge Panel, see Badge Panel.

Press and Hold the Menu/Power button for five seconds to perform a hard reboot of the display screen.

3.3.2: Badge Panel

The badge panel provides easy access to frequently used features, basic display and vehicle controls, and a list of recent notifications. To access the Badge Panel, press the Polaris logo at the top of the display screen, or press the Polaris Menu/Power hard button.

  • 1 Badge Panel

  • 2 App Tray

  • 3 Controls Tab

  • 4 Notifications Tab

  • 5 Brightness Settings

  • 6 Display Mode

  • 7 All Settings

3.3.2.1: App Tray

The App Tray provides easy access to key features on the display screen. Tap on any of the listed icons to navigate to that display screen. For example, tap the map icon to navigate to the map screen, or press the plow icon to navigate to the plow mode screen.

3.3.2.2: Notifications

Press the Notifications tab 4 to view and manage notifications.

3.3.2.3: Screen Brightness

From the Control tab 3, select screen brightness by moving the touchscreen slider to the left or right 5. Press the AUTO check box to allow the screen to adjust automatically based on ambient light conditions.

3.3.2.4: Display Mode

From the Control tab 3, select the display mode from the available options 6.

The display mode can be set to Day, Night, or AUTO mode.

Day Mode

Night Mode

3.3.2.5: All Settings

Press the All Settings button 7 to navigate to the settings menu. for more information about the settings menu, see Settings.

3.3.3: Gauge Screen

Press the Gauge Screen button to toggle between gauge screens. The display comes loaded with two different gauge screens. Additional gauge screens can be added or deleted.

Each gauge screen is customizable and can be set up in the following configurations:

  • Four round widgets

  • Two round widgets and a list of three data values

  • A list of five data values

To customize your gauge screens, press the gear icon located in the lower right corner of the display.

3.3.4: Map Screen

Press the MAP SCREEN button shown above to display the map screen. The map will center you based on the location of the GPS.

NOTE
Controls on the map surface disappear after 10 seconds of inactivity, return with a tap anywhere on the map.

3.3.4.1: Zoom

Use the plus and minus signs on the left side of the screen, or pinch the screen with your fingers to zoom in and out on the map.

  • Pinch zoom

  • Plus / Minus button

  • Auto-zoom to way-point while navigating

  • Current zoom level relative to maximum and minimum zoom

3.3.4.2: Map Orientation

The COMPASS icon on the right side of the screen toggles north up and course up. It will also re-center your vehicle if not already centered.

Map Orientation Map Icon

North Up view locks the maps orientation so that North is always at the top of the screen, regardless of your vehicle’s position or direction.

Course Up view rotates the map to match the direction of your vehicle.

3.3.4.3: Waypoints

Waypoints are user-defined locations on the map. Waypoints can be saved and shared with friends.

To add a waypoint, do the following:

  1. From the map screen, tap the map menu icon at the bottom of the display screen 1.

  2. Select Add Waypoint 2 from available options.

3.3.4.4: Points of Interest (POI)

Points of interest (POI), such as restaurants, gas stations, hotels, dealers, and more, are available from the map screen. POI will display on the map screen as you zoom in and out of the map. Tap on the POI icon to view more information about the location.

3.3.4.5: Go to Nav

Go to Nav is available from the map screen when viewing a waypoint or POI. Go to Nav will display the distance and directional bearing of the POI.

NOTE
Go to Nav does not provide turn-by-turn directions to a POI.

3.3.5: Phone Screen

Connect a smart phone and headset to listen to audio, make and receive calls and text messages, access a phone’s contact list, and call history.

Connect your Phone to the Display

The Ride Command display is compatible with Android and iOS. Go to https://ridecommand.polaris.com/en-us/supported-devices for latest operating system compatibility.

Connect your Bluetooth® device to do the following:

  • Connect your Bluetooth® device to pair and connect phones and Bluetooth® headsets.

  • List of paired devices with connection status.

  • For phones, shows signal strength.

  • Listen to music over a headset or through optional vehicle speakers.

iPhone

To connect your iPhone to the display, do the following:

  1. In your iPhone settings turn on Bluetooth®. If available, make your phone discoverable to other devices in your iPhone’s Bluetooth® settings. When your phone appears on the display press the “+” button next to it.

  2. A prompt will appear on your iPhone requesting permission to pair with your phone.

  3. Ensure the confirmation code on the screen and your phone are the same then press “Pair” on your phone.

  4. For optimal experience, enable notifications and sync contacts from your smartphone’s Bluetooth® settings.

Android

To connect you Android device to the display, do the following:

  1. From your smartphone settings, open the Bluetooth® options on your device and ensure that Bluetooth® is turned on.

    NOTE
    On some phones you have to make the phone visible to other devices. If your phone has this feature, it should show up on the Bluetooth® connection screen of your phone. If no option exists to make your phone visible to the display, it is already visible to the display.
  2. Press the add device button, then press “OK” on the display.

  3. When your phone appears on the display press the “+” button next to it to pair with your phone.

  4. Ensure the confirmation code on the screen and your phone are the same then press “OK” on your phone.

  5. For optimal experience press “Accept” on your phone when requested to access contacts and messages.

  6. The display will now show a list of previously connected phones on the display. If it is unpaired, click on your phone from the list.

  7. Once the display says connected/paired, your phone is now connected to the display via Bluetooth®. After a phone is connected, the Device Manager Screen will appear.

  8. When a smartphone is connected to the display via Bluetooth®, users are able to make phone calls from the display through the keypad, recent calls, or their contacts by pressing the phone icon in the device manager screen or through the pull down menu.

    NOTICE
    Ensure that your smartphone Bluetooth® settings are set to share phone calls, media audio, text messages, and contact information.
    NOTICE
    There is no built in microphone in the display. Phone call audio will play through the phone speakers or Polaris approved headset if connected. Some dial options may be unavailable at speeds greater than 3 MPH.

Connecting your Bluetooth® Headset with the Display

The display can connect with Polaris approved Bluetooth® headsets to listen to music, take phone calls, and talk with other riders.

To connect your Bluetooth® heaset to your display, do the following:

  1. From the Device Manager menu press “Add Device.”

  2. Turn your Bluetooth® headset on and put it in phone pairing mode.

  3. When your Bluetooth® headset appears on the display press the “+” icon on the display. Once your headphones are connected you will see the headset icon in the upper left-hand corner of the display screen.

3.3.6: Audio Screen

  1. Press the audio screen button shown above to display the audio screen.

  2. Use the source button in the top left corner to change between FM, AM, Weather, Bluetooth®, and USB Audio.

  3. Press the tune up or down icons to change the radio station by small increments or press the scan up or down icon to search for the next quality signal station.

  4. To set favorites, scroll to a radio station and hold an “Empty” favorite icon. Press the arrows on either side of the favorites to view all 18 favorite slots.

Radio

  • Radio sources: AM, FM, MW (Medium Wave - Europe), LW (Long Wave - Europe), WX (Weather)

  • Show currently playing station, song and artist, if available

  • Tune up/down

  • Scan

  • Save and choose station presets

USB / iPod Audio

NOTE
Media navigation is only available if music is streamed through Apple Music and saved to the device storage of the phone.

  • Show currently playing song, artist, and album, if available

  • Show song duration and current progress

  • Browse available music by artist, album, song title and playlist, if available

  • Show play queue of upcoming songs, add and remove music from queue

  • Play/pause, go to next/ previous song, repeat, shuffle

Bluetooth®

  • Show currently playing song

  • Play/pause, go to next/ previous song

Streaming Services

  • Show song duration and current progress

  • Play/pause, skip

Audio Controls

  • Output to speakers or Bluetooth®

  • Volume Up / Down

  • Mute / Pause

3.3.7: Pin Activated Security System (P.A.S.S.) (if equipped) — Ride Command

The optional PIN Activated Security System (P.A.S.S.) is to prevent unauthorized use. When enabled, the vehicle cannot be operated until a valid passcode has been entered using the Ride Command display screen.

Enable P.A.S.S.

NOTICE
After activating P.A.S.S. for the first time you must power down the vehicle and allow the electronic control module (ECM) to fully shutdown before restarting. This may take up to three minutes.
  1. Go the settings menu by pressing the Menu button.

  2. Select Vehicle Settings from the left toolbar.

  3. Select Engine Start Lockout.

  4. If this your first time activating P.A.S.S. you will be prompted to enter a new passcode. Enter and verify new passcode.

    Record your passcode for future reference.

  5. Turn Engine Start Lockout from No to Yes.

  6. Turn off the vehicle using the key ignition switch.

NOTICE
If the battery becomes low while the P.A.S.S. system is enabled, the gauge may show “New Vehicle Detected” after the battery has been recharged/replaced. Leave the key in the ON position to allow system reconfirmation.

Disable P.A.S.S.

  1. Go the settings menu by pressing the Menu button.

  2. Select Vehicle Settings from the left toolbar.

  3. Select Engine Start Lockout.

  4. Enter passcode to disable P.A.S.S.

  5. Turn Engine Start Lockout from Yes to No.

3.3.8: Group Ride

NOTE
The display requires a GPS lock, indicated by a blue arrow marker (as shown below), before you are able to setup or join a group ride.

Invite your friends to a group to see their live location on the map of your smartphone, tablet, or in vehicle Ride Command Display.

For information on how Group Ride works and for instructions on how to set up Group Ride using your smartphone, or with a vehicle-to-vehicle (V2V) antenna, tap the “i” icon beside the title from the Group Ride Panel 1.

3.3.8.1: Group Ride Setup

There are two ways to set up a group ride.

Mobile Phone Group Ride:

  • Works within cellular range

  • Requires a tethered mobile phone

  • Infinite range between vehicles

  • Works with friends using the mobile app

Vehicle-to-vehicle Group Ride:

  • Works anywhere, no phone required

  • Requires an installed V2V antenna, standard on MY20+ vehicles

  • 1+ miles range between vehicles

Mobile Phone Group Ride

To set up a group ride using a mobile phone, do the following:

  1. From the map menu, tap the Group Ride button.

  2. Tap the Setup Mobile Phone Group Ride button on the display screen.

  3. Complete all three steps on the screen, in the specified order, to set up group ride.

  • Enable your Bluetooth® tethering in your phone's settings. Tap instruction for more information of how to enable tethering on an iPhone or Android phone.

  • Connect your phone via Bluetooth®. If you phone is currently connected you MUST disconnect and reconnect it.

  • Press the login button to login to your Ride Command account. If you do not have a ride command account, sign up at ridecommand.polaris.com

NOTE
Once you've completed all three steps above, your information will be stored (unless cleared manually) and you will not need to login again into your Ride Command account for future group rides.
  1. Press the back button to go back to the group ride screen and join your Group Ride.

NOTE
In order for vehicles with a V2V antenna and vehicles using mobile phone based group ride to join the same group, at least one member of the group must be connected to both the V2V antenna and the mobile phone based group ride.
Vehicle to Vehicle (V2V) Antenna

If your vehicle is equipped with a V2V antenna, use the following procedure to setup Group Ride:

  1. From the map menu, tap the Group Ride button.

  2. Tap Setup V2V Group Ride button on the display screen.

  3. Tap the Antenna Installed toggle switch to the Yes position.

You are now able to join a group ride with other riders who have a V2V antenna installed. Press the back button to go back to the group ride screen and join your Group Ride. If you would like to ride with friends who do not have a V2V antenna, complete the setup instructions below to set up a mobile phone group ride.

3.3.8.2: Joining a Ride Group

To join a group, do the following:

  1. From the map menu, tap the Group Ride button.

  2. Nearby ride groups will display in order of distance. A GPS lock is required to view nearby group rides.

  3. Tap the Join button 1 to join a group.


Joining a group immediately brings you to the map view of that group. Other riders appear as dots on the map. If a rider is moving, the dot includes a heading arrow pointing in the direction they are riding.

NOTE
The map is set to zoom-to-group and as you ride it will automatically zoom to keep all riders in view. Tap the zoom control to return to manual zoom mode.
NOTE
The ride group panel on the side of the screen shows the name of the group and lists all group members with their name, icon color, distance and bearing from you to that rider.

3.3.8.3: Riding with a Group

  1. Tap the handle by the group name 1 to minimize the panel and show more map.

  2. After 10 seconds of not interacting with the screen, the map controls will disappear. Tap the screen to make them visible again.


  1. Tap on a rider icon in the ride group panel to show that rider relative to your location. If center-on-me is enabled, the display reverts to the centered state after 10 seconds.

3.3.8.4: Creating a Ride Group

To create a Ride Group, do the following:

  1. On the Group Ride Panel, tap the “New Group” button 1 to create a group for others to join.

  2. Give the group a name and choose whether a passcode should be required for others to join the group. If the “Private” toggle is tapped, you will be prompted to enter a four-digit passcode.


  1. After creating a group, the panel closes and shows the new group on the map.

  2. After a second rider joins, the map will switch to zoom-to-group and as you ride it will automatically zoom to keep all riders in view. Tap the zoom control to return to manual zoom mode.

3.3.9: Plow Mode (if equipped)

NOTE
Plow Mode is a feature available for use with RANGER XP 1000 vehicles that have a factory installed Ride Command System with a winch and auto stop winch fairlead as part of the factory wiring harness.
NOTE
It is not recommended to use plow mode with winch in rapid recovery mode.

Plow Mode is an automated plow control system based on vehicle gear position. To enable Plow Mode, do the following:

  1. On the display, go to “Settings,” “Vehicle,” and then select “Plow Installed.”

  2. From the Plow installed screen, move the toggle switch from “No” to “Yes.”

NOTE
The procedure above is only required one time. The system will remember your settings for future use. If you want to disable seeing the plow mode screen as part of the gauges screen option, you can set the toggle back to “No” at a later date.

3.3.9.1: Manual Plow Mode

Manual Plow Mode allows you to use the Ride Command touchscreen display to raise and lower the plow.

To raise and lower the plow, do the following:

  1. To raise the plow, press the up arrow on the touchscreen display and slide it to the left.

  2. To lower the plow, press the down arrow on the touchscreen display and slide it to the left.

3.3.9.2: Auto Plow Mode

Automatic Mode allows the display to automatically lower the plow when you shift to Low and will automatically raise the plow when you shift to Reverse.

To switch to AUTO plow mode, the system requires the following conditions to be met:

  1. Plow must be fully up and the autostop fairlead must be detecting the rubber stopper.

  2. Gear Position must be in Park

  3. The Winch in and Winch out relays must be in place in the fusebox (factory installed)


NOTE
Auto-plow mode will be disabled if excessive speed is detected.
Back Drag Mode
NOTE
Automatic Mode must be selected to allow selection of Back Drag Mode.

Back Drag Mode reverses the normal mode operation. When Back Drag Mode is selected, shifting to REVERSE will lower the plow and shifting to LOW will raise the plow automatically. To engage Back Drag Mode, press the “Back Drag Mode” button on the Ride Command display.

3.3.9.3: Plowing in High Range

Polaris does not recommend plowing in High Range. Excessive belt wear and belt failure, plow damage, and vehicle damage can occur. The system by default will not allow automatic operation when the vehicle is in High Range. This lockout can be beneficial while plowing as it allows the operator to shift to High Range to move the vehicle forward without lowering the plow automatically. Anytime the vehicle is shifted into High Range and Automatic Plow mode is engaged, a warning notification will appear on screen. If plowing in high is needed, touching the Enable in High button to enable High Range operation in automatic mode. If the user changes screens, or restarts the vehicle, High Range will be locked out again and the rider will need to acknowledge the over ride again.

3.3.9.4: Faults and Warnings

The display has several built in fault checks for plow mode. When the system detects a fault, an alert will be shown on the plow mode screen. Some faults can be cleared by a quick power cycle of the ignition key switch ( less than 1 second). Some require a full reboot of the display to clear. If a plow mode related fault occurs, the display will show the required action needed to clear and reset the fault on the plow screen. Additional information about fault codes and corrective action are available from the display in the “Vehicle Diagnostics” screen found through the “Vehicle” settings tab.

Chapter 4: Operation

4.4.1: Settings

To access the Setting menu, press the Menu/Power button, or tap the POLARIS logo at the top of the display screen. This will open the control panel. From the Control Panel, select the settings tab, and then tap the All Settings button located in the lower right corner of the display screen.

Info

Select the Info tab to view basic information about your model, such as:

  • Vehicle Model

  • VIN

  • Software Version

  • Odometer Miles

  • Engine Hours

  • Distance to Next Service

General

Select the General tab to do the following:

  • View Bluetooth® Devices

  • View Phone Notifications

  • Change Language and Units

  • Update Software

  • Update Maps/Trails

Time

Select the Time tab to do the following:

  • Set Time from GPS

  • Select Time Zone

  • Enable/Disable Daylight Savings Time

  • Set Time

  • Set Date

  • Enable/Disable 24–Hour format

Audio

Select the Audio tab to do the following:

  • Access Equalizer

  • Access Balance and Fader

  • Clear Radio Presets

  • Set Radio Tuner Region

Vehicle

Select the Vehicle tab to do the following:

  • View Diagnostics

  • View Oil Life Status

  • View GPS Status

  • Set V2V Antenna Status

  • Enable/Disable Plow Mode

4.4.2: Engine Overheat Indicators

NOTICE
See your vehicle owner’s manual for more information.

A flashing indicator indicates continued operation could result in serious engine damage. The engine management system will automatically reduce engine power and set a fault. Stop the engine immediately. Allow the engine to cool down.

NOTICE
If engine overheating seems to be caused by something other than poor cooling conditions, see your dealer for service.

4.4.3: GPS Mapping

NOTE
The compass is controlled by the GPS systems. Calibration is not required.

Use the compass and full-featured GPS when the GPS receiver is installed (includes the display of latitude, longitude and elevation). Mark and save waypoints and rides.

Chapter 5: Dynamix DV Active Suspension (If Equipped)

5.5.1: Overview

WARNING
Driving while distracted can result in loss of vehicle control, crash, and injury. We strongly recommend that you use extreme caution when using any device that may take your focus off of driving. Your primary responsibility is the safe operation of your vehicle.

DYNAMIX DV active suspension (if equipped) offers unprecedented control and comfort for any riding condition you experience with your RZR. The DYNAMIX DV active suspension is an electronically controlled suspension system designed to optimize vehicle comfort and handling through continuously monitoring the driver’s inputs and vehicle motion, to control the suspension in real-time.

DYNAMIX DV active suspension features FOX® electronically controlled shocks driven by a custom Polaris-designed suspension control module (SCM). The suspension control algorithms and software were designed and developed by Polaris’ engineering team, leveraging our expertise and deep knowledge of off-road vehicle dynamics. DYNAMIX DV active suspension proactively makes split-second adjustments based on operator inputs, controlling the shocks to achieve optimum performance, control, and stability under varying riding conditions and driving styles.

WARNING
Do not enter information while operating your vehicle. Failure to pay attention to operating your vehicle could result in loss of control, injury, or death. You assume all risks associated with using this device. Read your User Guide. Always ride with the latest maps and trails data from polaris.com/ridecommand.

Your vehicle is equipped with an advanced Ride Command display. The suspension control screen provides additional information about the operation of your DYNAMIX DV active suspension system.

  • 1 Ride Mode Indicator

  • 2 Driveline Mode Indicator

  • 3 Gear Indicator

  • 4 Vehicle Speed

  • 5 Accelerator Pedal Position

  • 6 Pitch Angle

  • 7 Roll Angle

  • 8 Angle/G-ball Selector


  • 9 Front Left Compression Damping

  • 10 Front Left Rebound Damping

  • 11 Event Indicator

  • 12 Rear Left Compression Damping

  • 13 Brake Switch

  • 14 Rear Left Rebound Damping

  • 15 Front Right Compression Damping

  • 16 Steering Angle

  • 17 Front Right Rebound Damping

  • 18 G-ball (Longitudinal/Lateral Acceleration)

  • 19 Rear Right Compression Damping

  • 20 Rear Right Rebound Damping

5.5.2: Compression and Rebound Sweep

NOTICE
Compression sweep shown. Rebound sweep works similarly but from the bottom.

  • 1

    Softer

  • 2

    Stiffer

5.5.3: DYNAMIX DV System Components

Suspension Control Module (SCM)

The Suspension Control Module (SCM) contains the logic for suspension control, including communications, operator inputs, and shock drivers. The SCM also has an internal 6-axis inertial measurement unit which is used to monitor and adjust the performance of the vehicle by the suspension control algorithms.

CAUTION
Moving or altering the orientation of the SCM may have an adverse effect on vehicle handling. Never move the SCM from it’s factory mounting location.

Electronic Shock Damping Control

Your suspension has electronically controlled, independent compression and rebound shock damping. This is used to control how fast the shocks compress and extend.

  • Compression Damping: Force acting against a shock movement in the compressing direction (shock length becoming shorter). When a shock is being compressed, lower compression damping results in faster compression movement and higher compression damping results in a stiffer, slower compression movement.

  • Rebound Damping: Force acting against a shock movement in the extension direction (shock length becoming longer). When a shock is being extended, lower rebound damping results in faster extension movement and higher rebound damping results in a slower extension movement.

  • 1 Rebound Valve

  • 2 Rebound Damping

  • 3 Compression Valve

  • 4 Compression Damping

Electronic Steering Rack (EPS)

This vehicle also has an electronically controlled power steering rack that has been developed to work with the DYNAMIX DV system in multiple ways:

  • This power steering has modes that adjust the power steering performance to the DYNAMIX DV ride setting.

  • Damping logic allows for the EPS to maximize assist levels.

  • The power steering logic was specifically tuned to counteract hits coming from the vehicle wheels and isolate the driver from feeling these torque spikes in their hands.

These electronically controlled systems work together to provide a full vehicle ride and handling mode that can be easily selected by the driver.

5.5.4: DYNAMIX DV Ride Modes

There are four Ride Modes with pre-defined suspension and steering settings to tailor the ride and handling to known uses and conditions. The Ride Modes are summarized below.

ICON

NAME

Suspension Description

Electronic Power Steering Description

Baja Mode

High compression and low rebound damping for large and aggressive suspension events.

Good feeling of the front wheels with excellent bump rejection.

Rock Mode

High compression and low rebound with angle based damping adjustments for maneuvering through rockier terrain. At higher vehicle speeds, damping becomes similar to Comfort Mode.

High assist level and bump rejection for low steering effort when maneuvering in rocks.

Track Mode

Medium compression and high rebound damping for aggressive cornering events.

Best feeling of the front wheels for aggressive cornering events.

Comfort Mode

Low compression and rebound damping to allow the shock to move and absorb smaller suspension events.

High assist level and bump rejection for low steering effort and maximum comfort.

Ride Modes can be cycled through using the “up/down” button on the steering wheel. It will not cycle from top to bottom with an “up” button press.

Notice the Mode Slide Out panel shows the active mode and the order/position. Ride Modes are described in more detail in the following sections.

5.5.4.1: Baja Mode

Mode Character

  • Trophy truck

  • High dynamic ride height

  • Loose body movement

  • Nose high (front end high)

  • Ideal for rough/large input terrain

Use Areas

  • Desert/Baja

  • Whoops

  • Sand highway in Glamis

What the Suspension Is Doing

Compression Damping: High compression damping for absorbing bumps and not bottoming out in deep holes.

Rebound Damping: Low rebound damping allowing maximum shock extension for absorbing next bump. Slightly more rebound damping in the rear to stabilize chassis and provide front high feel.

Active Events: Very aggressive vehicle events so cornering, braking, and acceleration can still be done aggressively. On short duration Airborne events the dampers are biased to keep the nose high so that the vehicle leans back when traversing whoops.

What the Steering System Is Doing

Large input bump rejection. Medium assist level with a good balance between feeling the front-end grip and turning effort.

5.5.4.2: Rock Mode

Mode Character
Developed for rock crawling. It maximizes ride height and improves pitch and roll stability during slow speed crawling maneuvers. Ideal for driving over obstacles and traversing hill peaks. Incorporates Angle Based Damping.

Phases to a comfort mode at higher speeds.


Use Areas

  • Slow speed rock crawling

  • Moab

  • Technical sections of King of Hammers

What the Suspension Is Doing

Compression Damping: Damping is increased on downhill side shocks and decreased on uphill shocks to lean the vehicle into the obstacle or slope.

Rebound Damping: Low rebound damping when level to promote shock extension and increase ground clearance. Damping is increased on uphill shocks to lean the vehicle into the obstacle or slope.

Active Events: Angle based damping is active at low speeds. At high vehicle speeds this mode is the same as comfort mode.

What the Steering System Is Doing

Large input bump rejection. High assist level so that the driver does not become fatigued while rock crawling.

Examples of Use

When the Vehicle is Level: Maximize ground clearance for obstacle avoidance with high compression damping and low rebound damping. Low rebound damping allows the tire to fall into the rock holes quickly not upsetting the chassis.

On Slope: Lean the vehicle into the hill with shocks. Increased compression and decreased rebound downhill. Decreased compression and increased rebound uphill.

5.5.4.3: Track Mode

Mode Character

Brings aggressive flat cornering, lowest dynamic ride height, and the best tire grip and feedback. The vehicle rides with a lower stance that is ideal for heavy turning trails, hard pack and small/medium bumps.

Use Areas

  • Aggressive cornering

  • Dune (in the dunes)

  • Short course racing

  • Tight twisty trails

What the Suspension Is Doing

Compression Damping: Medium compression damping for a low dynamic ride height and tight feeling vehicle.

Rebound Damping: High rebound damping for a low dynamic ride height and tight feeling vehicle.

Active Events: Very aggressive vehicle events, cornering, braking, and acceleration. This mode keeps the vehicle flat and stable with balanced tractions for cornering.

What the Steering System Is Doing

Medium assist level so that the driver has the best feel of the front-end grip. Bump rejection features are still aggressive to minimize torque spikes felt in the steering wheel.

5.5.4.4: Comfort Mode

Mode Character

Developed to maximize ride comfort to give the passengers a “plush” ride. Ideal for non-aggressive driving and rides with smaller suspension inputs, such as cruising home at the end of the day.

Use Areas

  • Any non-aggressive driving

  • Washes

What the Suspension Is Doing

Compression Damping: Low damping to maximize ride comfort.

Rebound Damping: Low damping to maximize ride comfort.

Active Events: Low aggressiveness on the active events. They respond as needed but are tuned to optimize ride comfort.

What the Steering System Is Doing

High assist level to make the vehicle easy to steer and reduce operator fatigue. High input bump rejection.

5.5.5: DYNAMIX DV System Features

NOTE
These features are tuned differently based on the selected Ride Mode.

5.5.5.1: Active Pitch Control

Dynamix DV constantly monitors pedal input and engine torque to predict when the vehicle is going to pitch forward or backward and applies damping to control the motion. This functions at all speeds and scales based on how much the throttle position is changing and how hard the vehicle is expected to pitch.

5.5.5.2: Acceleration Control

The system continuously monitors vehicle speed, accelerator pedal position, and engine torque to reduce vehicle pitch body motion and optimize damping for different types of vehicle acceleration. For example, when you hit the accelerator pedal from a stop, the dampers are optimized based on which ride mode selected to achieve the desired pitch and traction response.

5.5.5.3: Braking Control

The system continuously monitors the brake pedal position and vehicle deceleration rate reducing body motion and increasing braking stability in harsh terrains. This is the opposite of Acceleration Control. During hard braking events, the system will increase front compression to prevent vehicle nose dive, soften the rear compression damping to absorb braking bumps, and increase the rear rebound damping to control vehicle pitch.

5.5.5.4: Cornering Control

Shock compression and rebound damping are adjusted when cornering. The inside shocks increase in rebound damping while the outside shocks increase compression to control body roll. The inside shocks decrease in compression to stabilize the vehicle for any bumps on the inside wheels while the outside shocks may reduce rebound in some cases to promote traction.

  • The outside shocks will resist compression and the inside shocks will resist extension.

  • Damping biases front to rear throughout the corner entry, apex, and exit.

Example Maneuvers

  • Turning

  • Cornering

5.5.5.5: Airborne Event Control

The Dynamix DV system is constantly and automatically detecting for when the vehicle is airborne and when the vehicle has landed. The Dynamix system updates damping while airborne and post landing to optimize the vehicle response immediately after the airborne event.

  • While Airborne: Rebound damping is reduced to promote shock extension while compression is increased to 100% to ensure a nice plush landing.

  • After Landing: Rebound damping is increased to stabilize the landing and prevent loss of wheel traction or hopping of the vehicle.

The damping application is biased based on airborne duration so the vehicle has optimized performance in large airborne events and small airborne events like whoops. As the vehicle is airborne longer, the compression damping will gradually increase to maximize the bottom out performance when landing.

Example Maneuvers

  • Large whoops that cause an airborne event

  • Glamis jumps

  • Short course race jumps

  • Jumps

5.5.5.6: Angle-based Damping

When riding on a slope or navigating obstacles, the shock dampers adjust based on the angle to lean the vehicle into the hill.

  • Increases compression and decreases rebound for downhill wheels.

  • Decreases compression and increases rebound for uphill wheels.

When riding on flat ground, the shocks adjust to maximize ground clearance for obstacle avoidance with high compression damping and low rebound damping.

  • High compression damping keeps the shocks extended which increases the ride height and ground clearance while traversing obstacles.

  • Low rebound damping allows the tire to fall into the rock holes quickly not upsetting the chassis.

NOTE
This is used only in Rock Mode and at speeds less than 15 mph (24 kph).
Example Maneuvers

  • Slow driving on banked turn

  • Side hilling

  • Circles on hill

5.5.5.7: DYNAMIX Instant Compression Button

When the DYNAMIX button is pressed, the system will increase compression damping to improve bottom out performance. The increased compression will persist as long as the button is pressed and momentarily after the button is released. This allows the vehicle to better absorb what the driver will encounter ahead, such as an obstacle, a hole on the trail or a G-Out when dune riding. Rebound damping is not affected by the DYNAMIX button and still operates based on the ride mode selected and the vehicle state.

NOTE
This feature behaves the same way in each Ride Mode.

Chapter 6: Maintenance

6.6.1: Care and Maintenance

To clean the display shell, use a soft cloth with mild soap and water. Do not use harsh or abrasive cleaners. For best results, use a micro-fiber towel to clean the screen. Window cleaner or alcohol may also be used.

NOTICE
Immediately clean off any gasoline that splashes onto the display.

6.6.2: Vehicle Storage

When preparing the vehicle for storage make sure the ignition switch is in the OFF position to prevent battery drain and diminished battery life.

6.6.3: Speed Limitation

Various aspects of the display such as phone contacts and call logs may be unavailable while driving at high speeds.

6.6.4: Update Software

NOTICE
Before updating the display, always export your existing rides and waypoints to a USB drive to avoid losing them.

To update the software, do the following:

Download Software onto your Personal Computer

  1. Go to ridecommand.polaris.com/display .

  2. Log into your account, or create a new account.

  3. Using the Vehicle Identification Number (VIN), add your new Polaris vehicle to your Garage.

  4. Locate and download the latest software to a USB flash drive (8+ GB).

Upload Software on your Vehicle

  1. Connect the USB flash drive to the USB cable and power up your vehicle.

  2. On the RIDE COMMAND display, select the Settings menu on your display by pressing the POLARIS icon at the top of the screen.

  3. Select General Settings, then Update Software.

  4. Select the file you wish to load (use date listed in the file name to determine most recent file).

  5. Select Yes to restart display (restart required).

Error Messages

If an error occurs while updating your software, perform one or all of the following actions to resolve the issue:

  1. Remove and reconnect the USB flash drive securely.

  2. Make sure the display files are not inside a folder on the flash drive.

  3. Make sure only display files are on the flash drive. Remove any other files if necessary.

  4. Try using a different USB flash drive.

6.6.5: Update Maps

To update the maps on your display, do the following:

  1. Go to ridecommand.polaris.com/display and download the map update to a USB flash drive.

  2. Insert USB flash drive into the USB port on your vehicle.

  3. Press the Update maps in the General Settings.

  4. Select the file you want to install by pressing the corresponding down arrow icon.

  5. This will update the display’s map which will automatically restart the display once the update is complete. Do not remove the USB flash drive until the display has fully restarted.

6.6.6: USB Hardware

Software Updates

For software update, POLARIS recommends using a SanDisk® or similar USB flash drive with a minimum of 4GB in available memory, formatted using the FAT32 or exFAT® file systems. For best results remove all files from the flash drive before starting the update process.

Map Updates

For Map updates, a 32GB USB drive is required (USB 3.0 drive is highly recommended) USB drive must be formatted to exFAT® before copying the map file onto it.

Trail Updates

For Trail updates, a 4GB drive formatted to FAT32 can be used.