i Slingshot Ride Command User’s Guide

|
|
|
Slingshot Ride Command User’s Guide |
The Owner's Manual for this vehicle contains warnings, instructions and other information you must read and fully understand before safely riding or performing maintenance on this vehicle. Always follow the warnings and instructions in Owner's Manual.
Click the link above for the Table Of Contents, or download a full PDF of the Owner Manual in the Owner Support area of Polaris.com.
|
|
|
|
Slingshot Ride Command User’s Guide |
Unless noted, Polaris and Ride Command are trademarks of Polaris Industries Inc.
Bluetooth® is a registered trademark of Bluetooth SIG, Inc. iPhone® is registered trademarks of Apple Inc. iOS® is a registered trademark of Cisco Systems, Inc. Android® is a registered trademark of Google LLC. Kingston® is a registered trademark of Kingston Technology Corporation. Sandisk® is a registered trademark of SanDisk LLC.
Copyright 2021 Polaris Industries Inc. All information contained within this publication is based on the latest product information at the time of publication. Due to constant improvements in the design and quality of production components, some minor discrepancies may result between the actual vehicle and the information presented in this publication. Depictions and/or procedures in this publication are intended for reference use only. No liability can be accepted for omissions or inaccuracies. Any reprinting or reuse of the depictions and/or procedures contained within, whether whole or in part, is expressly prohibited.
The original instructions for this vehicle are in English. Other languages are provided as translations of the original instructions.
Printed in U.S.A.
RIDE COMMAND User Guide
Thank you for purchasing a Polaris product, and welcome to our world-wide family of Polaris enthusiasts. Be sure to visit us online at www.polaris.com for the latest news, new product introductions, upcoming events, career opportunities and more.
Here at Polaris, we proudly produce an exciting line of utility and recreational products. We believe Polaris sets a standard of excellence for all utility and recreational vehicles manufactured in the world today. Many years of experience have gone into the engineering, design, and development of your Polaris product, making it the finest machine we’ve ever produced.
Snowmobiles
Sportsman all-terrain vehicles
Low emission vehicles (LEVs)
Ranger utility vehicles
Pro XD work vehicles
Slingshot three-wheel motorcycles
Ride Command electronic vehicle displays
RZR sport vehicles
GEM vehicles
Indian motorcycles
Polaris Power generators
Polaris Government and Defense combat vehicles
Timbersled Snow Bikes
For safe and enjoyable operation of your product, be sure to follow the instructions and recommendations in this owner’s manual. All product repairs should be performed by a factory certified Master Service Dealer (MSD) technician.
Your Polaris dealer knows your product best and is interested in your total satisfaction. Your Polaris dealership can perform all of your service needs during and after the warranty period.
The following signal words and symbols appear throughout this manual and on your vehicle. Your safety is involved when these words and symbols are used. Become familiar with their meanings before reading the manual.
DANGER indicates a hazardous situation which, if not avoided, WILL result in death or serious injury.
WARNING indicates a hazardous situation which, if not avoided, COULD result in death or serious injury.
CAUTION indicates a hazardous situation which, if not avoided, COULD result in minor to moderate injury.
NOTICE provides key information by clarifying instructions.
IMPORTANT provides key reminders during disassembly, assembly, and inspection of components.
The Prohibition Safety Sign indicates an action NOT to take in order to avoid a hazard.

The Mandatory Action Sign indicates an action that NEEDS to be taken to avoid a hazard.

Welcome to Polaris Ride Command. This intuitive software includes a variety of interactive features and access to your Slingshot’s custom information.
For a safe and enjoyable riding experience with your new display, be sure to read your vehicle’s owner’s manual and this user’s guide. Should you need additional assistance with display operation or software updates, please see your Polaris dealer or visit ridecommand.polaris.com.
For the latest Ride Command information, including software, maps, and trails updates, please visit ridecommand.polaris.com.
Before driving with your new display, please complete the following:
Read this manual in its entirety.
Familiarize yourself with the features and operations of the display while the vehicle is stationary.
Download the Polaris Ride Command application from your phone’s app store and create your personalized account.
Check your display to ensure you have the appropriate maps and roads visible for your area. For instructions on updating the maps on your display, see Device Compliance Statements.
When updating software, be sure you are using a compatible USB flash drive. See USB Hardware for more information.
Check https://www.polaris.com/en-us/owners-manuals for the latest updates to the owner’s manual.
Phone functionality, in pairing with this display, is dependent on the capabilities of your cell phone.
Some Polaris vehicles come equipped with a near-field communication (NFC) chip. The NFC chip is embedded in the Polaris emblem located at the front of the vehicle and seamlessly connects you to a digital platform of vehicle information and tools. See your dealer for more information.
On models equipped with NFC, place your smartphone directly over the Polaris emblem to do the following:
View vehicle-specific information
Access your Polaris Garage
Download and view the owner’s manual
View accessory instructions
Watch how-to videos
Access warranty information
Check for service notifications

Additional NFC features are available when using the Ride Command mobile app. To access these features, do the following:
Download the Ride Command mobile app from the Apple App Store® or Google Play® store.
Create or log in to an existing account.
From the Ride Command mobile app home screen, select Add Vehicle.
On the vehicle, tap the NFC-enabled badge with the phone to scan the vehicle.
Confirm information, name your vehicle, and tap add to garage.
Refer to device manufacturer’s instructions to verify NFC read capability, and/or NFC-capable add-ons.
This vehicle contains the following radio equipment or components that contain radio equipment:
|
COMPONENT |
COMPONENT ID |
MANUFACTURER |
|---|---|---|
|
9200 Series Display |
RC-7W |
Polaris Industries Inc. |
This device complies with part 15 of the FCC Rules. Operation is subject to the following two conditions: (1) This device may not cause harmful interference, and (2) this device must accept any interference received, including interference that may cause undesired operation.
Changes or modifications not expressly approved by the party responsible for compliance could void the user’s authority to operate the equipment.
This vehicle contains the following radio equipment or components that contain radio equipment:
|
COMPONENT |
COMPONENT ID |
MANUFACTURER |
|---|---|---|
|
9200 Series Display |
RC-7W |
Polaris Industries Inc. |
This device contains license-exempt transmitter(s)/receiver(s) that comply with Innovation, Science and Economic Development Canada’s license-exempt RSS(s). Operation is subject to the following two conditions:
This device may not cause interference.
This device must accept any interference, including interference that may cause undesired operation of the device.
This vehicle contains the following radio equipment or components that contain radio equipment:
|
COMPONENT |
9200 Series Display |
|
COMPONENT ID |
RC-7W |
|
MANUFACTURER |
Polaris Industries Inc. |
|
TRANSMITTING FREQUENCY* |
2402 – 2480 MHz |
|
MAX RF TRANSMITTING PWR |
0.2432 W |
|
* Other transmitting radio frequencies may exist outside of EU markets. |
|
Hereby, Polaris Industries Inc. declares that the above radio equipment is in compliance with Directive 2014/53/EU.
The full text of the EU declaration of conformity is available at the following internet address:
https://www.polaris.com/en-us/radio-conformity/
The Ride Command display automatically turns on upon vehicle start up. It will remain active until the vehicle’s ignition is switched off.
The icon bar at the top of the touchscreen display shows mobile device connectivity, headset connections, cellular signal strength, fuel range, compass, ambient temperature, and clock. Some of these built-in features are functional only with the addition of Polaris accessories. Your Polaris dealer can assist.
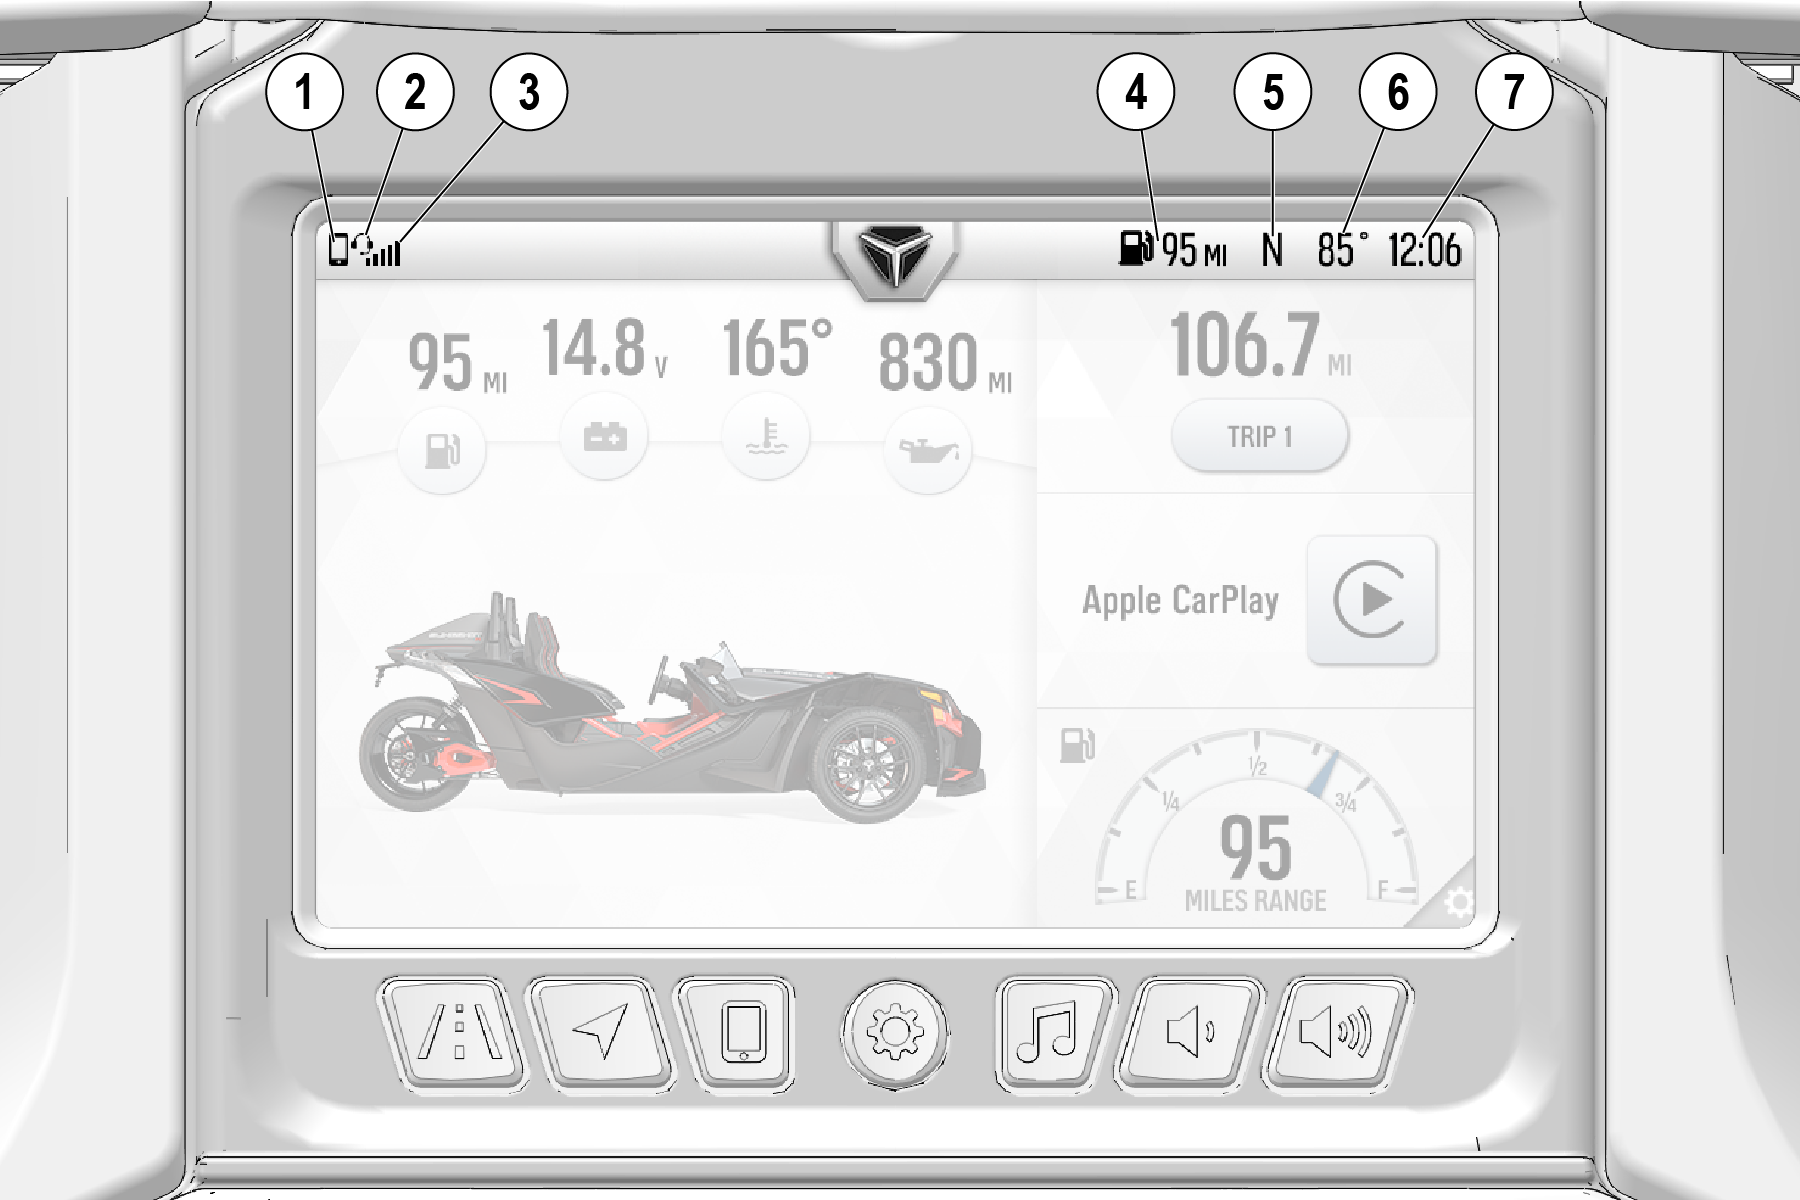
1 Mobile Device Indicator
2 Headset Indicator
3 Cellular Signal Strength
4 Fuel Range
5 Compass
6 Ambient Temperature
7 Clock

1 Rider Screen Button
2 Map Button
3 Device Manager Button
4 Settings Button
5 Audio Button
6 Volume Decrease Button
7 Volume Increase Button
| Button | Description | Function |
|---|---|---|

|
Rider Screen Button | Press the Rider Screen button to access the Rider Screens and use split screen views. |

|
Navigation Button | Press the Navigation button for navigation (if equipped) and to manage your saved routes and destinations. |

|
Device Manager Button | Press the Device Manager button to sync your display with a Bluetooth-enabled device, such as a smartphone or headset. |

|
Settings Button | Press and release the Settings button to enter the Settings screen. |

|
Audio Button | Press the Audio button to access the radio and audio from Bluetooth- and USB-connected devices. |

|
Volume Decrease Button | Press the Volume Decrease button to lower the volume of audio through the built-in speaker system. |

|
Volume Increase Button | Press the Volume Increase button to increase the volume of audio through the built-in speaker system. |
The Driver Screens are the default Ride Command display upon vehicle start up. This customizable split-screen view communicates important information.
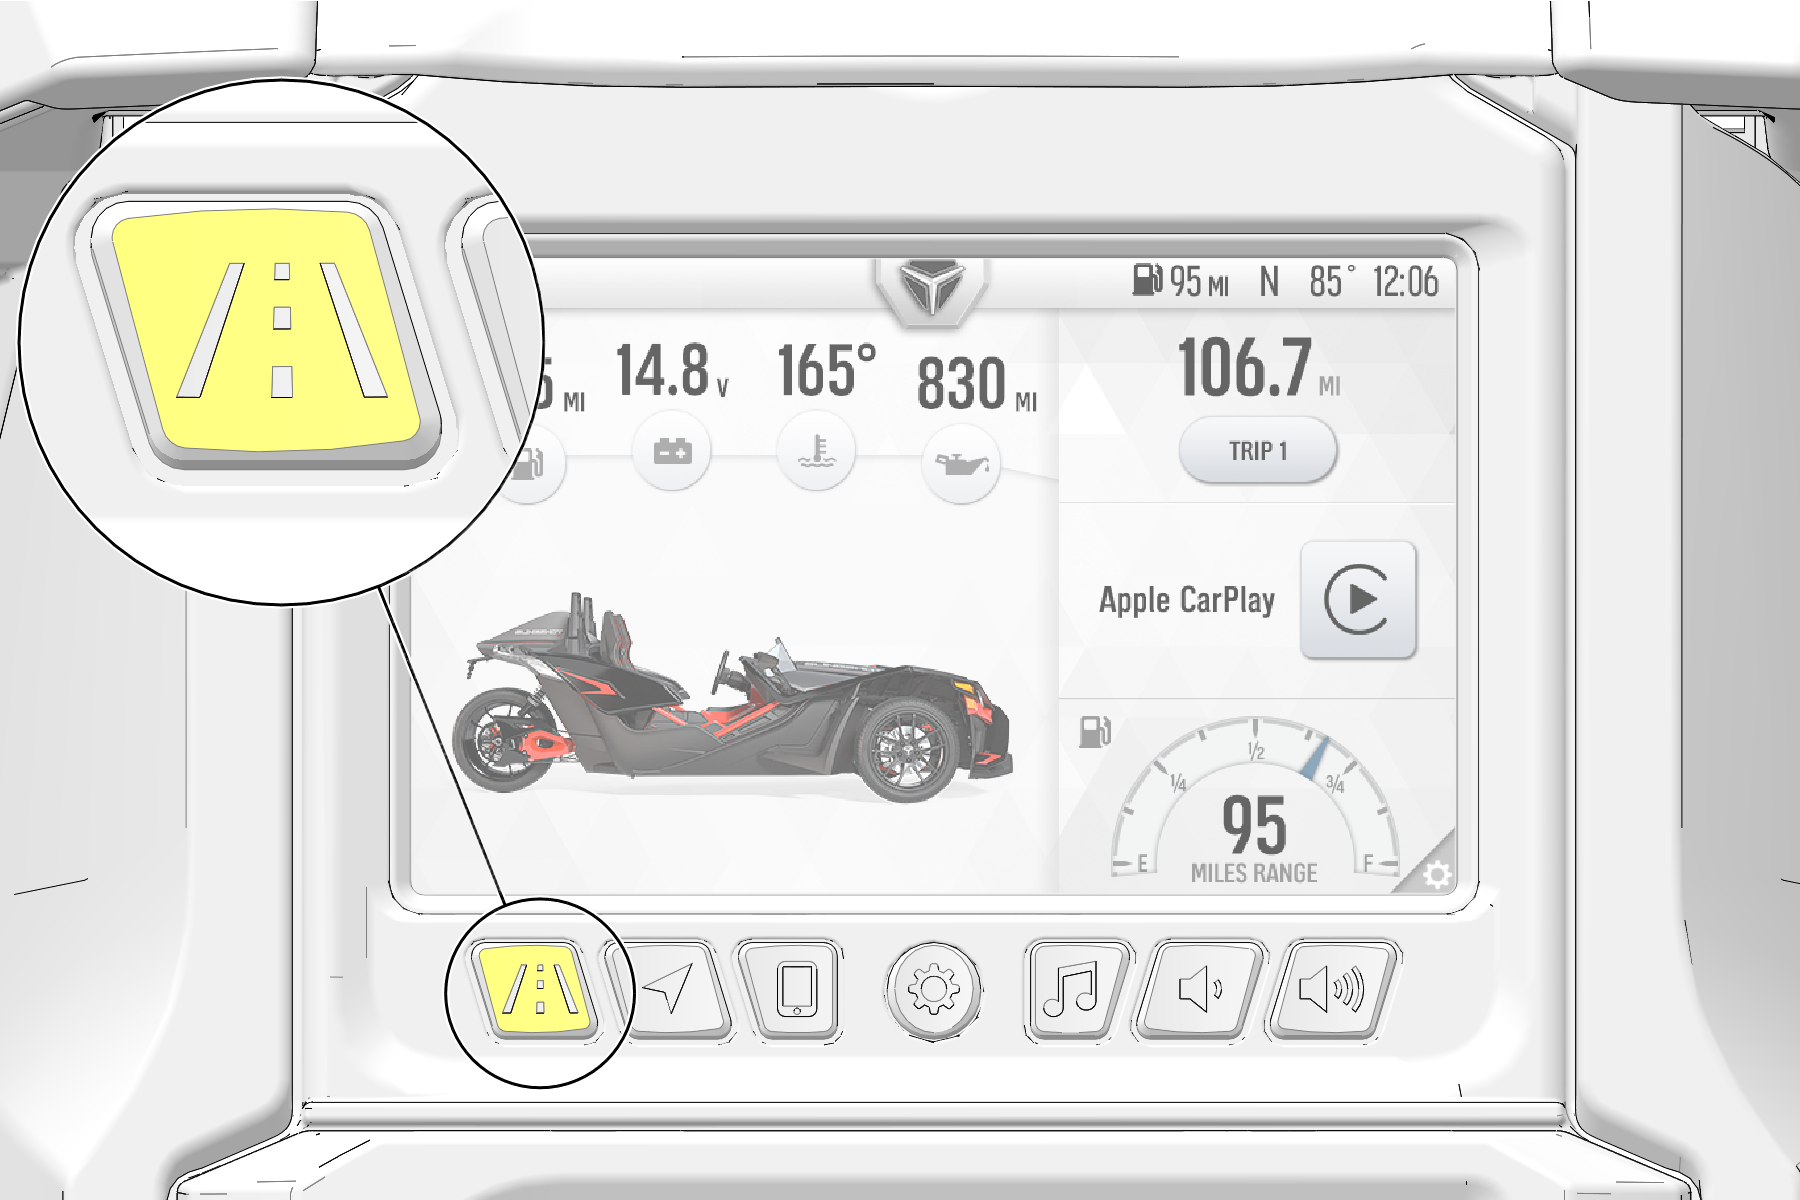
The Driver Screens can be accessed at any time by pressing the Driver button (shown above).
You can page through these views by swiping your finger horizontally across the touchscreen display or by pressing the Driver button once to rotate to the next view.
Navigation Screen
Vehicle Statistics Screen

Current Ride Screen

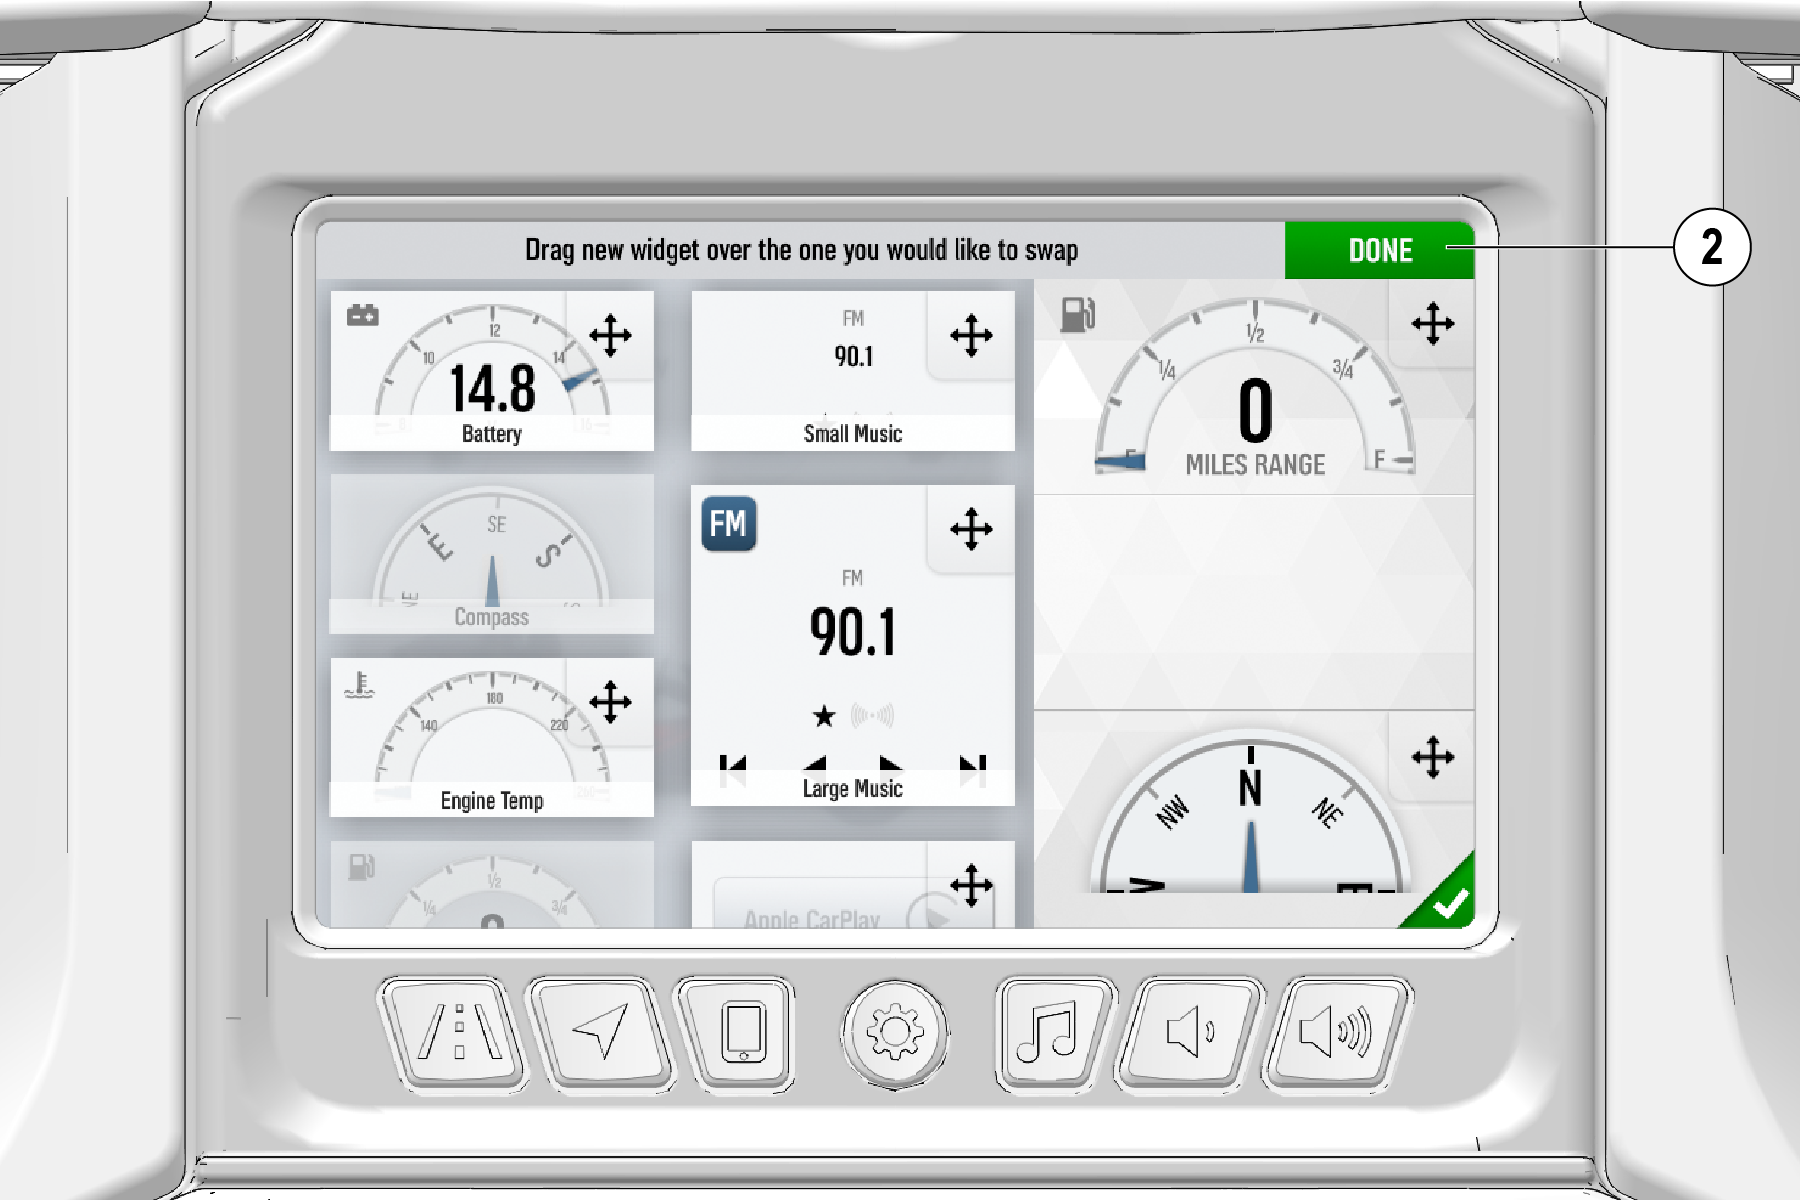
The right portion of the Driver Screen can be customized. To customize the widgets on the screen, press the Settings Icon 1 in the lower right corner.
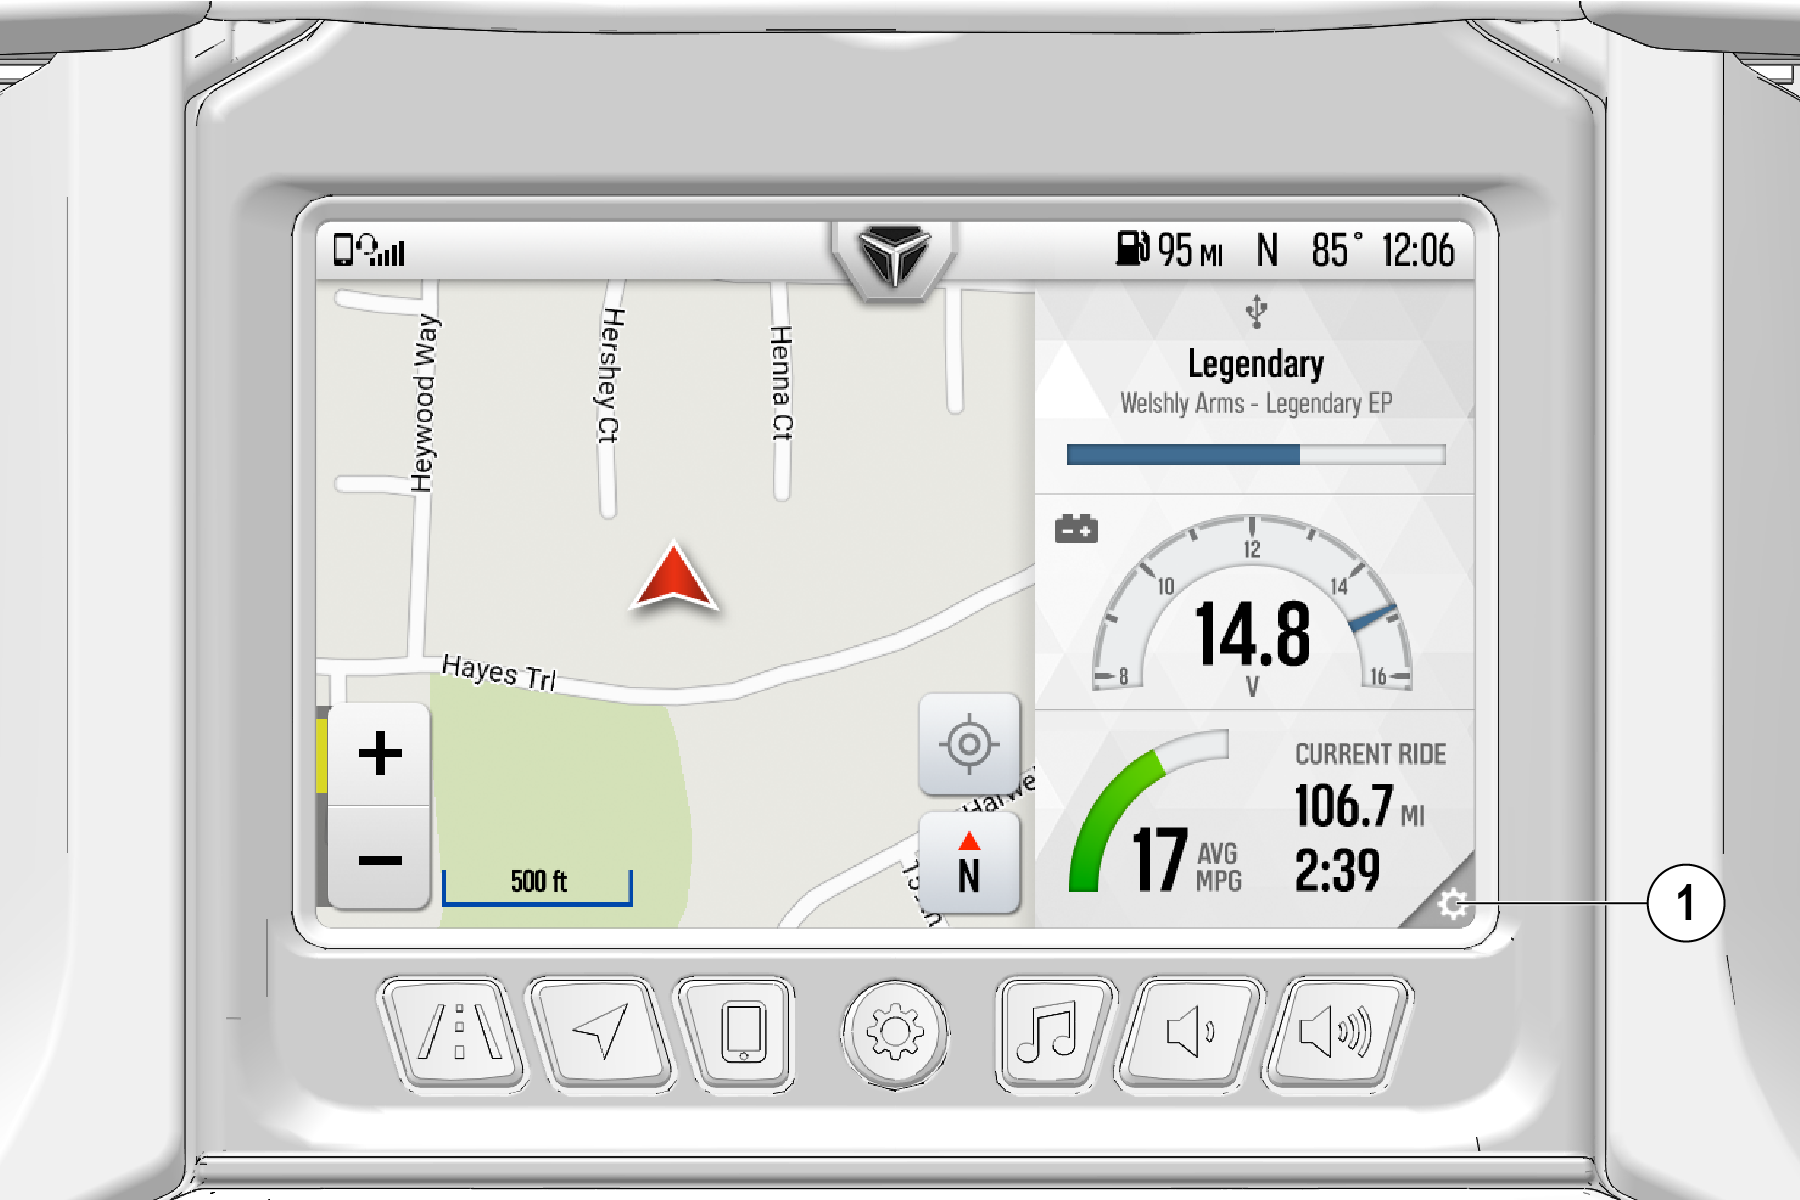
From the Settings Screen, swipe up and down to find the widgets you would like to add. Press and drag each widget to the location on the right hand side of the screen in the position that you would to place it. Press done 2 when you have the desired widgets in the order that you wish to save your settings.
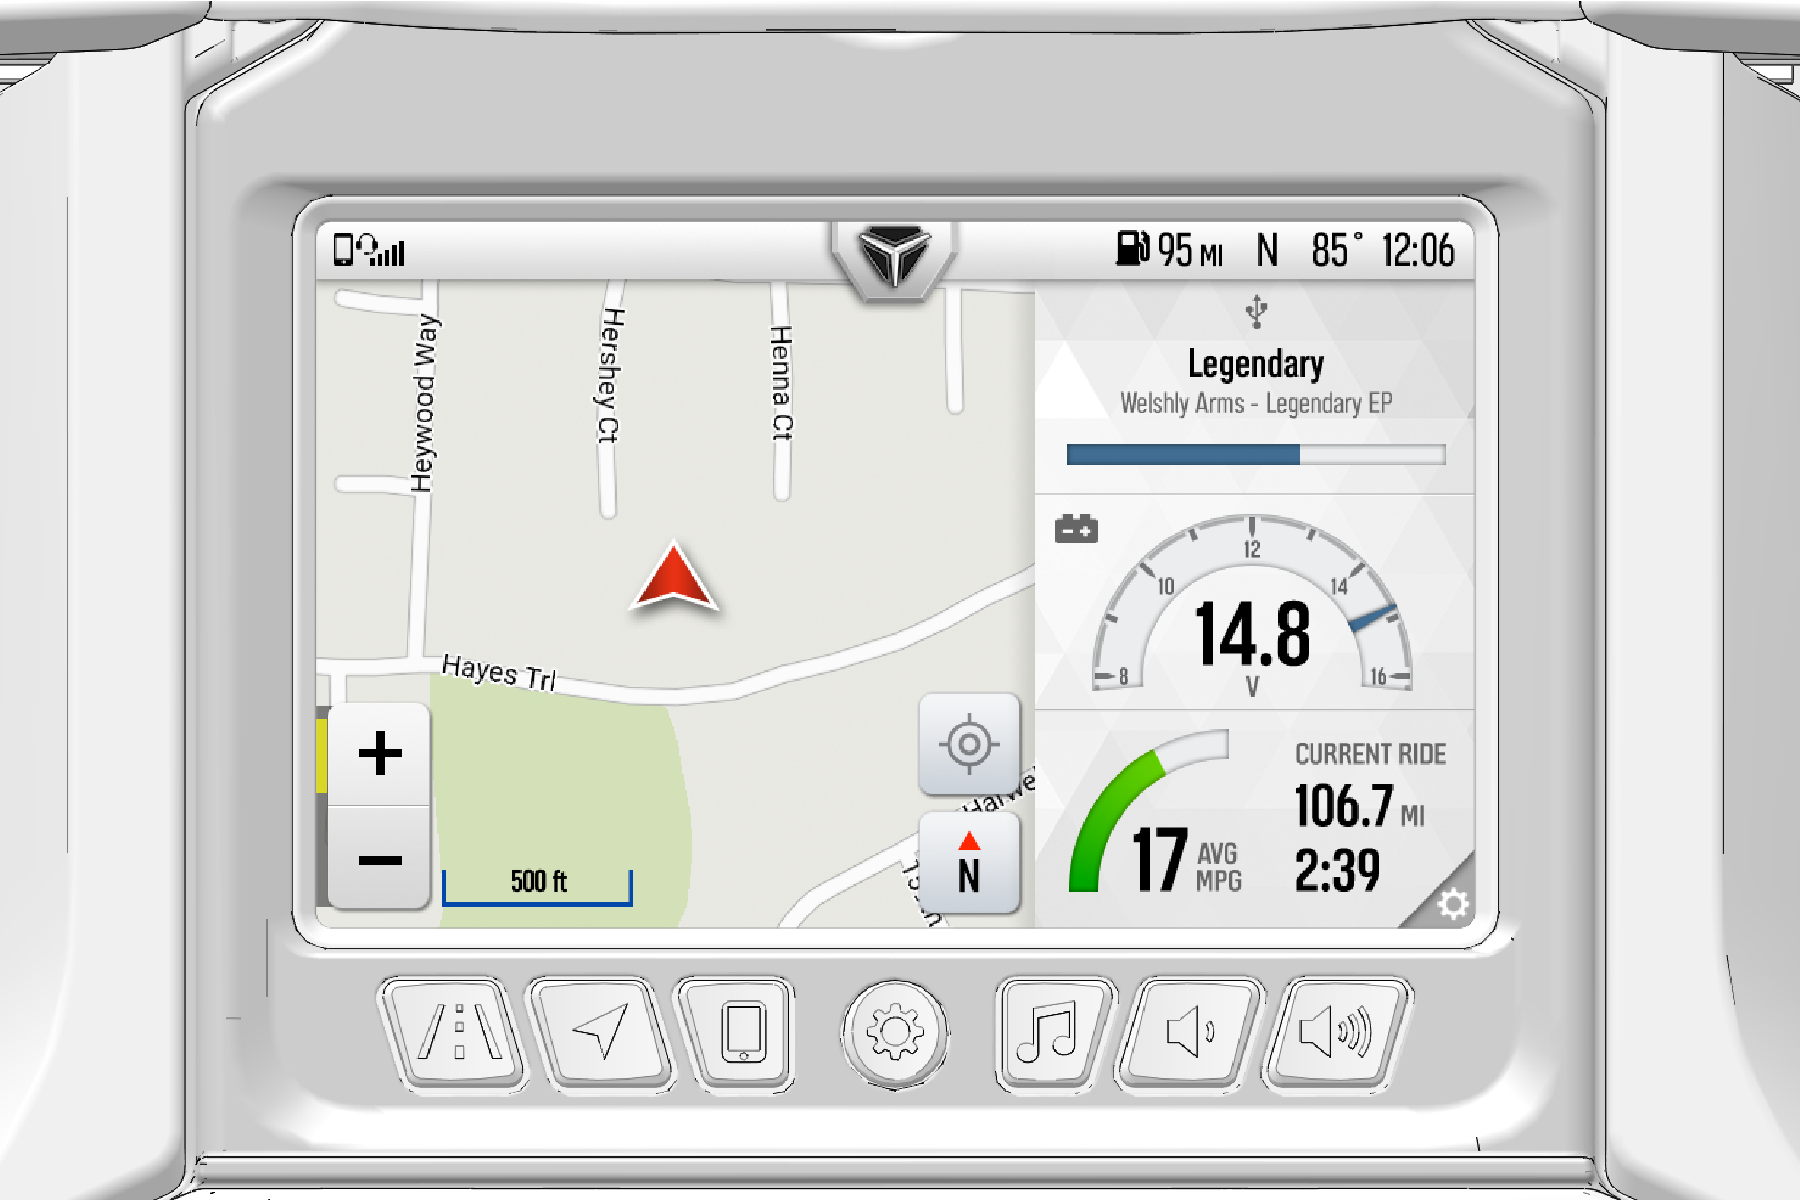
The Navigation Screen (if equipped) utilizes your Slingshot’s GPS to provide directions to specific addresses and points-of-interest within your vicinity. The position indicator arrow centers itself based on the location of the GPS.
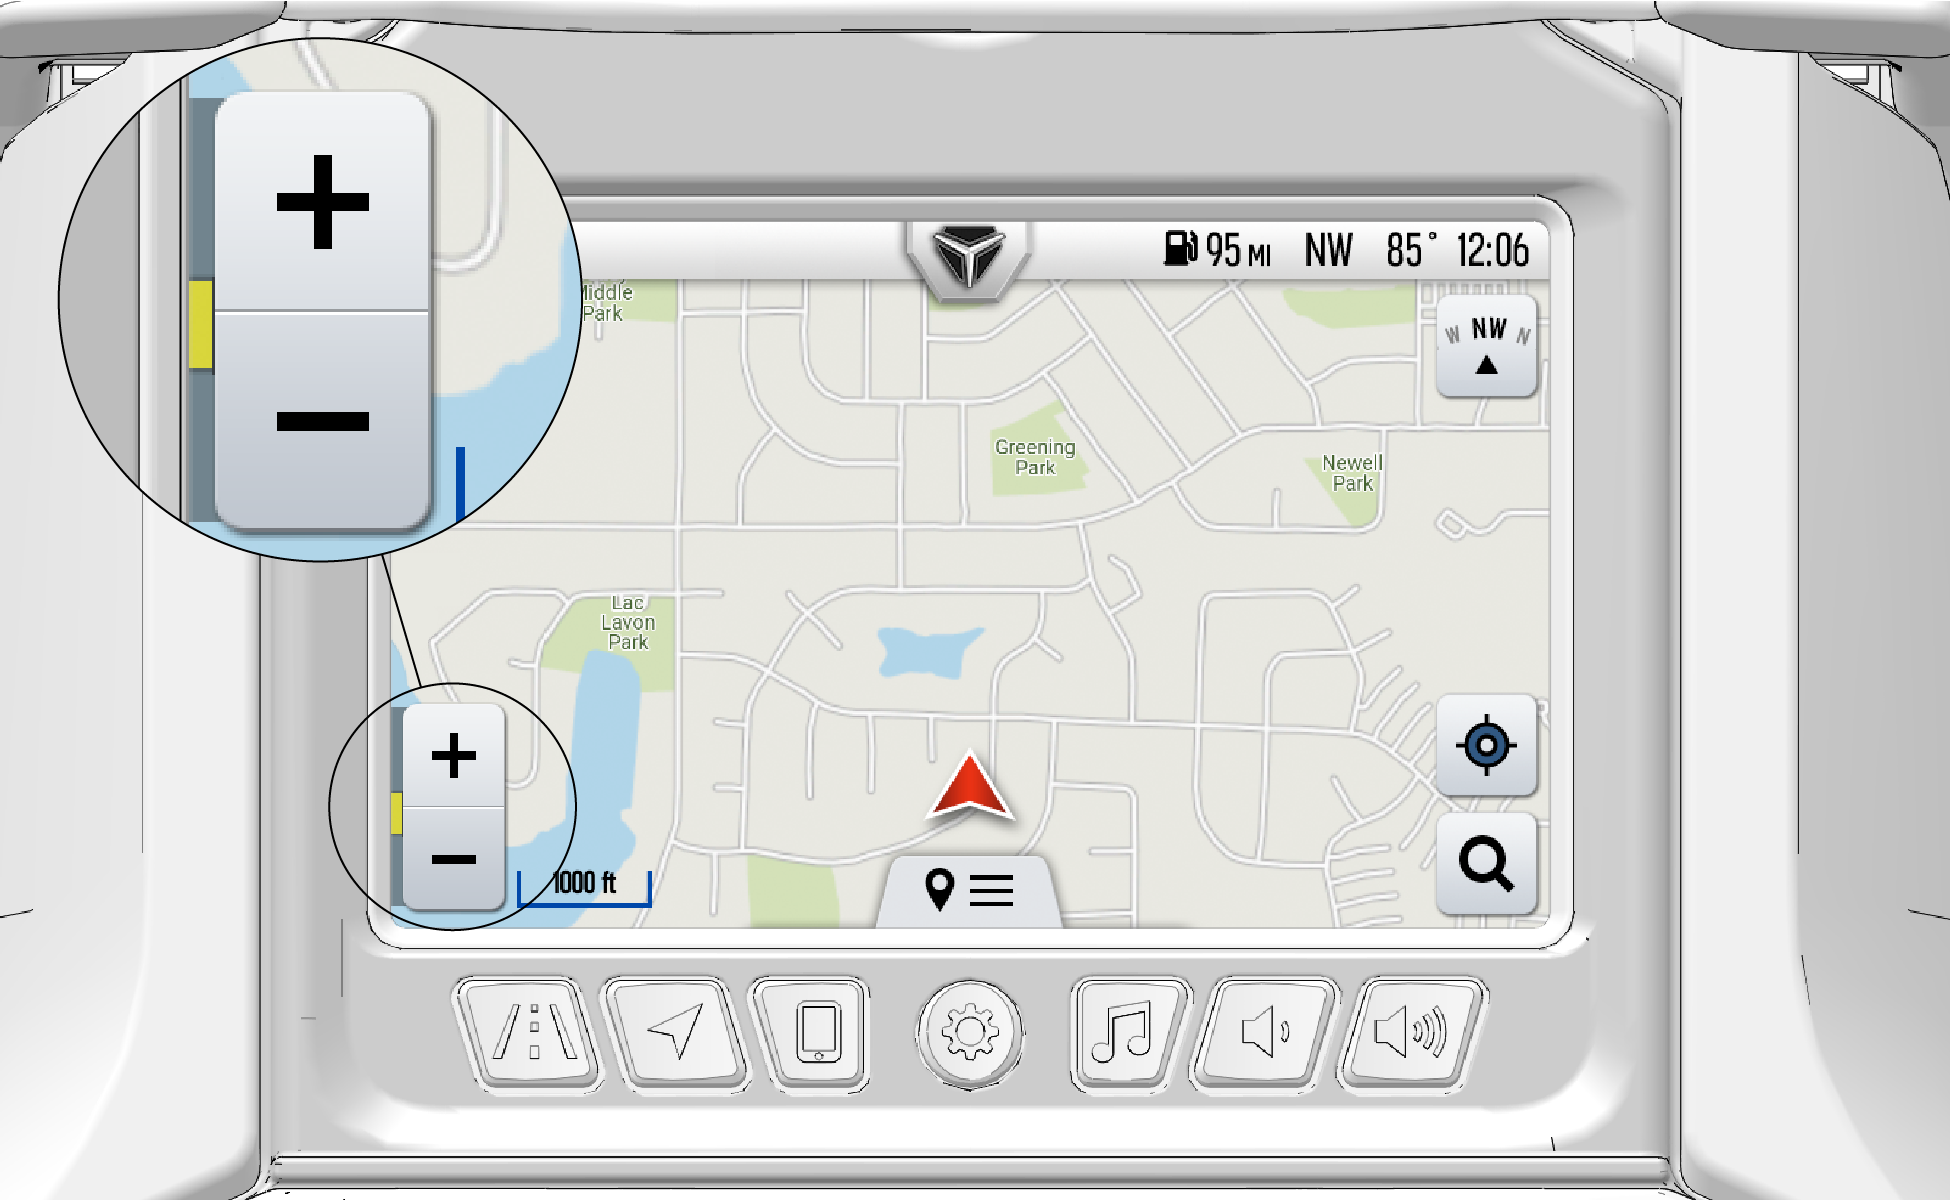
Auto-zoom to the position indicator is always active during navigation. The current zoom level is relative to the maximum and minimum zoom capabilities.
Zoom In
To
zoom in on the position indicator, press the plus button or expand
your fingers on the touchscreen.
Zoom Out
To zoom out, press the minus button or
pinch your fingers together on the touchscreen.
The Map Orientation button is located on the upper right side of the screen. This button allows users to change map orientation between three modes: North Up, Course Up, and 3D. Pressing this button will also re-center the map on the position indicator arrow.

| Map Orientation | Map Icon |
|---|---|
|
North Up view locks the map orientation so North will always point upward, regardless of your Slingshot’s position or direction. |

|
|
Course Up view rotates the map to match the direction of your Slingshot. |

|
|
3D view tilts the map to the horizon and adds additional dimension to the environment. |

|
Pressing the search icon will bring up the search screen.
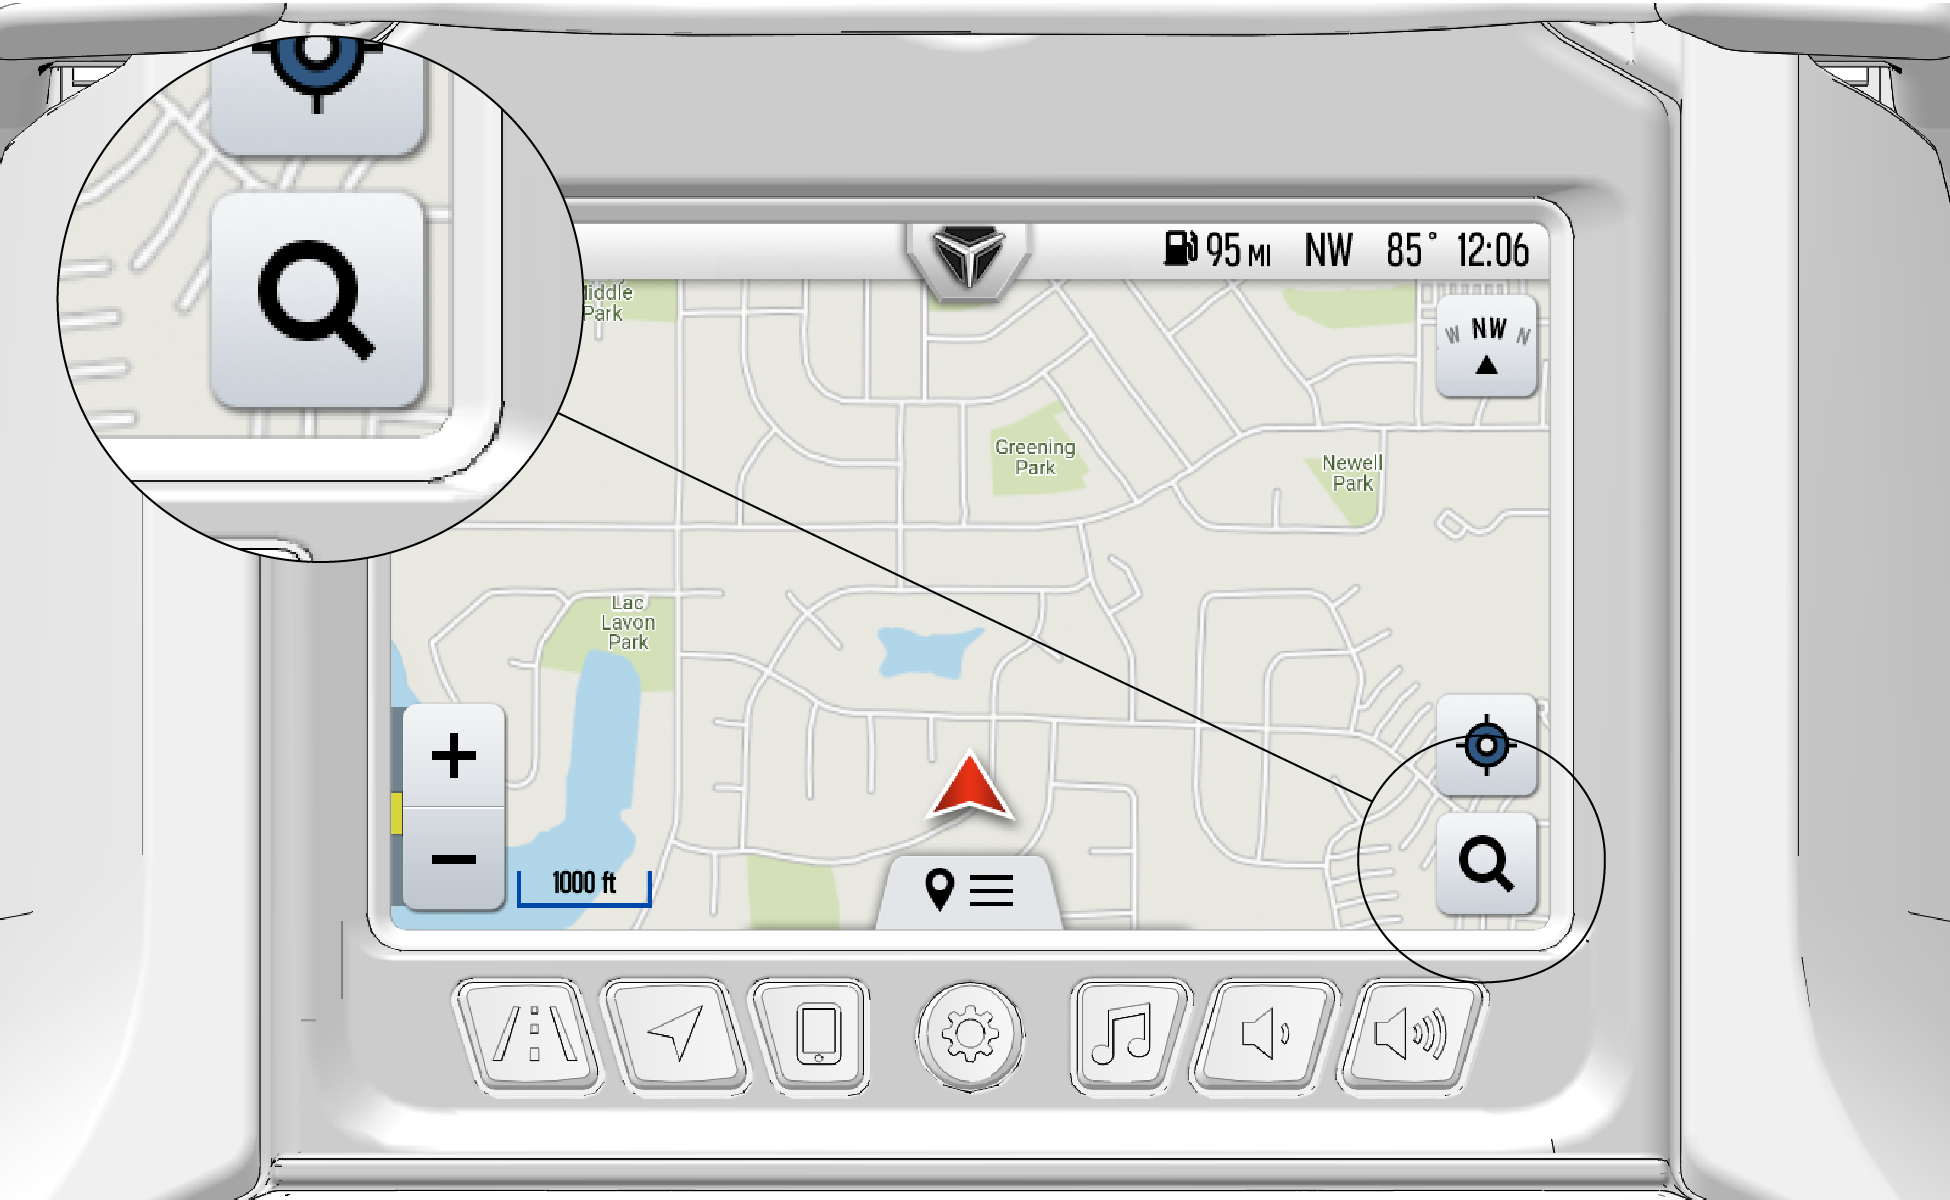
The search screen allows you to search for destinations, find points-of-interest, set a destination as your “home” location, browse saved locations, and view recent searches.

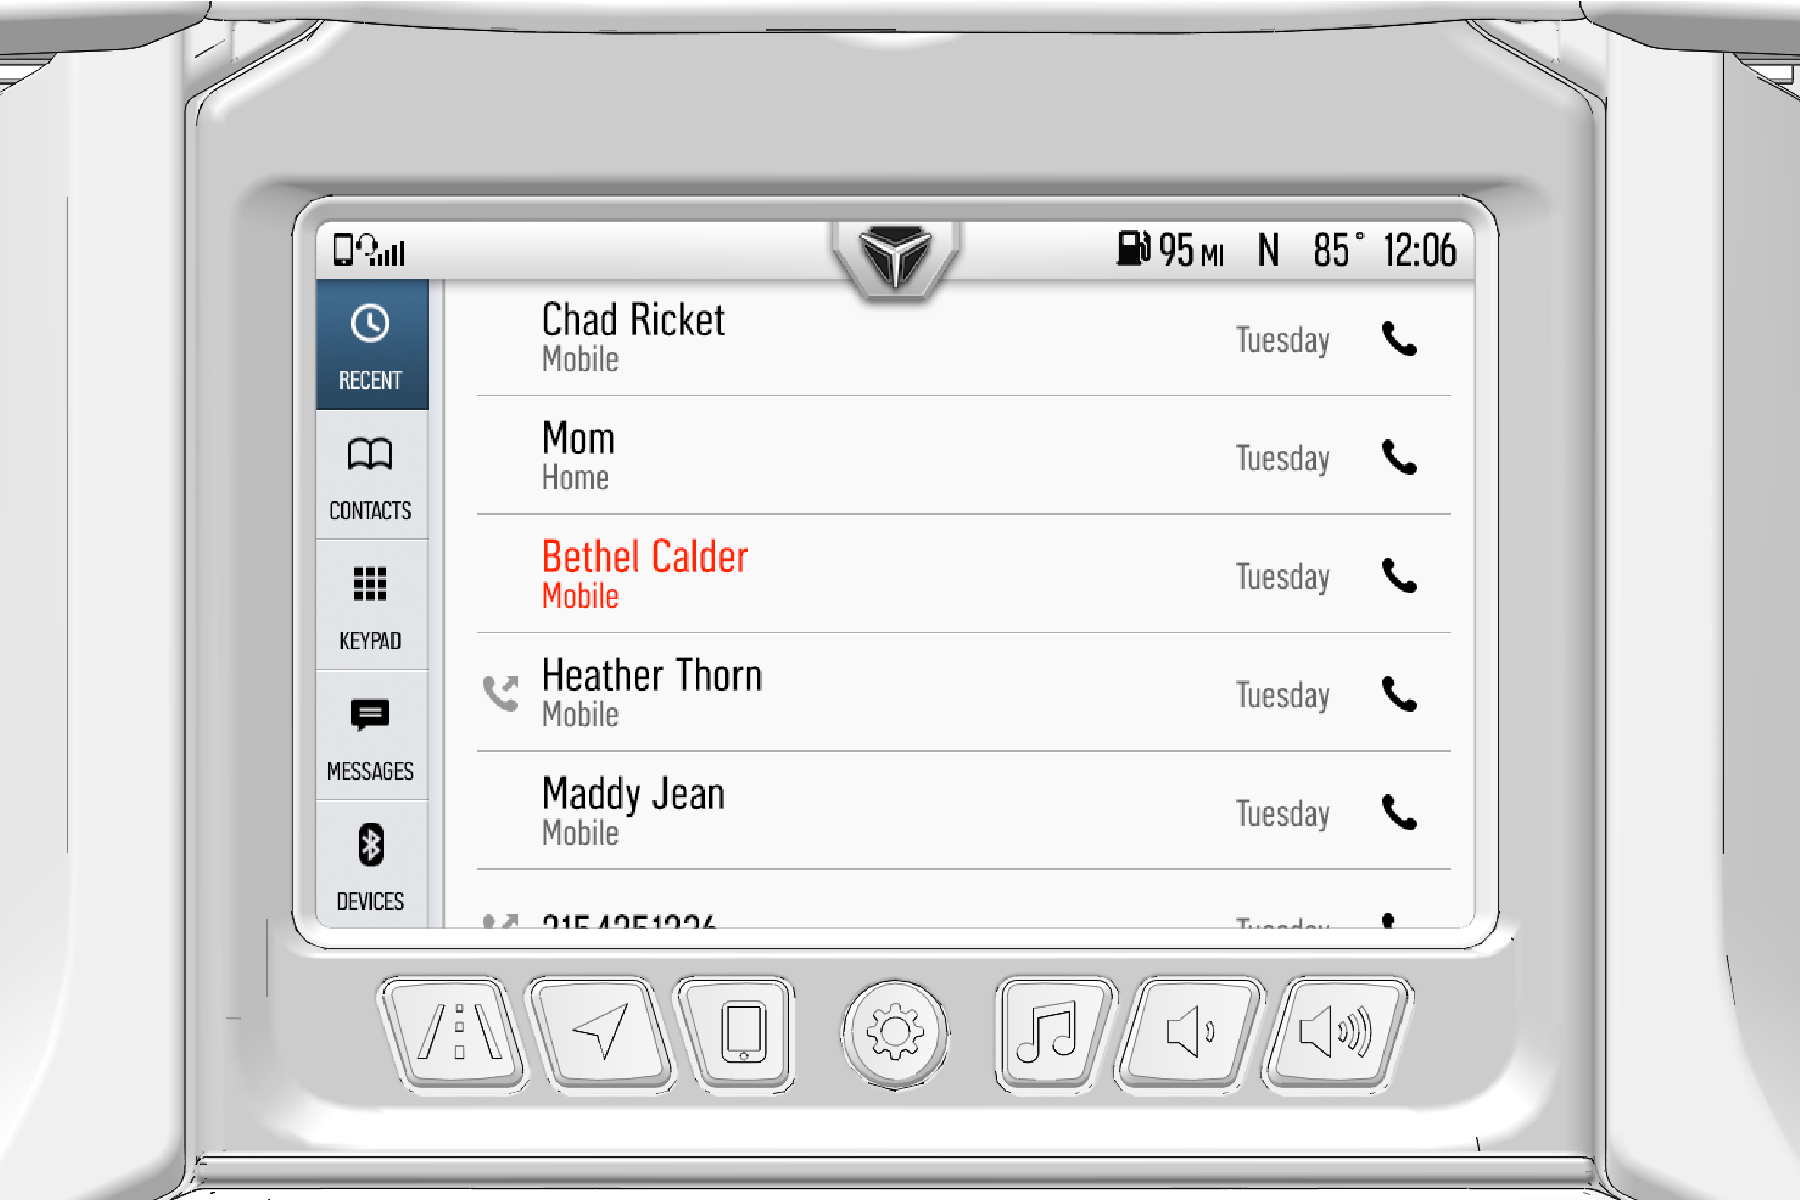
The Device Manager Screen manages your Bluetooth-paired devices. Pair a smartphone and headset to the Ride Command display to listen to music, make and receive calls and text messages, as well as access your personal contact list, favorites, and call history.

The Recent Calls tab displays all recent calls to and from your smartphone. On this screen, you can do the following:
View and refresh call history.
Respond to calls.
The Contacts tab connects to your smartphone’s contact list. On this screen, you can do the following:
Search for contacts using the alphabetical menu at the top of the touchscreen.
View stored information for each contact.

The Keypad tab allows you to free-dial phone numbers to make calls outside your phone’s saved contact list.

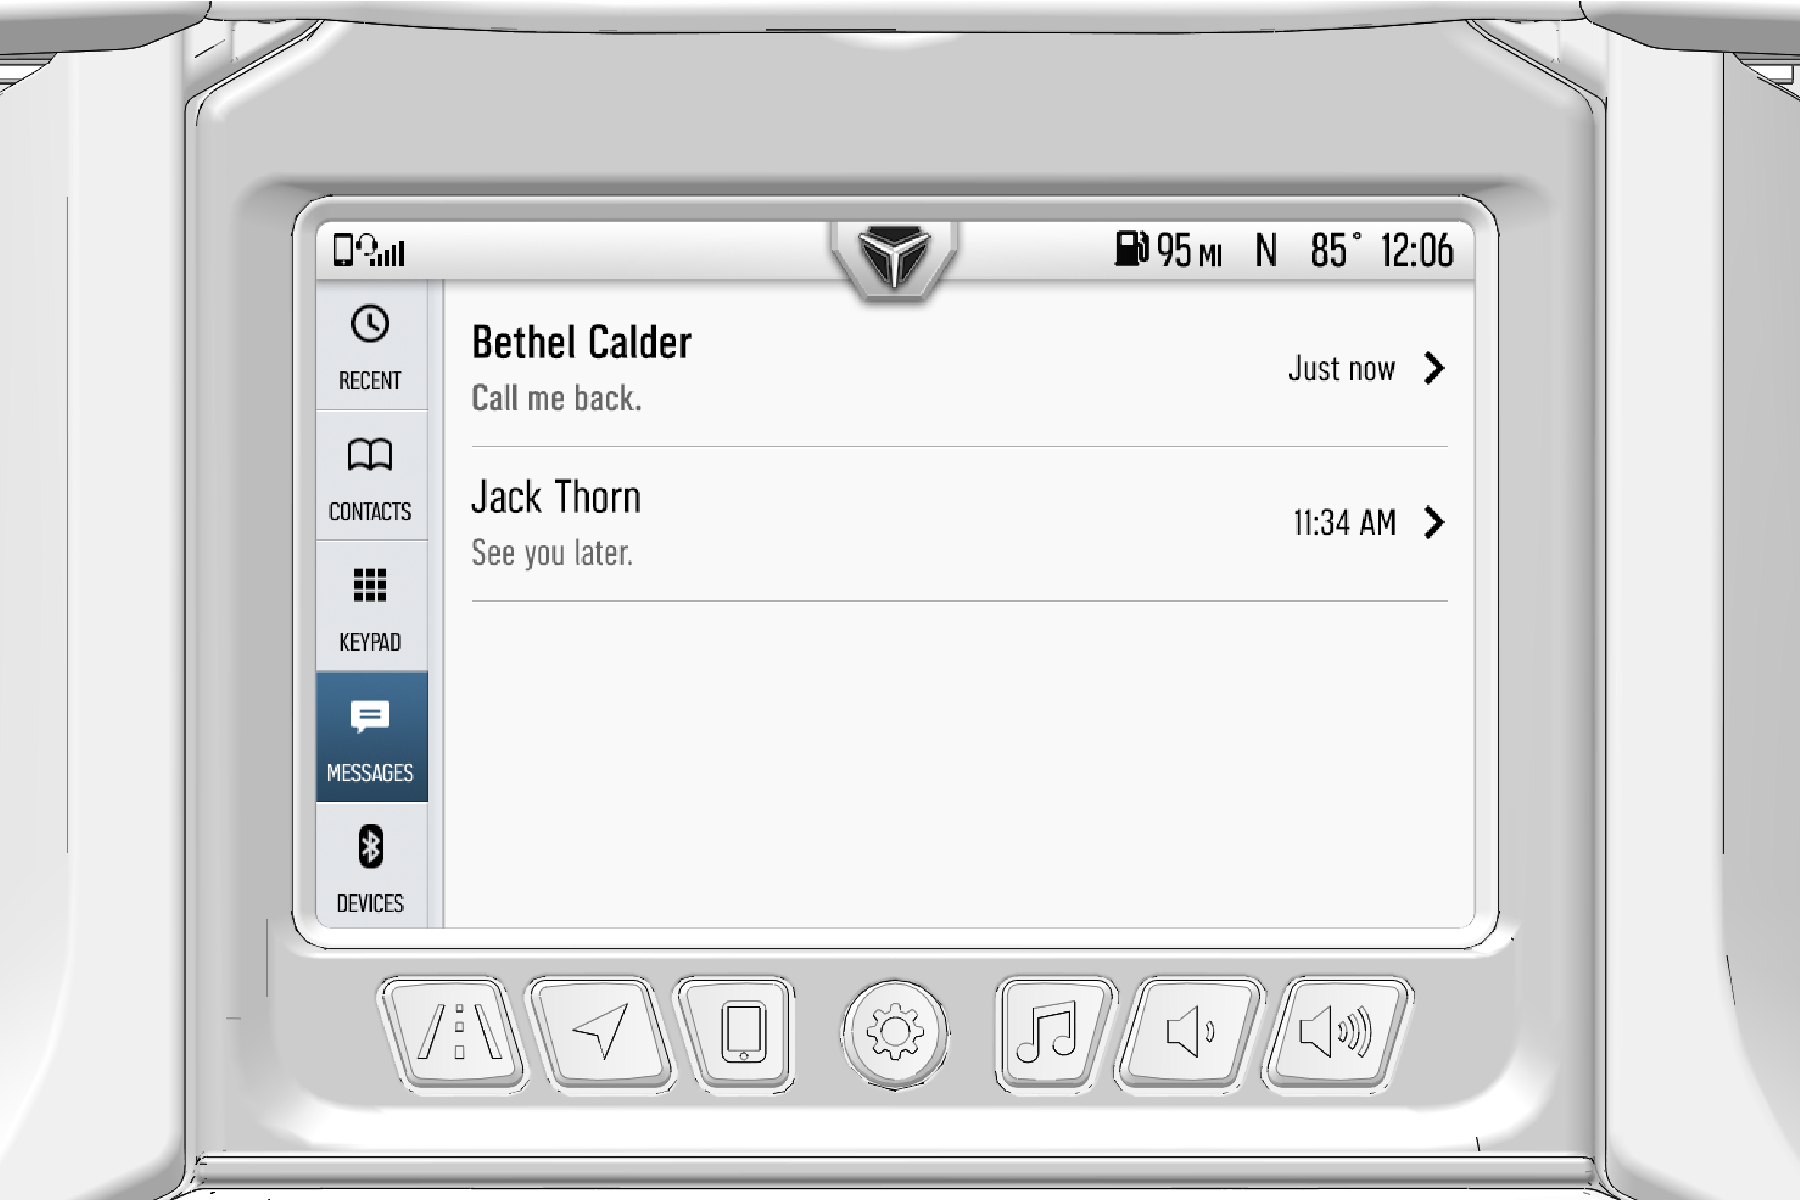
The Text tab shows message history sent from the display. From this screen, you can perform the following actions:
View message history and incoming messages.
Reply to a message using Quick Reply.
Customize a text response.
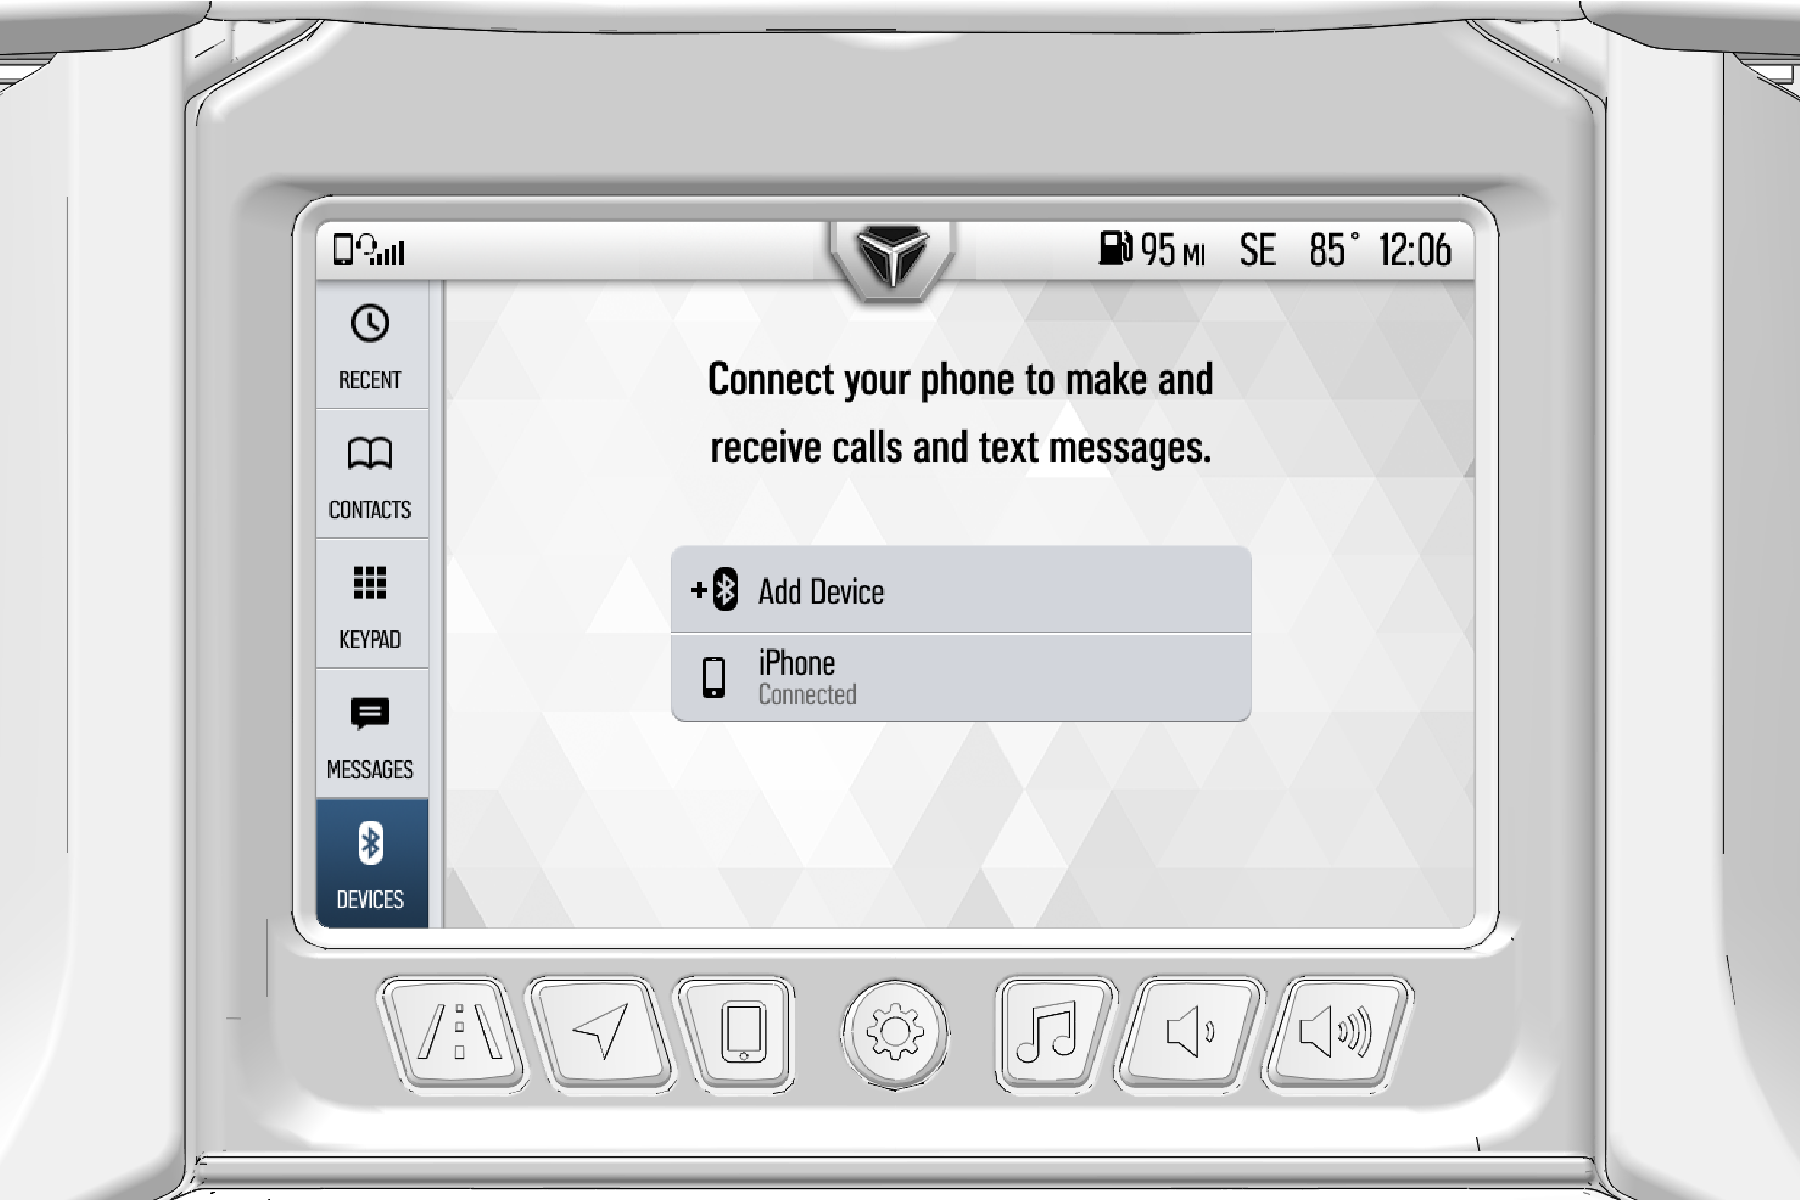
From the Devices tab you can perform the following actions:
Connect a device via Bluetooth®.
View connected devices.
The Settings Menu allows access to all of the information and settings that control your display.

The Settings menu can also be accessed by pressing the Badge Panel at the top of the touchscreen display and selecting All Settings.
The Settings menu contains the following tabs:
Info
General
Time
Audio
Vehicle

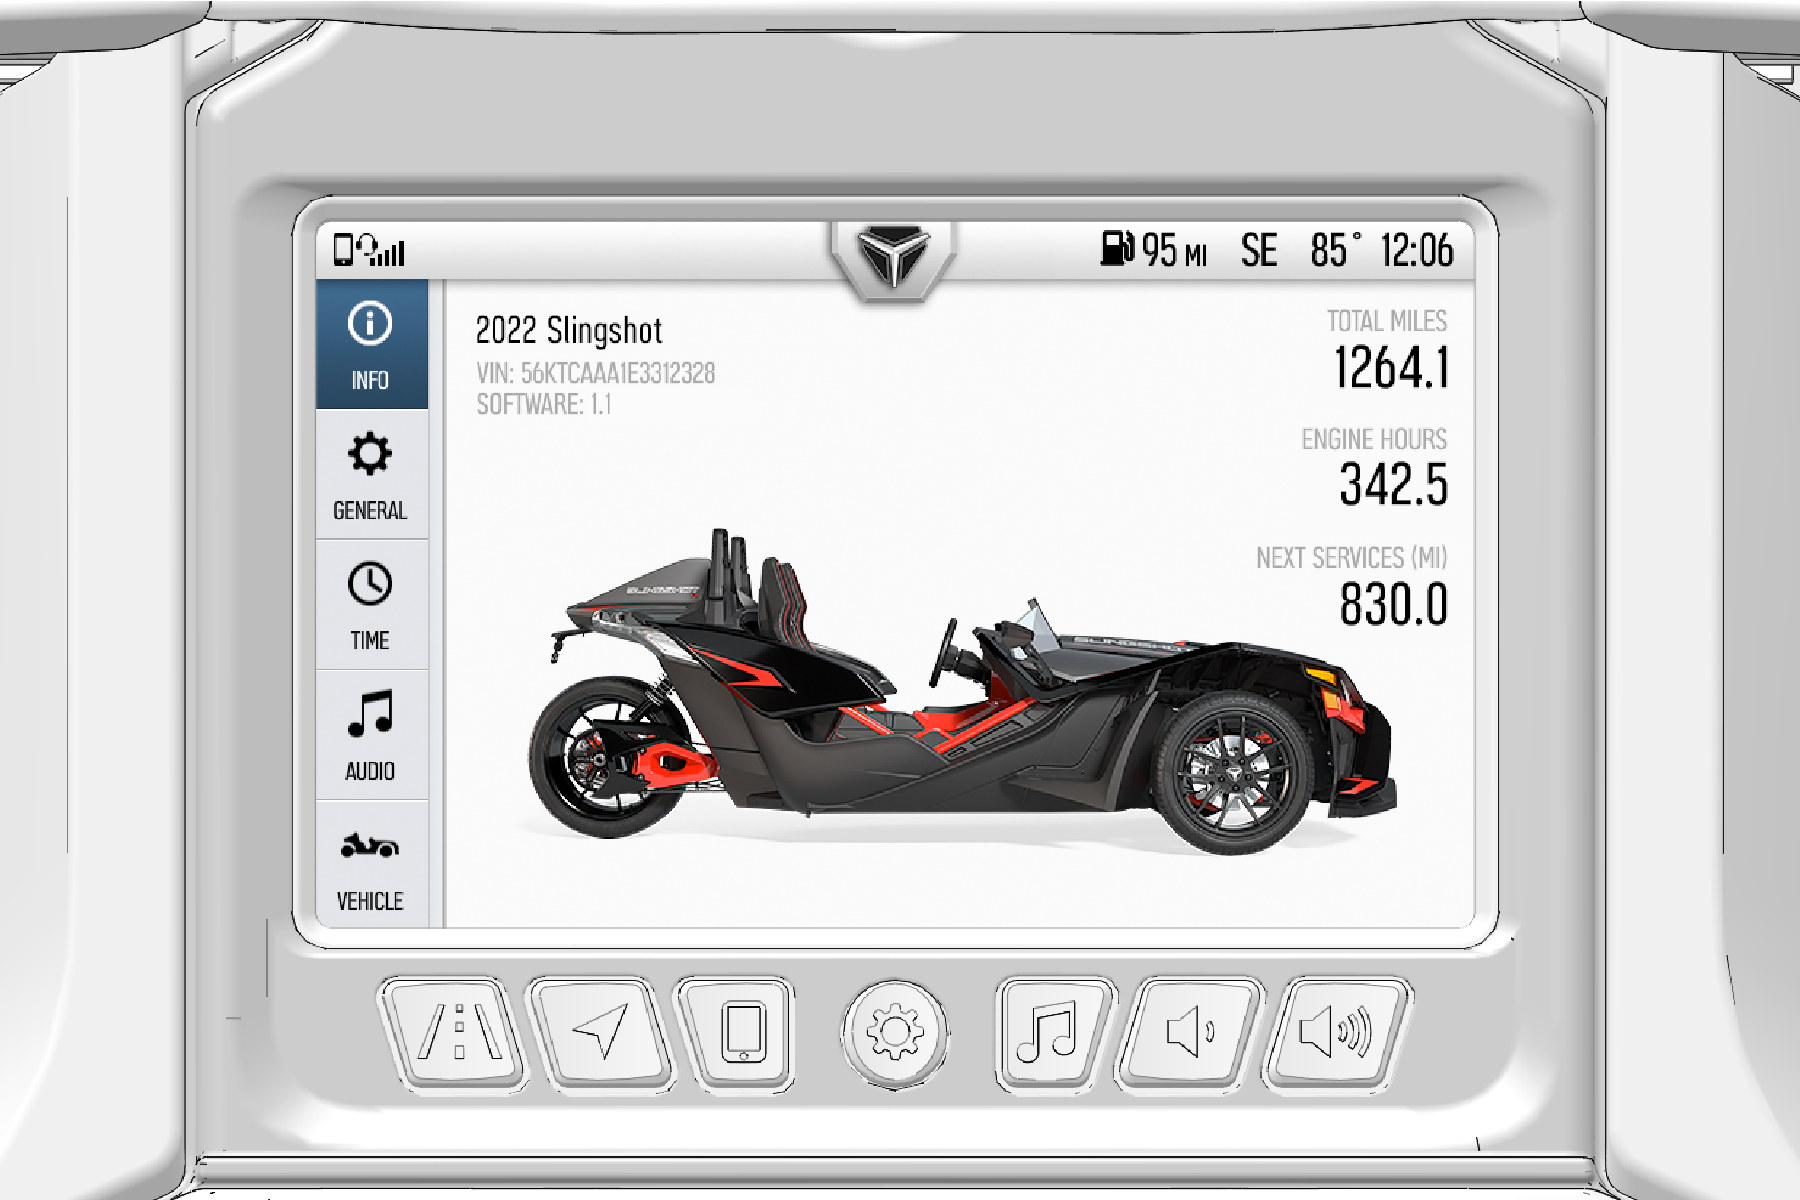
The Info tab displays vehicle and display information for your vehicle. On this screen, you can view the following:
Model Year
Vehicle Identification Number (VIN)
Software Version
Total Distance the Vehicle has traveled
Engine Hours
Distance to next service.
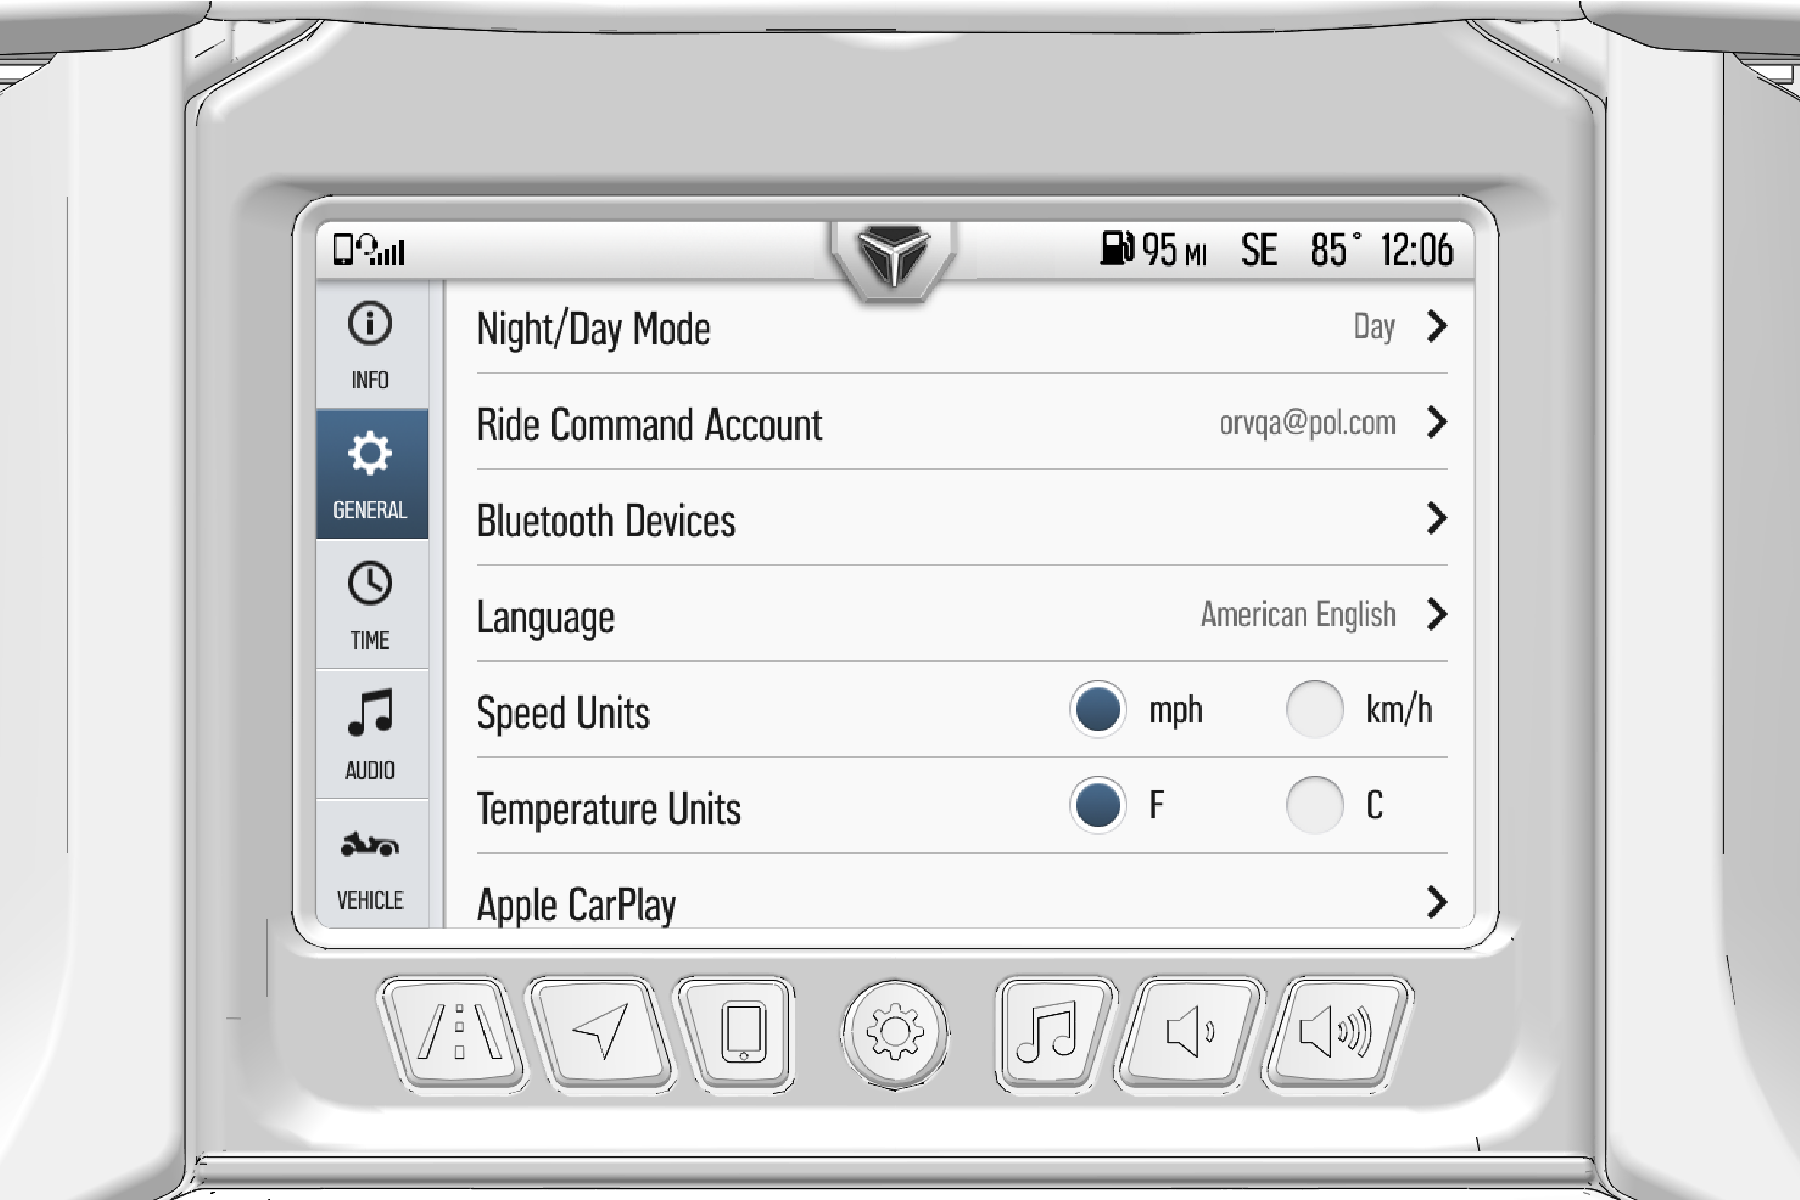
Under the General tab, you can view and customize the following settings:
Screen Mode
Ride Command Account Settings
Bluetooth® Devices
Language
Speed Units of Measure
Temperature Units of Measure
Apple CarPlay®
Update Maps
System Information
Select the Time tab to do the following:
Sync clock with GPS satellite (if equipped).
View the time zone.
Choose between a 12- or 24-hour clock format.
Daylight Savings Time: On or Off.
Set Time: Adjust clock time.

Select the Audio tab to do the following:
Manually adjust equalizer settings.
Choose from three Automatic Volume Control presets or turn function off.
Clear radio tuner history by resetting radio presets.
Set radio tuner region.

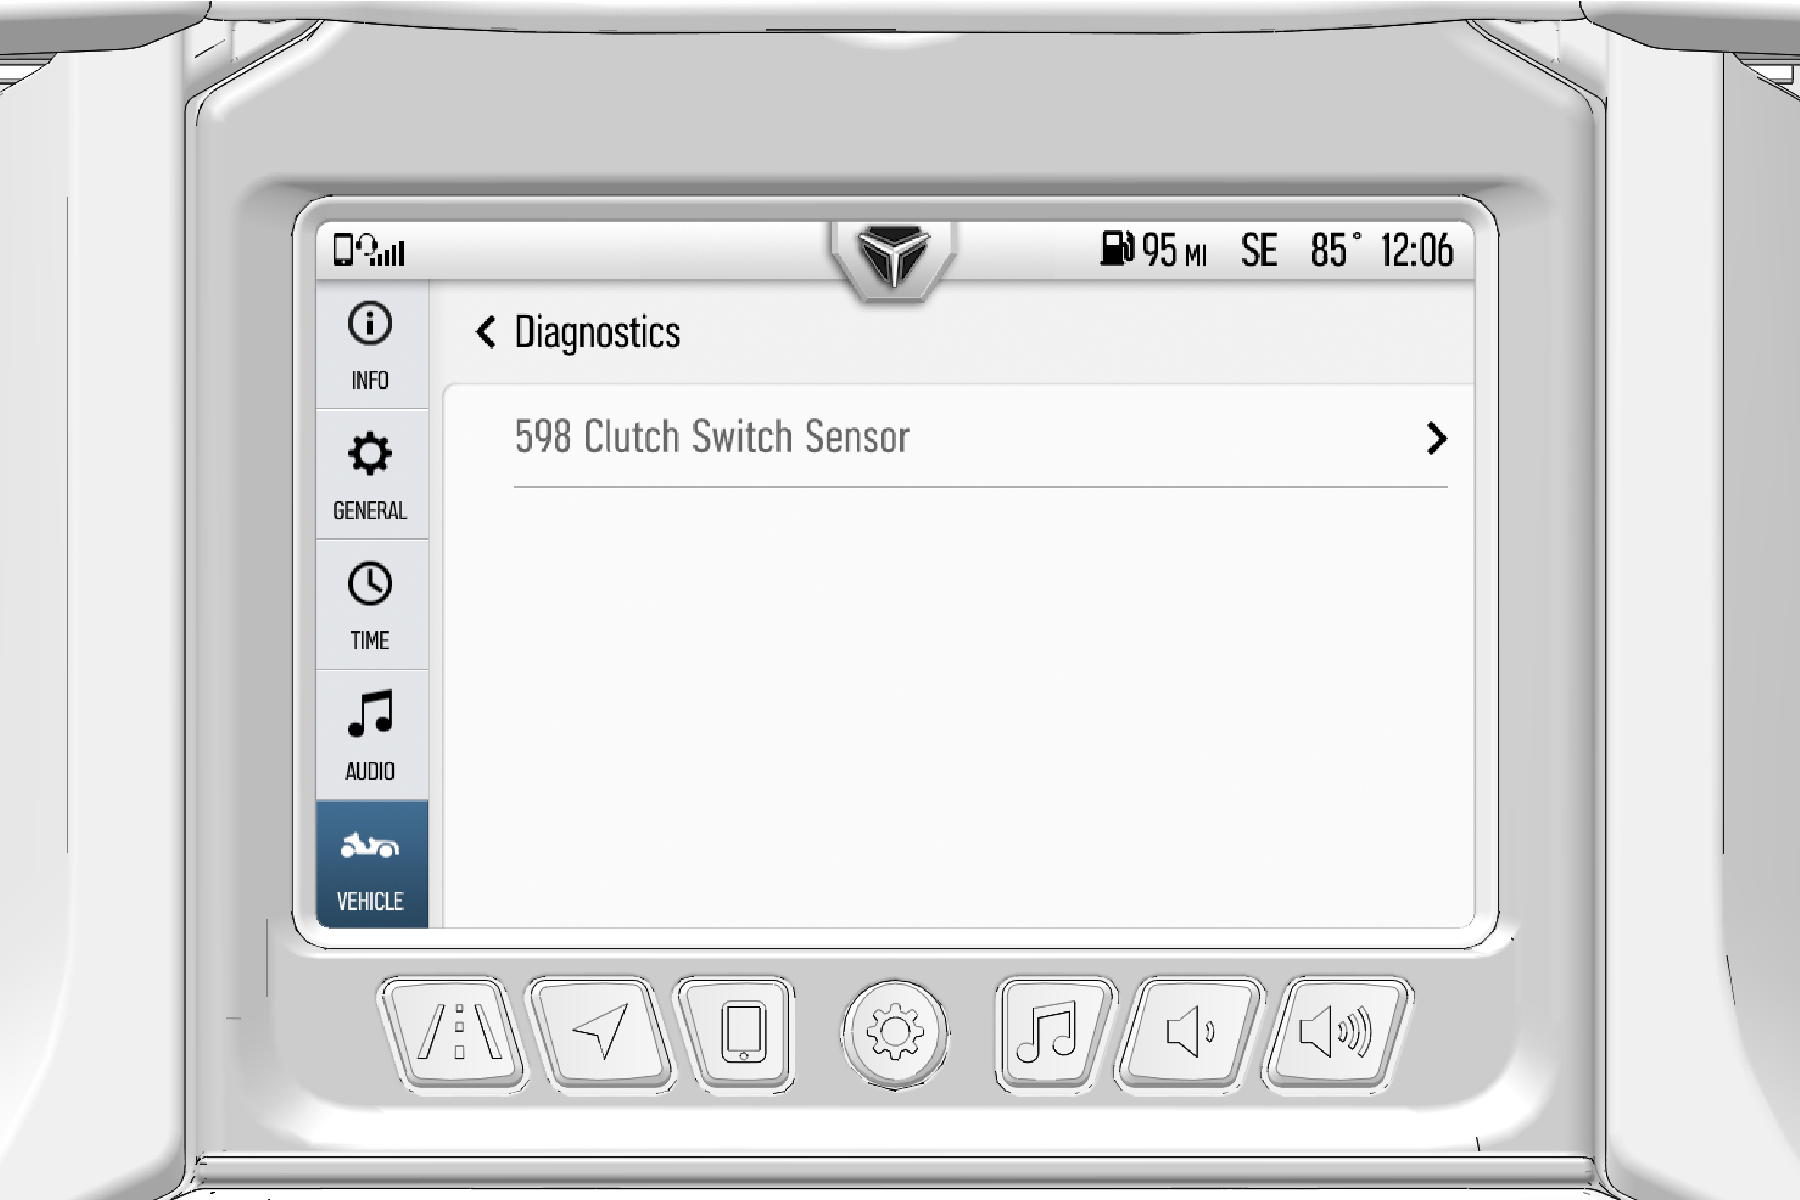
The Vehicle tab in the Settings menu displays information regarding the state of your Slingshot vehicle. Select the Vehicle tab to view the following:
Oil Life/Service Reset
Press the reload button to reset the oil life after each oil change.
GPS Status
Press the arrow icon to see a map of current GPS satellite connectivity.
Diagnostics
If, at any time, a blue warning banner appears on the bottom of your touchscreen, you can view the full warning on the Vehicle Diagnostics page.
Press the arrow icon to open the diagnostics panel.
To view a specific warning or error message, press the arrow icon within each row.
For more information on vehicle diagnostic information, see your authorized Polaris Slingshot dealer.
The Audio Screen utilizes the Slingshot’s radio, Bluetooth®, and USB port to provide audio and music through the built-in speaker system or through a Polaris-approved headset.
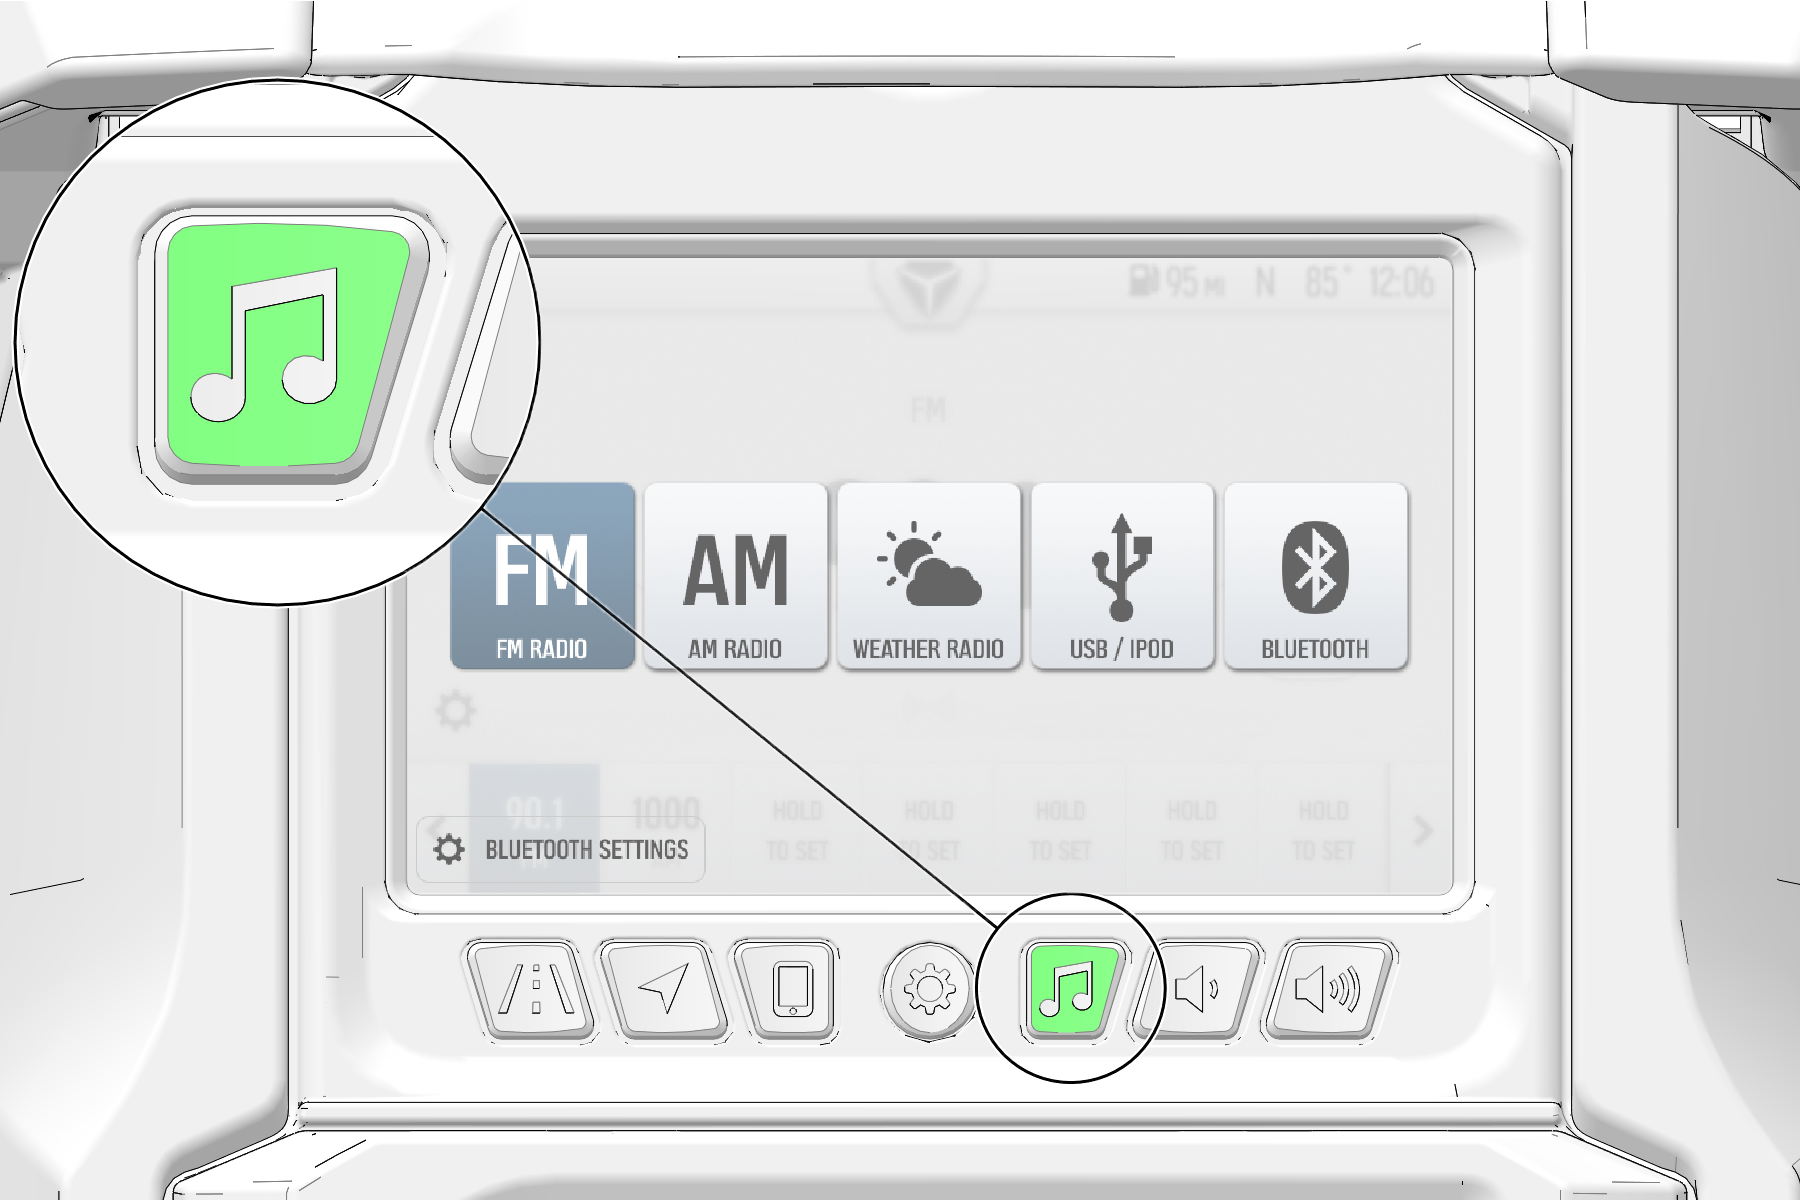
Your Ride Command display offers
the following audio options:
FM Radio
AM Radio
Weather Radio
USB/iPod
Bluetooth
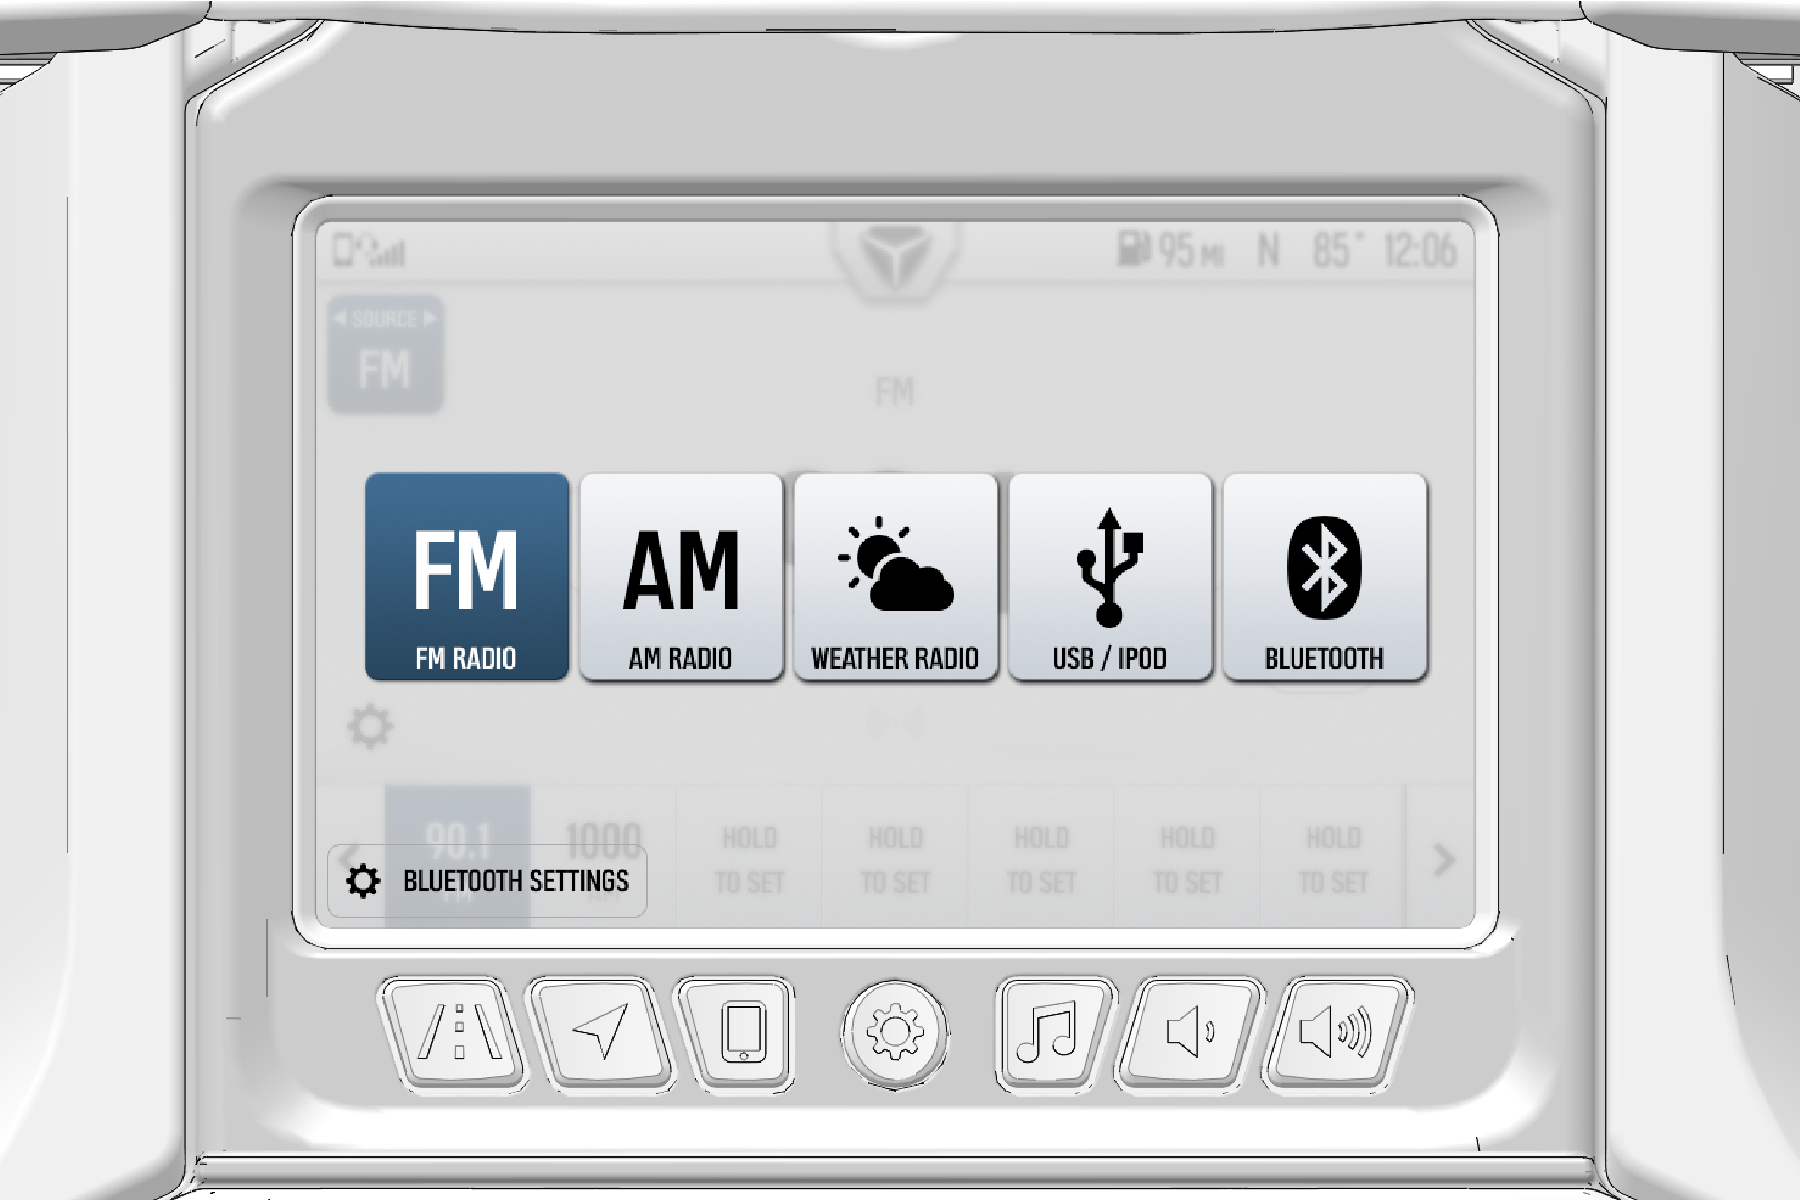
The Ride Command display utilizes
frequencies from five radio sources: AM, FM, MW (Medium Wave - Europe),
LW (Long Wave - Europe), and WX (Weather).
To access
one of the available radio frequencies, press the Audio button, followed
by the blue Source button to choose from AM, FM or weather radio.
Slingshot Ride Command utilizes USB technology to play audio through the built-in speaker system or connected headset.
For more information on using USB devices with your Ride Command display, see USB Hardware.
Plug in audio devices through the USB port in the glove box.
From the USB Audio panel you can do the following:
View the currently playing song and album.
Control song selection and pause and play tracks.
Repeat or shuffle audio tracks.
Navigate to different folders on the USB device.
Slingshot Ride Command utilizes Bluetooth® technology to play audio through the built-in speaker system or connected headset.
For more information on using Bluetooth® devices with your Ride Command display, see Bluetooth® Audio.
Make sure your device is paired to the display, see Pairing Your Device.
From the Bluetooth® panel you can to do the following:
View the currently playing song and album.
Control song selection and pause and play tracks.
Repeat or shuffle audio tracks.

The Volume buttons control the volume level of audio and music through the built-in speaker system or through a Polaris-approved headset.
Volume Decrease Button

Volume Increase Button
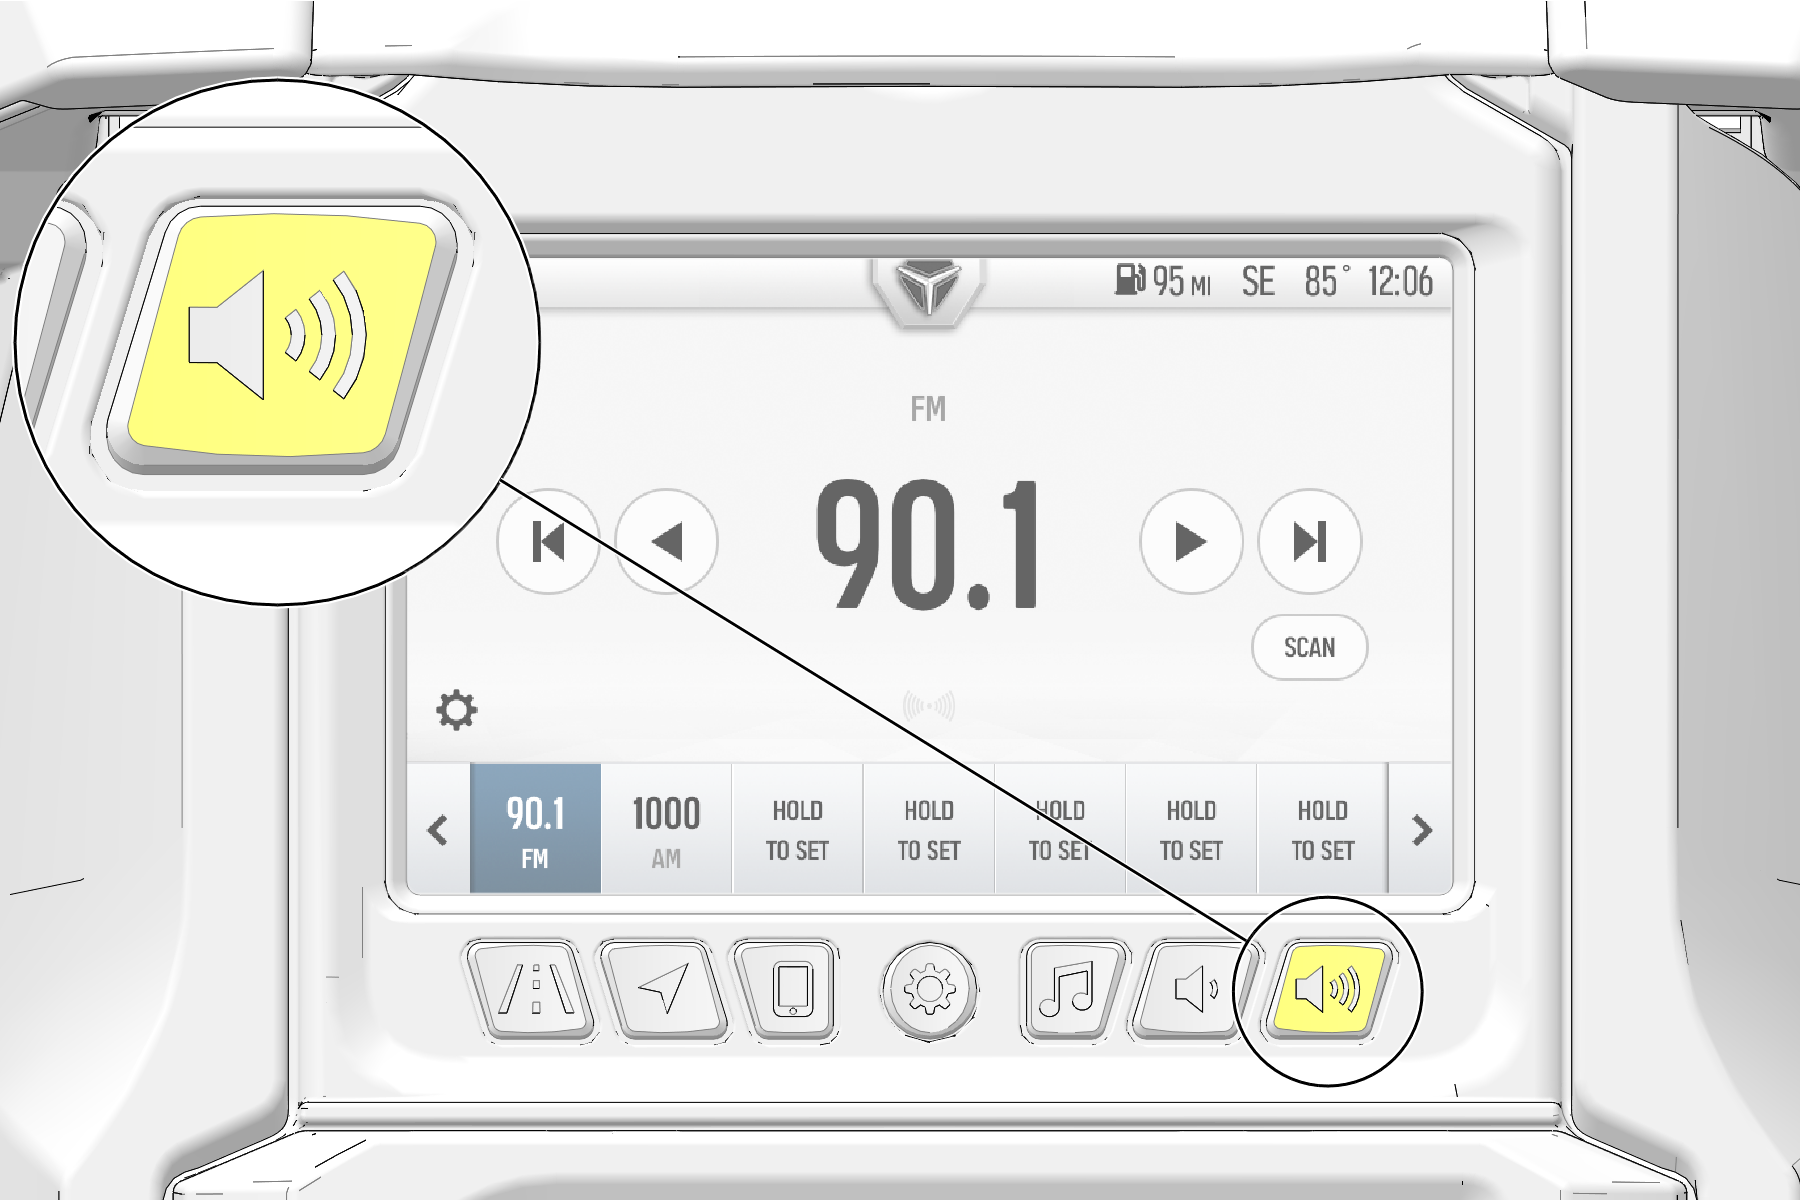
Volume Controls
Press and hold volume buttons to rapidly increase or decrease volume.
Press and release volume buttons to slowly increase or decrease volume.
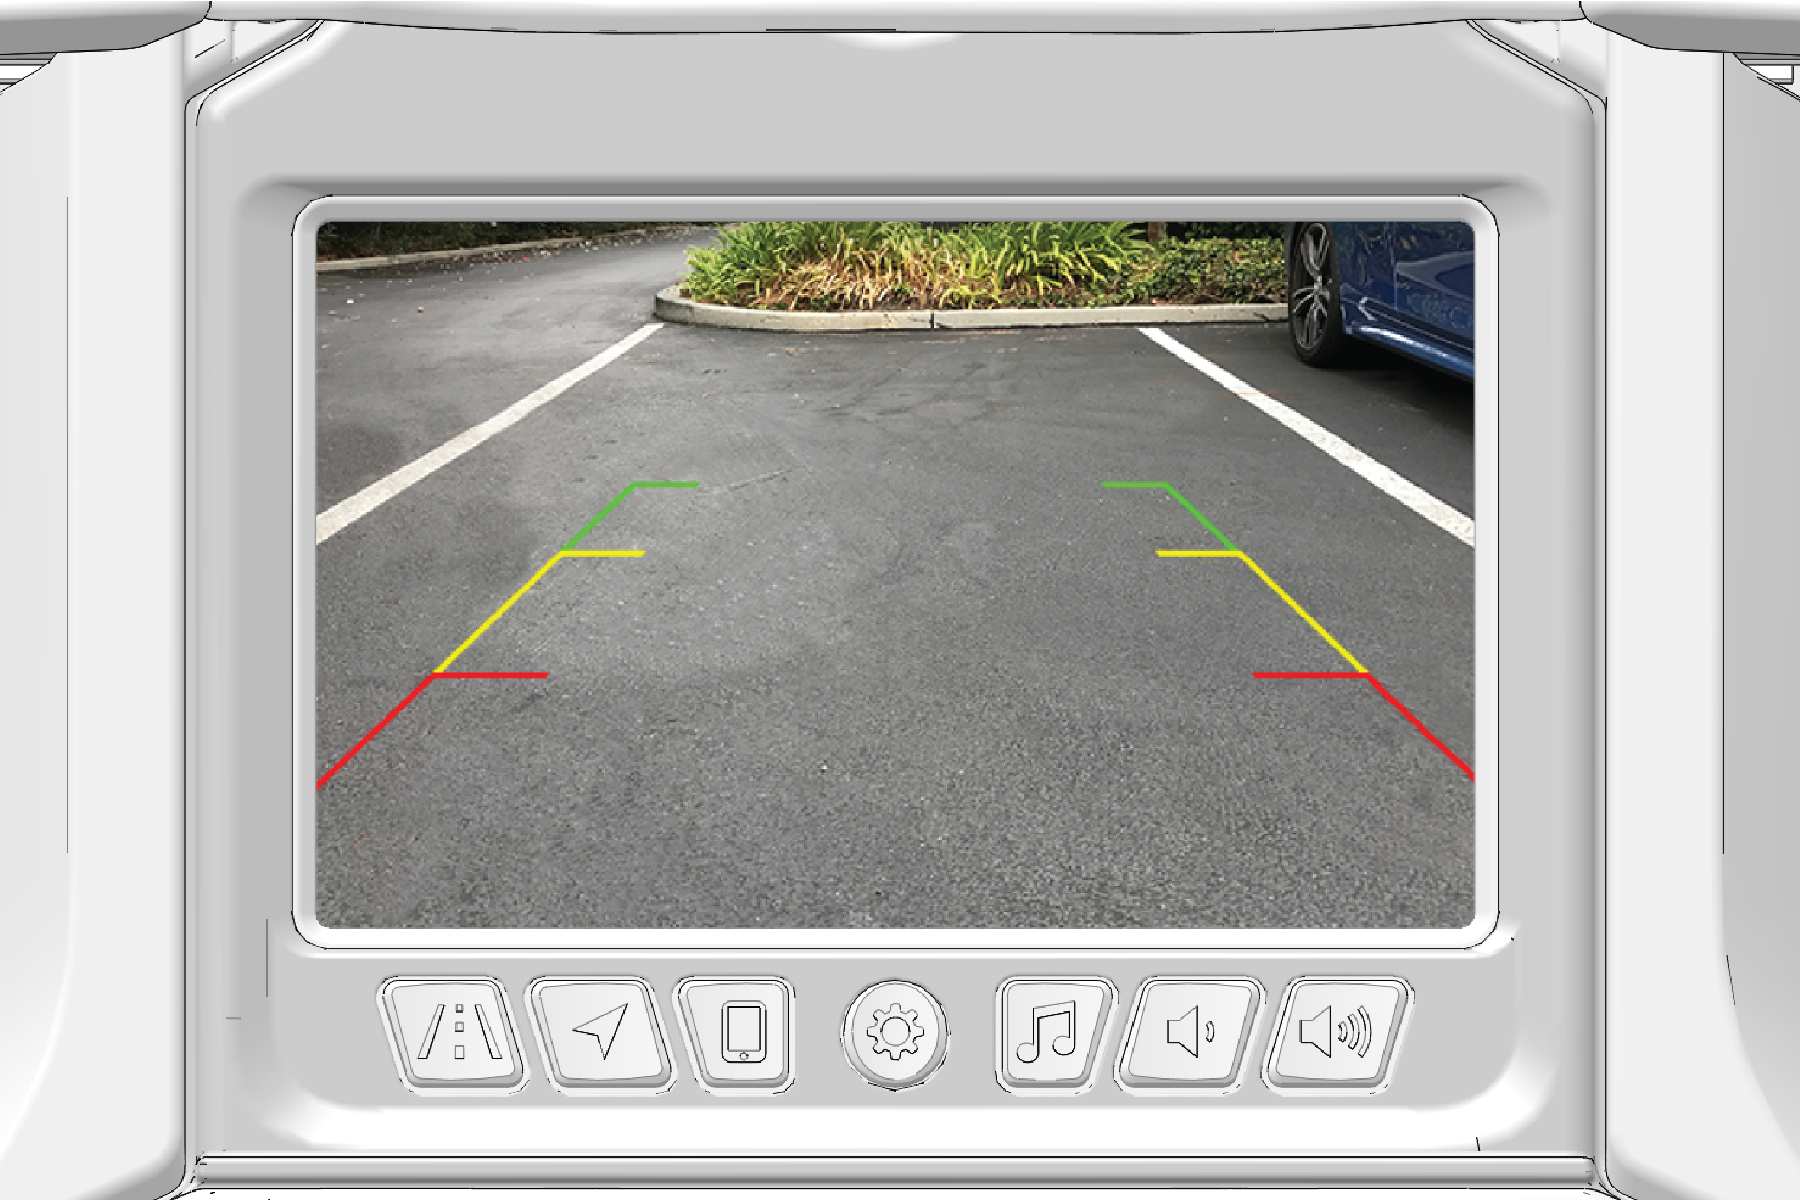
The rear of the vehicle is equipped with a camera to give drivers additional visibility when vehicle is in reverse.
Select the Badge Panel (Slingshot logo) to access the following tabs:
Controls
Notifications
Open the All Settings menu.
The Controls tab gives access to the following:
Adjust screen brightness using the slider.
Automate screen brightness.
Select ride mode.
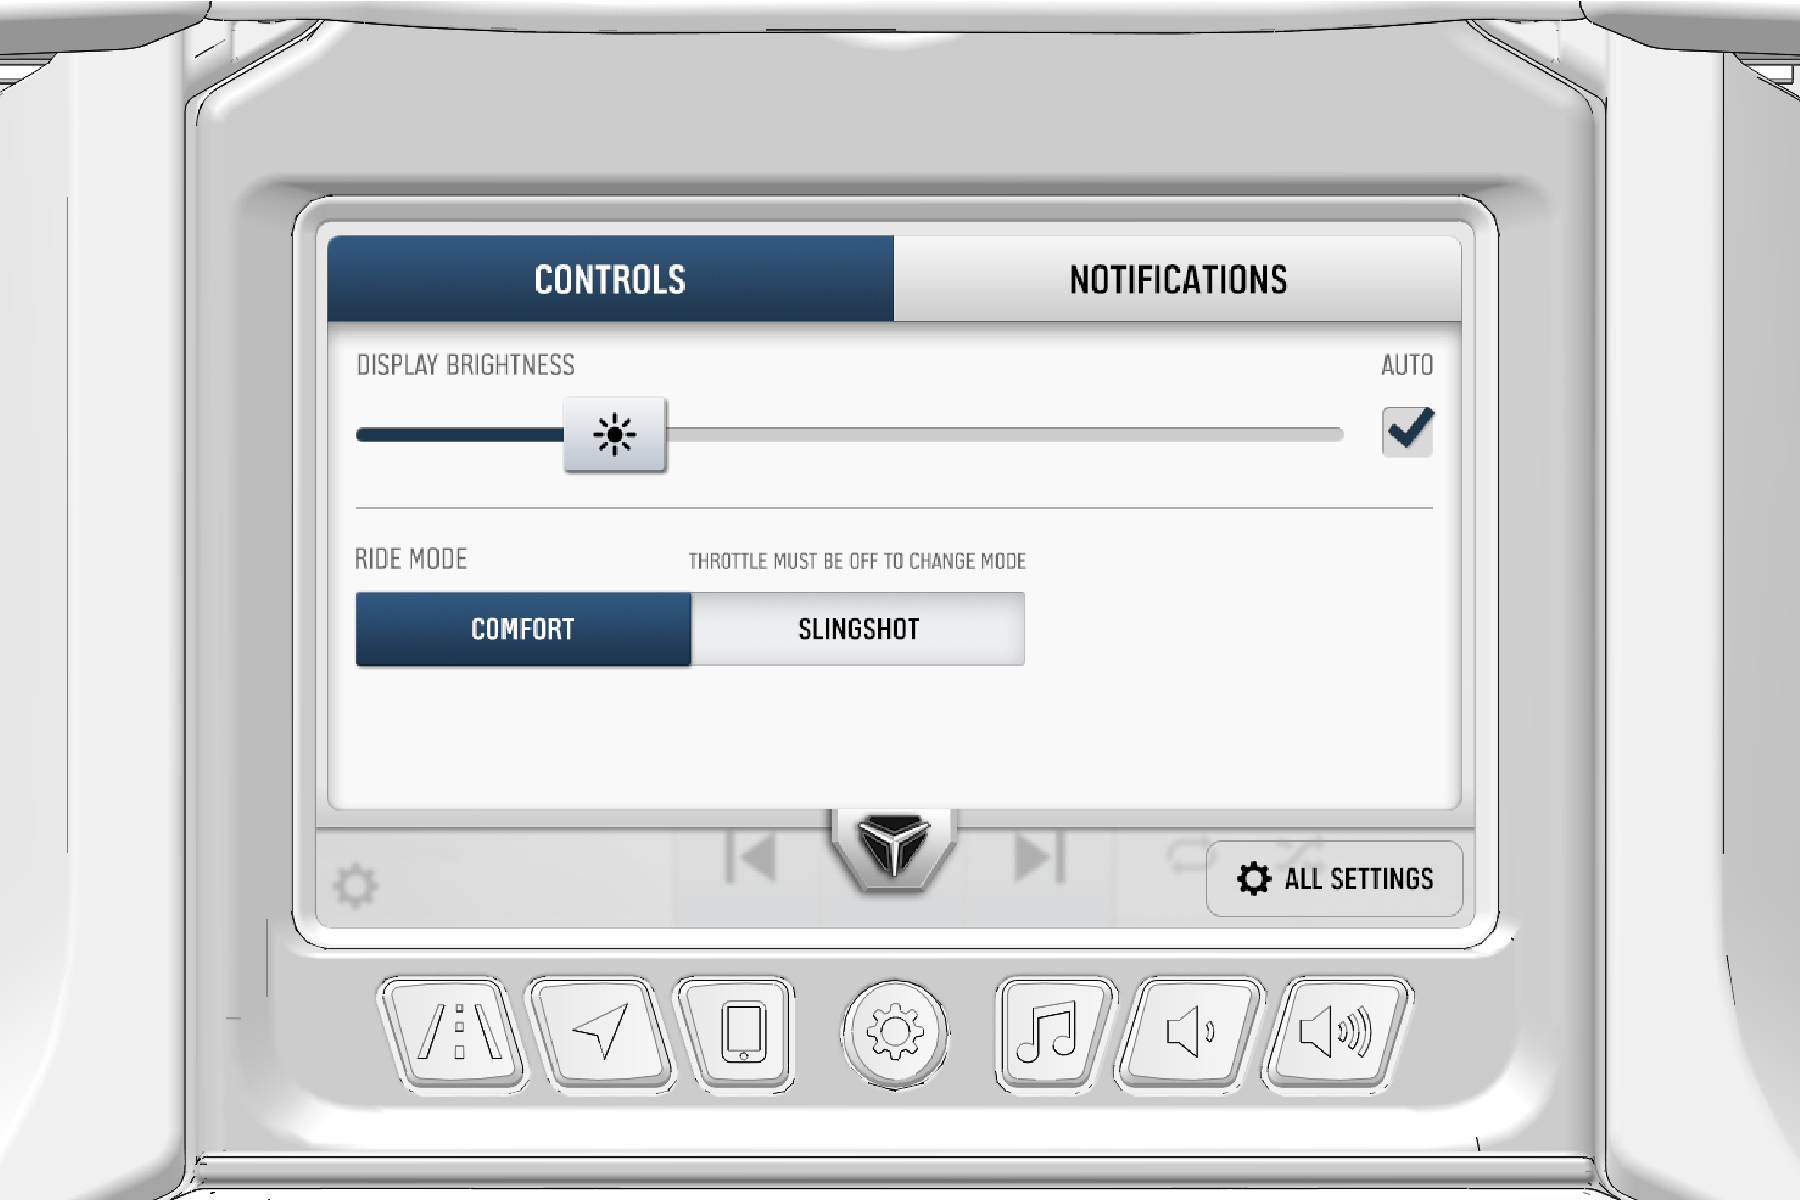
The Notifications tab shows vehicle notifications:

The Slingshot Ride Command display is Bluetooth-compatible. You can pair both Bluetooth-enabled headsets and iOS® and Android® smartphones. Connecting a smartphone via Bluetooth® allows users to make and receive phone calls, send and receive text messages (when supported), browse recent calls, and access contacts from your Ride Command display.
To pair your iPhone®, complete the following steps:
In your iPhone® settings turn on Bluetooth®.
If available, make your phone discoverable to other devices in your phone’s Bluetooth® settings.
Press the Device Manager button on the Ride Command display.
Select Add Device on the top of the menu.
When your phone appears on the display, press the + button next to it to pair with your phone.
Ensure the confirmation code on the screen and your phone are the same then press Pair on your phone.
A prompt will appear on your iPhone® requesting permission to pair with your phone.
Ensure the confirmation code on the screen and your phone are the same then press Pair on your phone.
For optimal experience, enable notifications and sync contacts from your phone’s Bluetooth® settings.
Once the display says connected/paired, your phone is now connected to the display via Bluetooth®.
To pair your Android® device, complete the following steps:
In your smartphone settings, turn on Bluetooth®.
If available, make your phone discoverable to other devices in your Bluetooth® settings.
Press the Device Manager button on the Ride Command display.
Select Add Device on the top of the menu.
When your phone appears on the display, press the + button next to it to pair with your phone.
Ensure the confirmation code on the screen and your phone are the same then press Pair on your phone.
A request will appear to pair with “Polaris Slingshot”. Ensure the confirmation code matches between the Ride Command display and your phone.
Press OK.
For an optimal experience enable notifications and sync contacts from your smartphone’s Bluetooth® settings.
Once the display says connected/paired, your phone is now connected to the display via Bluetooth®.
Listen to music, receive phone calls, and chat with a passenger by pairing your Ride Command display with any Polaris-approved Bluetooth® headset. For a list of supported devices, visit ridecommand.polaris.com/en-us/supported-devices.
To connect your Bluetooth® headset to your display, do the following:
Put your device into pairing mode.
Press the Device Manager button on the Ride Command display.
Select Add Device on the top of the menu.
When your device appears on the display press the + button next to it to pair with your device.
Once the headset is connected, the headset icon will appear in the upper left-hand corner of the display screen.

To choose between a headset and the built-in speaker system, return to the Device Manager menu or press the Badge Panel at the top of the screen.
To make a call:
Press the Device Manager button on the Slingshot Ride Command display.
To return a call, press the Recent tab.
To make a new call from your contact list, press the Contacts tab, scroll to the contact you wish to call and select their name.
To dial a number, press the Keypad tab to enter a number manually.
To view text messages:
Press the Device Manager button on the Slingshot Ride Command display.
Select the Messages tab to view your message history.
Select the name of the sender to view more options.
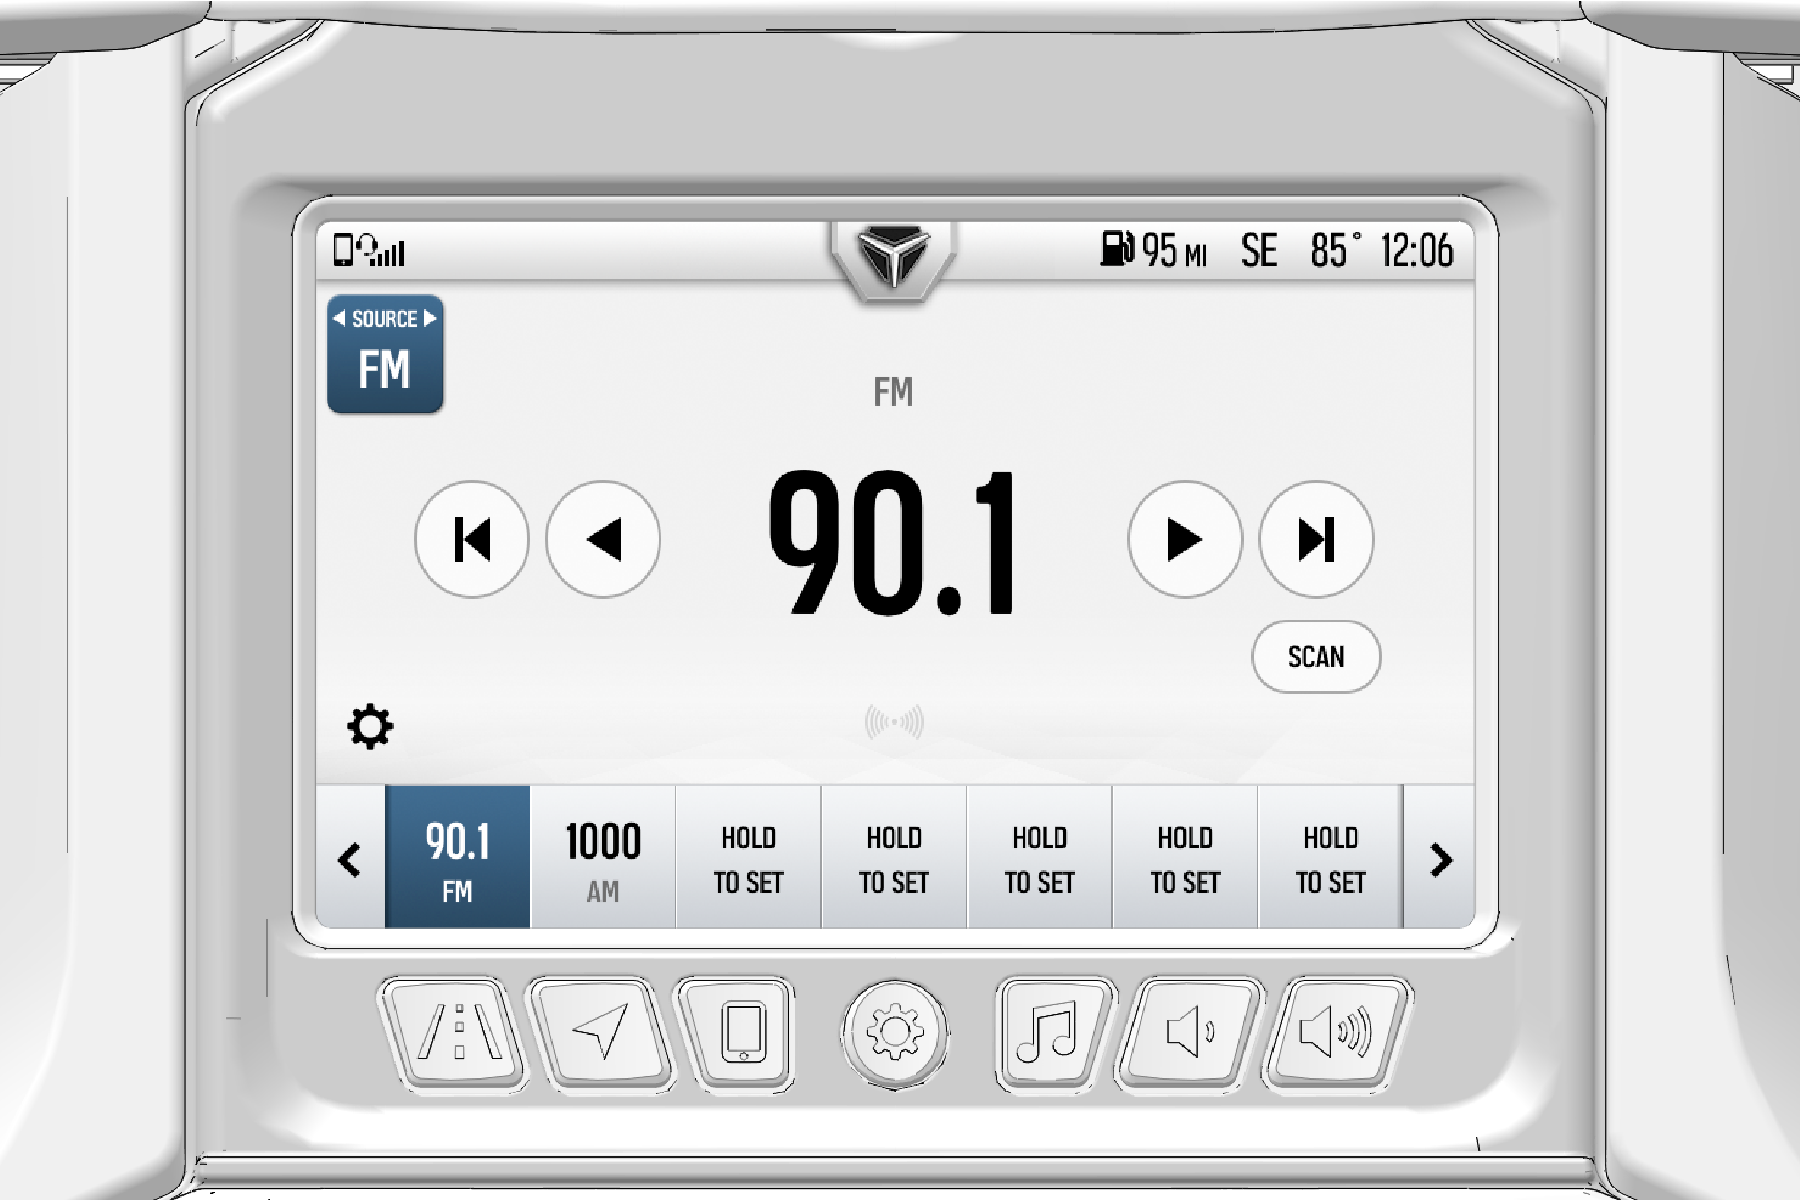
The Ride Command display plays audio from FM; AM; and weather radio bands; USB drives or devices, and Bluetooth-enabled devices.
The Ride Command display utilizes frequencies from three radio sources:
AM
FM
WX (Weather)
The radio screen displays the current station, song, and artist (if available).
To change stations:
Press tune 1 icons, left or right, to change station frequency incrementally.
Press scan 2 arrows, right or left, to find the next available station with a clear signal.
Press the scan 3 button to automatically tune to the next available FM or AM signal.
Press a station preset 4 to jump directly to that station.
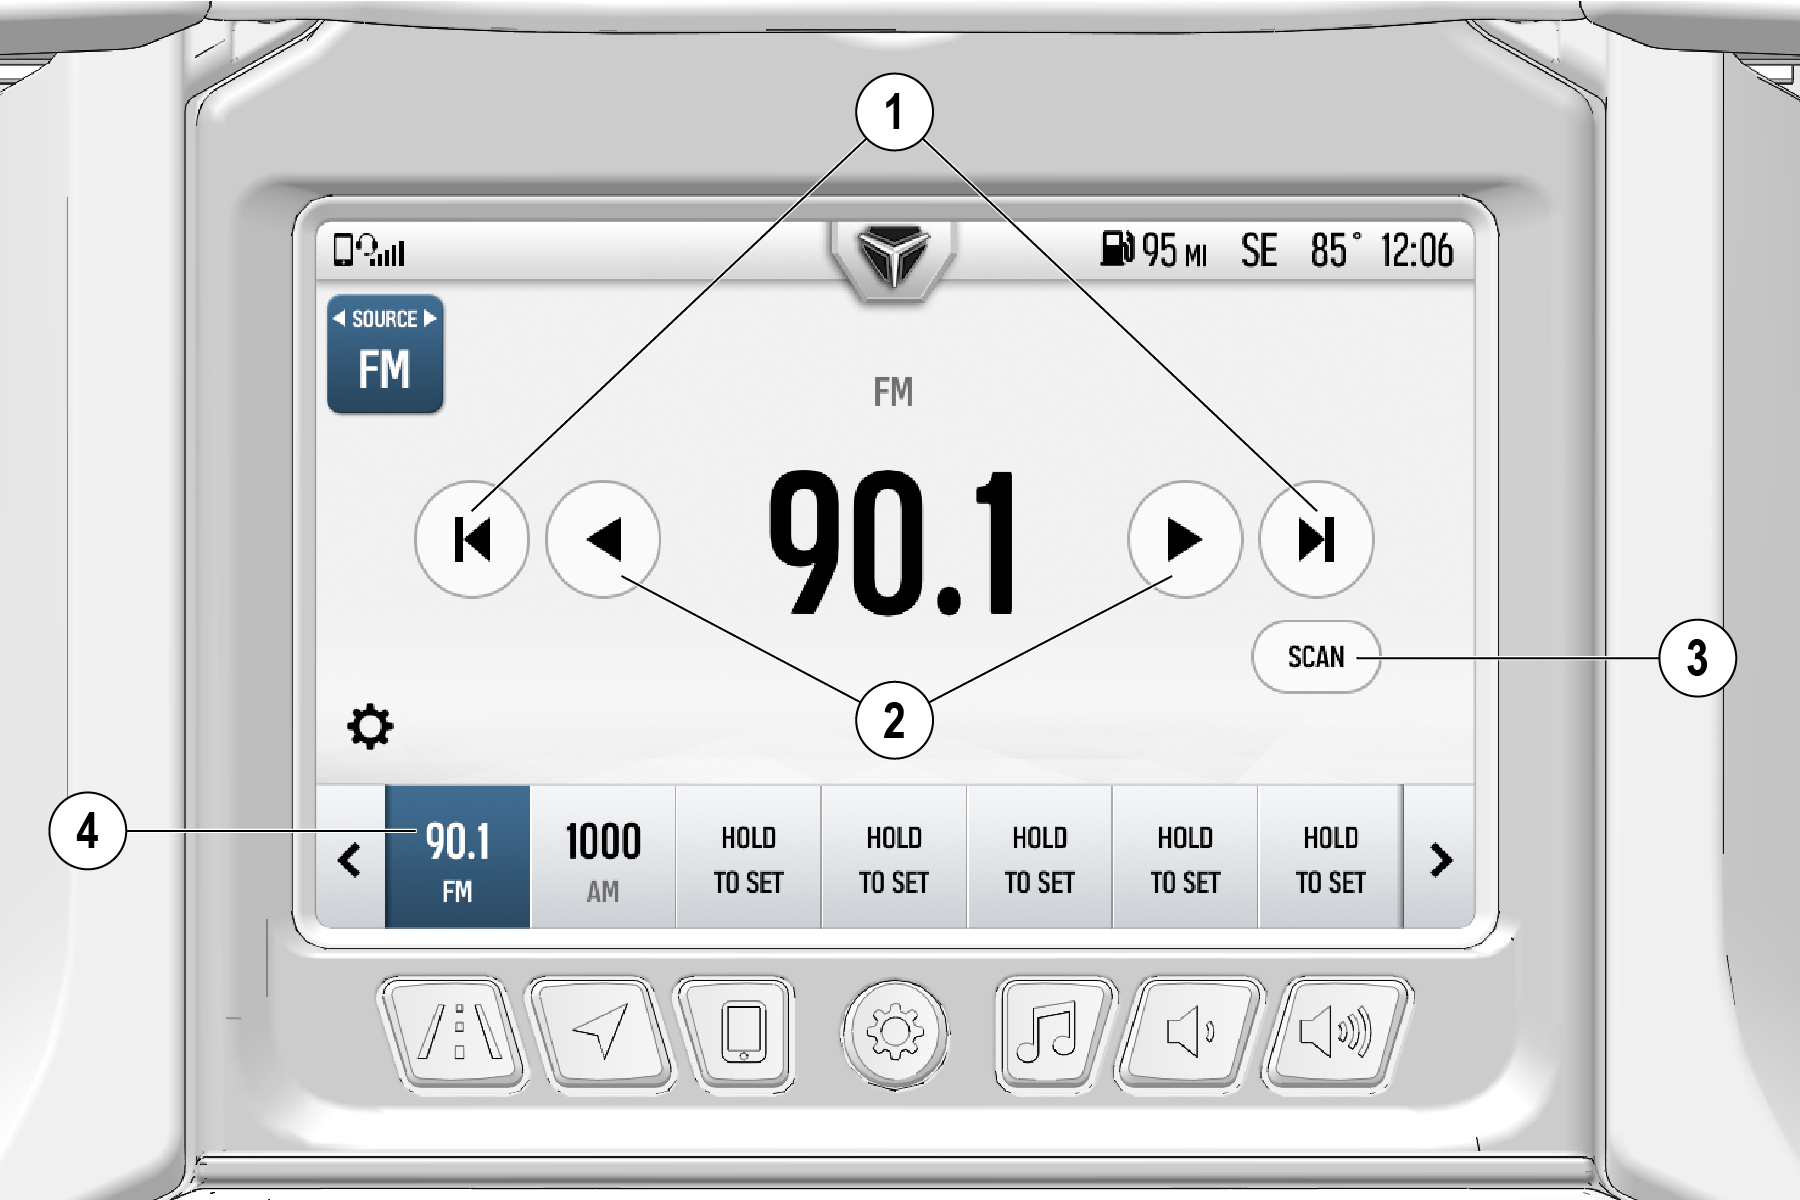
There are seven weather stations available on the display. Press the tabs on the bottom of the screen to change weather stations.
Up to 18 radio stations can be preset on your display. To save your favorite radio stations, complete the following steps:
Use the tuner arrows to navigate to a station of your choice.
From the scrollable preset menu, hold down on one of the tabs, labeled Hold To Set.
The radio station will be automatically saved.
Use the arrow buttons to page through presets.
Use the tuner arrows to navigate to a new station of your choice.
Press and hold down on the Preset button you wish to overwrite.
Press the Settings button and navigate to the Audio tab.
Beside Clear Radio Presets, press the reset button.
Press the Settings Button and navigate to the Audio tab.
Press the arrow button beside Radio Tuner Region.
Choose your region.
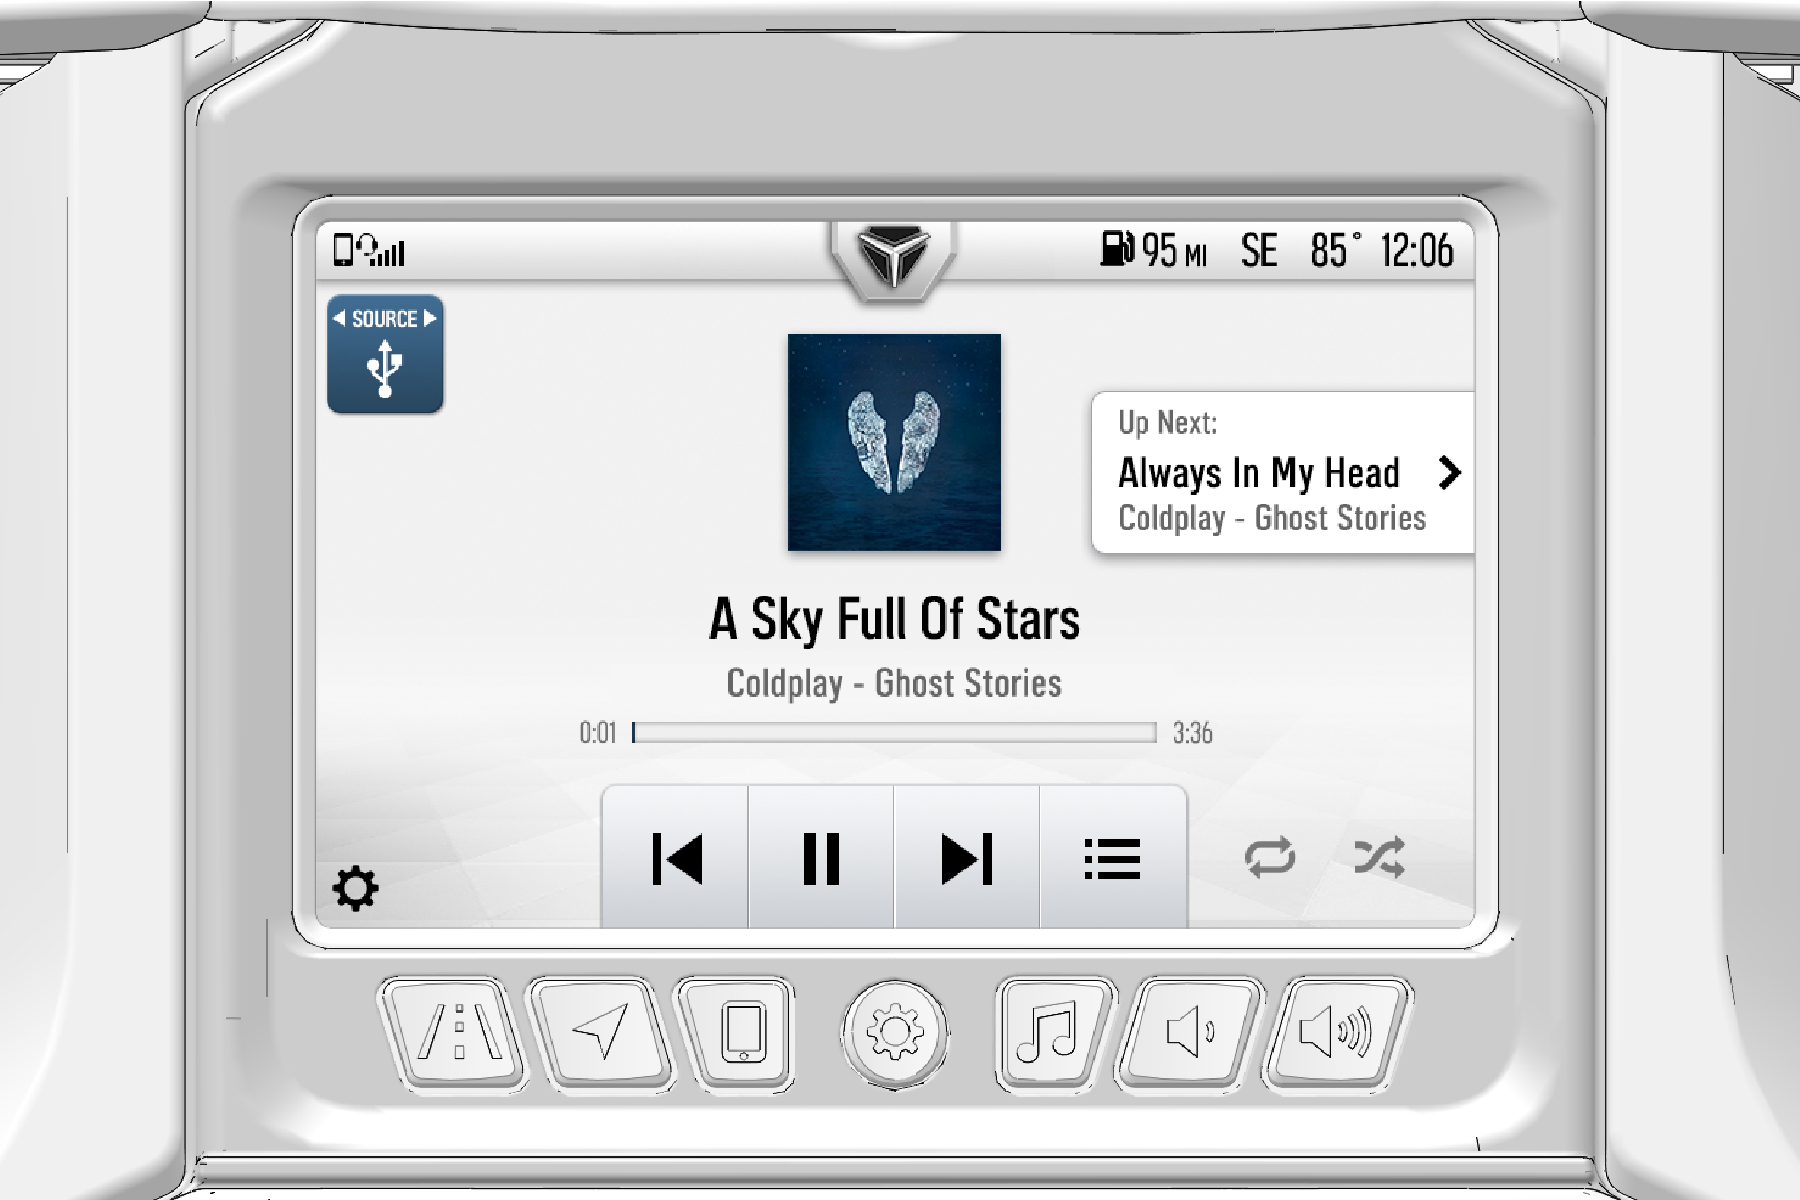
Music from a portable data storage device such as a USB flash drive, Apple iPod®, or other MP3 player, can be played through the display by connecting your device to the vehicle’s USB port.
To access USB or iPod audio, complete the following steps:
While your vehicle is stationary, connect your device through the USB port in the glove box in front of the passenger seat.
Press the Audio button.
Select the USB/IPOD source.
Available audio features for USB and MP3 devices:
Song duration and current progress.
Audio browser by artist, album, song title and playlist, if available.
Add or remove music from queue.
Play and pause audio track.
Play next or previous track.
Rewind or fast-forward audio track.
Repeat track or playlist.
Shuffle tracks.
| AUDIO FUNCTION | AUDIO ICON |
|---|---|
|
Play
To start a track, press the Play button from the bottom control bar of the touchscreen. |

|
|
Pause
To pause or stop a track, press the Pause button from the bottom control bar of the touchscreen. The pause button will only appear if an audio track is in progress. |

|
|
Next Track
To skip tracks or play the next song, press the Next Track button from the media control bar at the bottom of the touchscreen. |

|
|
Previous Track
To restart an audio track, press the Previous Track button once. To play the previous track, press the Previous Track button twice. |

|
|
Repeat Track/Playlist
To repeat an entire playlist, press the Repeat Track button once. To repeat just one track, press the Repeat Track button twice. A “1” will appear beside icon (shown right). |

|
|
Shuffle
To shuffle a playlist, press the Shuffle Button from the right-hand control bar of the touchscreen. |

|
|
Song Queue
To access individual audio files, select the Song Queue button on the media controls at the bottom of the touchscreen. |

|
Pressing the Song Queue button (shown above) allows users to browse all available songs from the USB device or create a custom playlist.
View Playlist
Press the Song Queue button from the bottom of the audio screen.
Remove files from the song queue by pressing “X” next to the title.

Create Playlist
Press the Song Queue button from the bottom of the audio screen.
Search for the desired audio files by artist, albums, or song.
Beside song selection, press the title or options button 1.

To start a new playlist, press Clear and Play. The present playlist will be deleted and replaced by this track.
To add to an existing playlist, press Add To Queue. The track will be added to the bottom of the song queue.
To play audio from a streaming service, do the following:
On your Bluetooth® device, open the streaming service app and select desired audio.
Press the Audio button on your Ride Command display.
Select the Bluetooth source.
Use the play and skip buttons to play/pause and go to next/previous song.
Use the repeat and shuffle buttons to repeat and shuffle songs from the device.
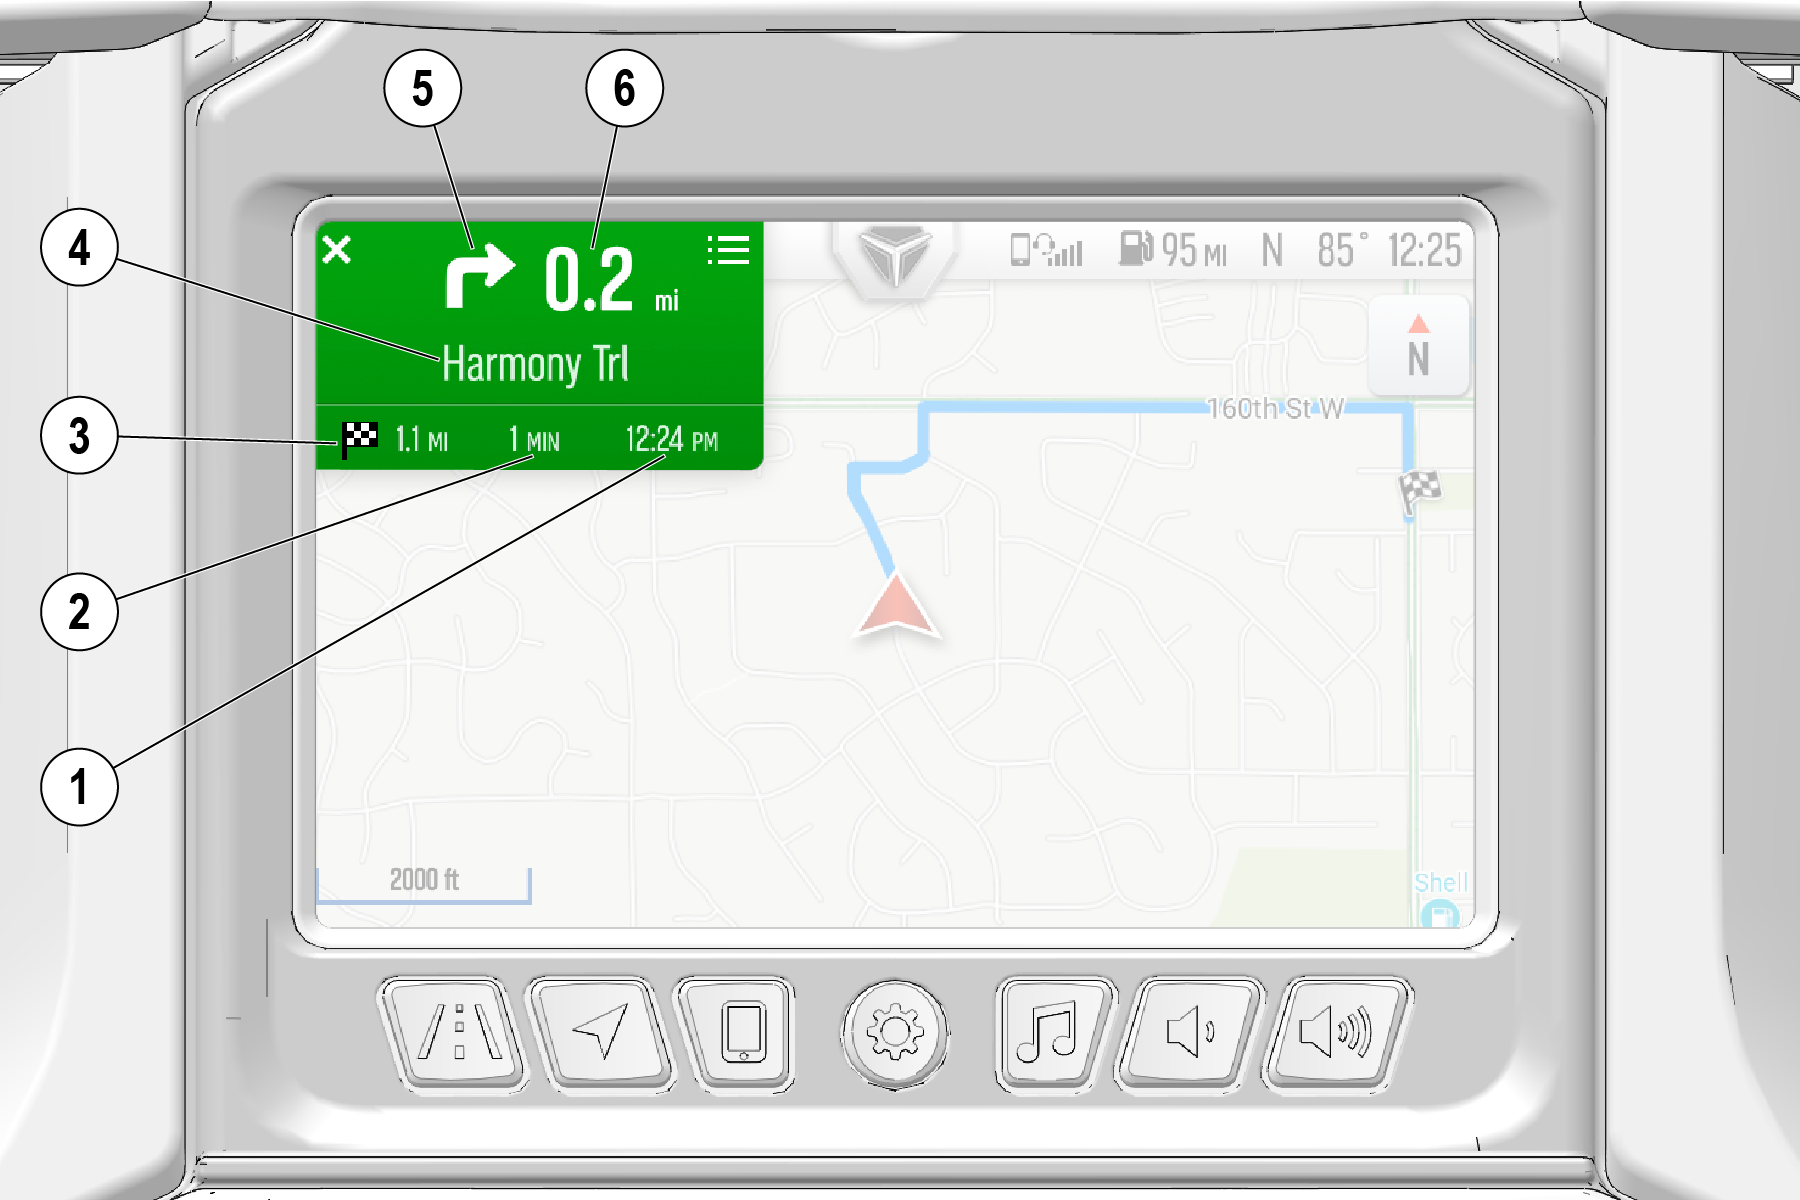
Your navigation routing window displays as follows:
1 Estimated time of day when you will reach your destination.
2 Estimated time to your destination.
3 Distance to your destination.
4 Name of the roadway of your next turn.
5 Direction of your next turn.
6 Distance to your next turn.
Your navigation controls (if equipped) are as follows:
1 X icon: Pause or end route navigation.
2 Menu icon: Access full route instructions.

If equipped, the navigation functionality of your Ride Command display allows you to input directions to specific addresses and points-of-interest in your area. The display uses read-aloud capability in addition to the on-screen navigation. Read-aloud directions will play through either a headset or built-in speaker system.
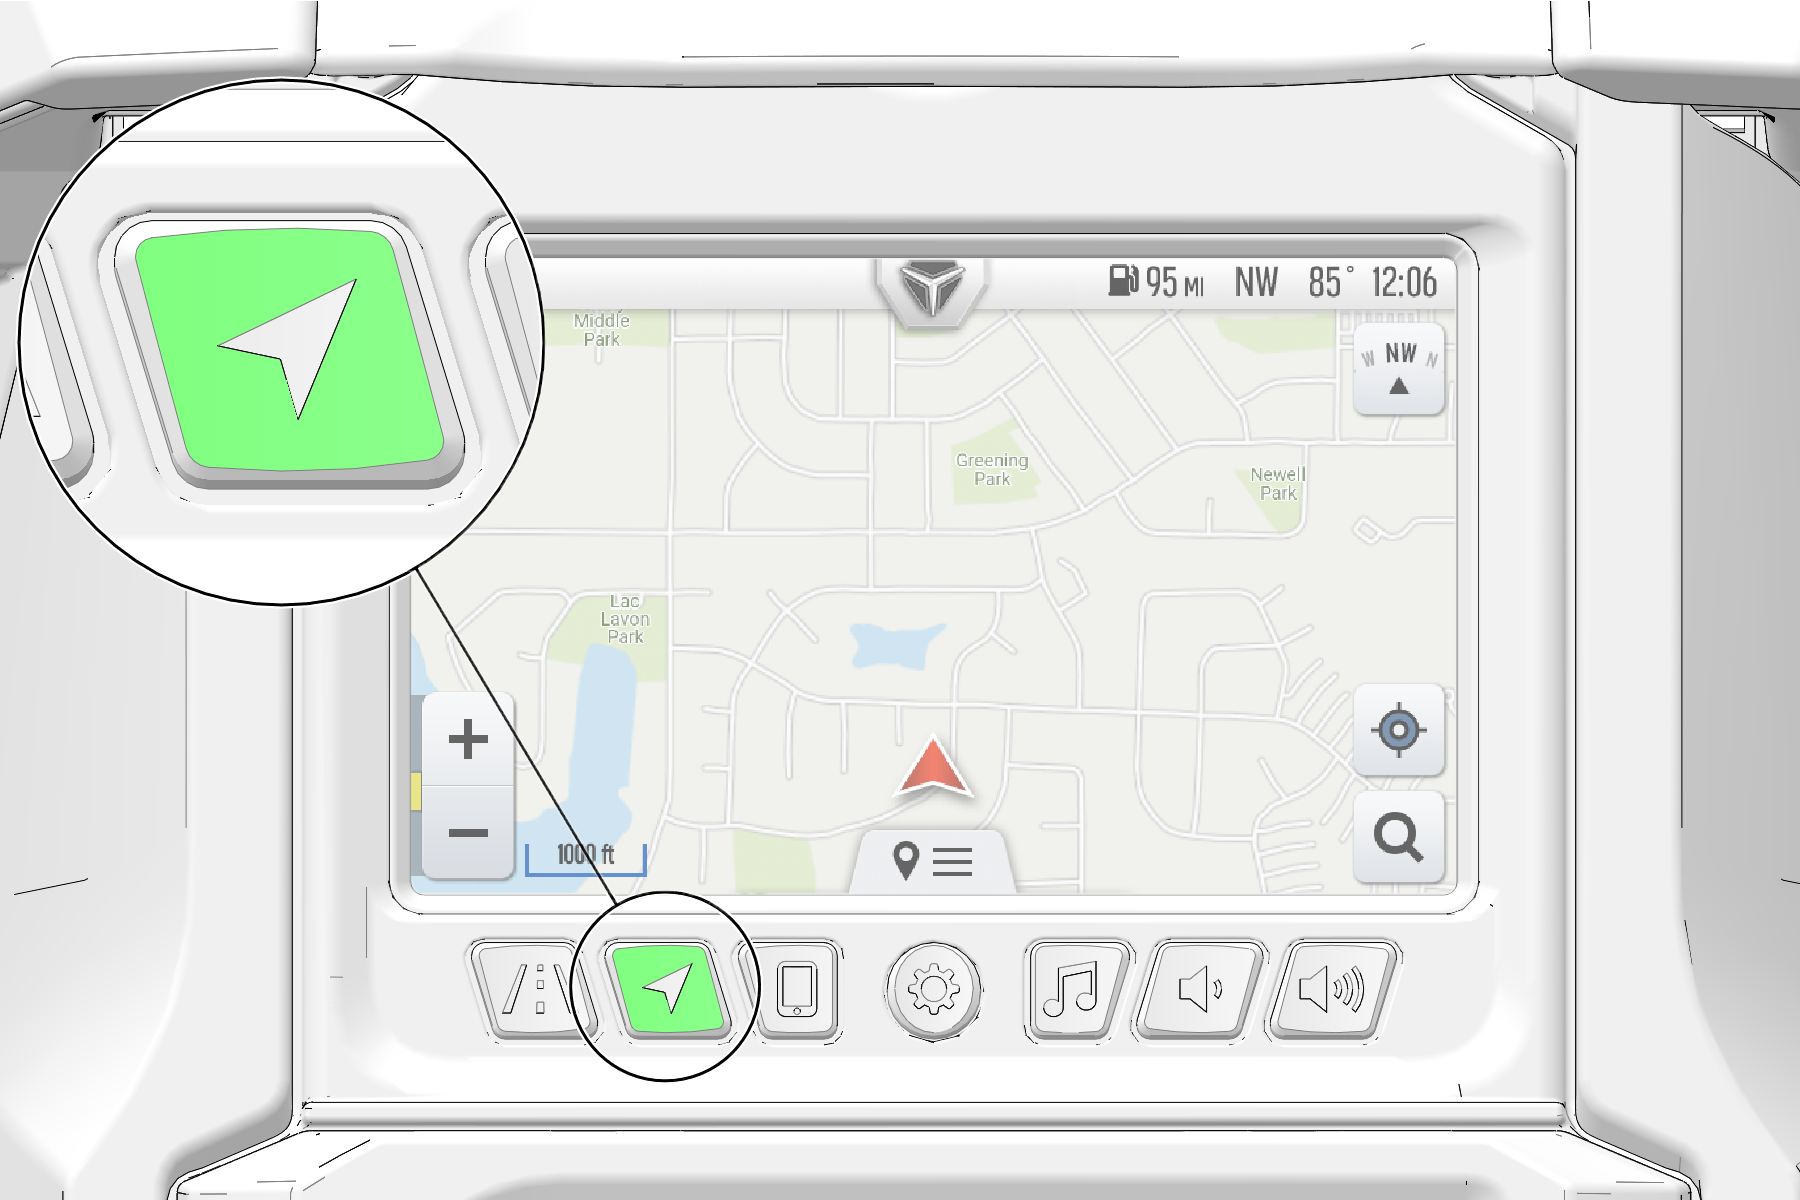
To get started, press the Navigation button (shown below) on your Ride Command display.
Press the Navigation button.
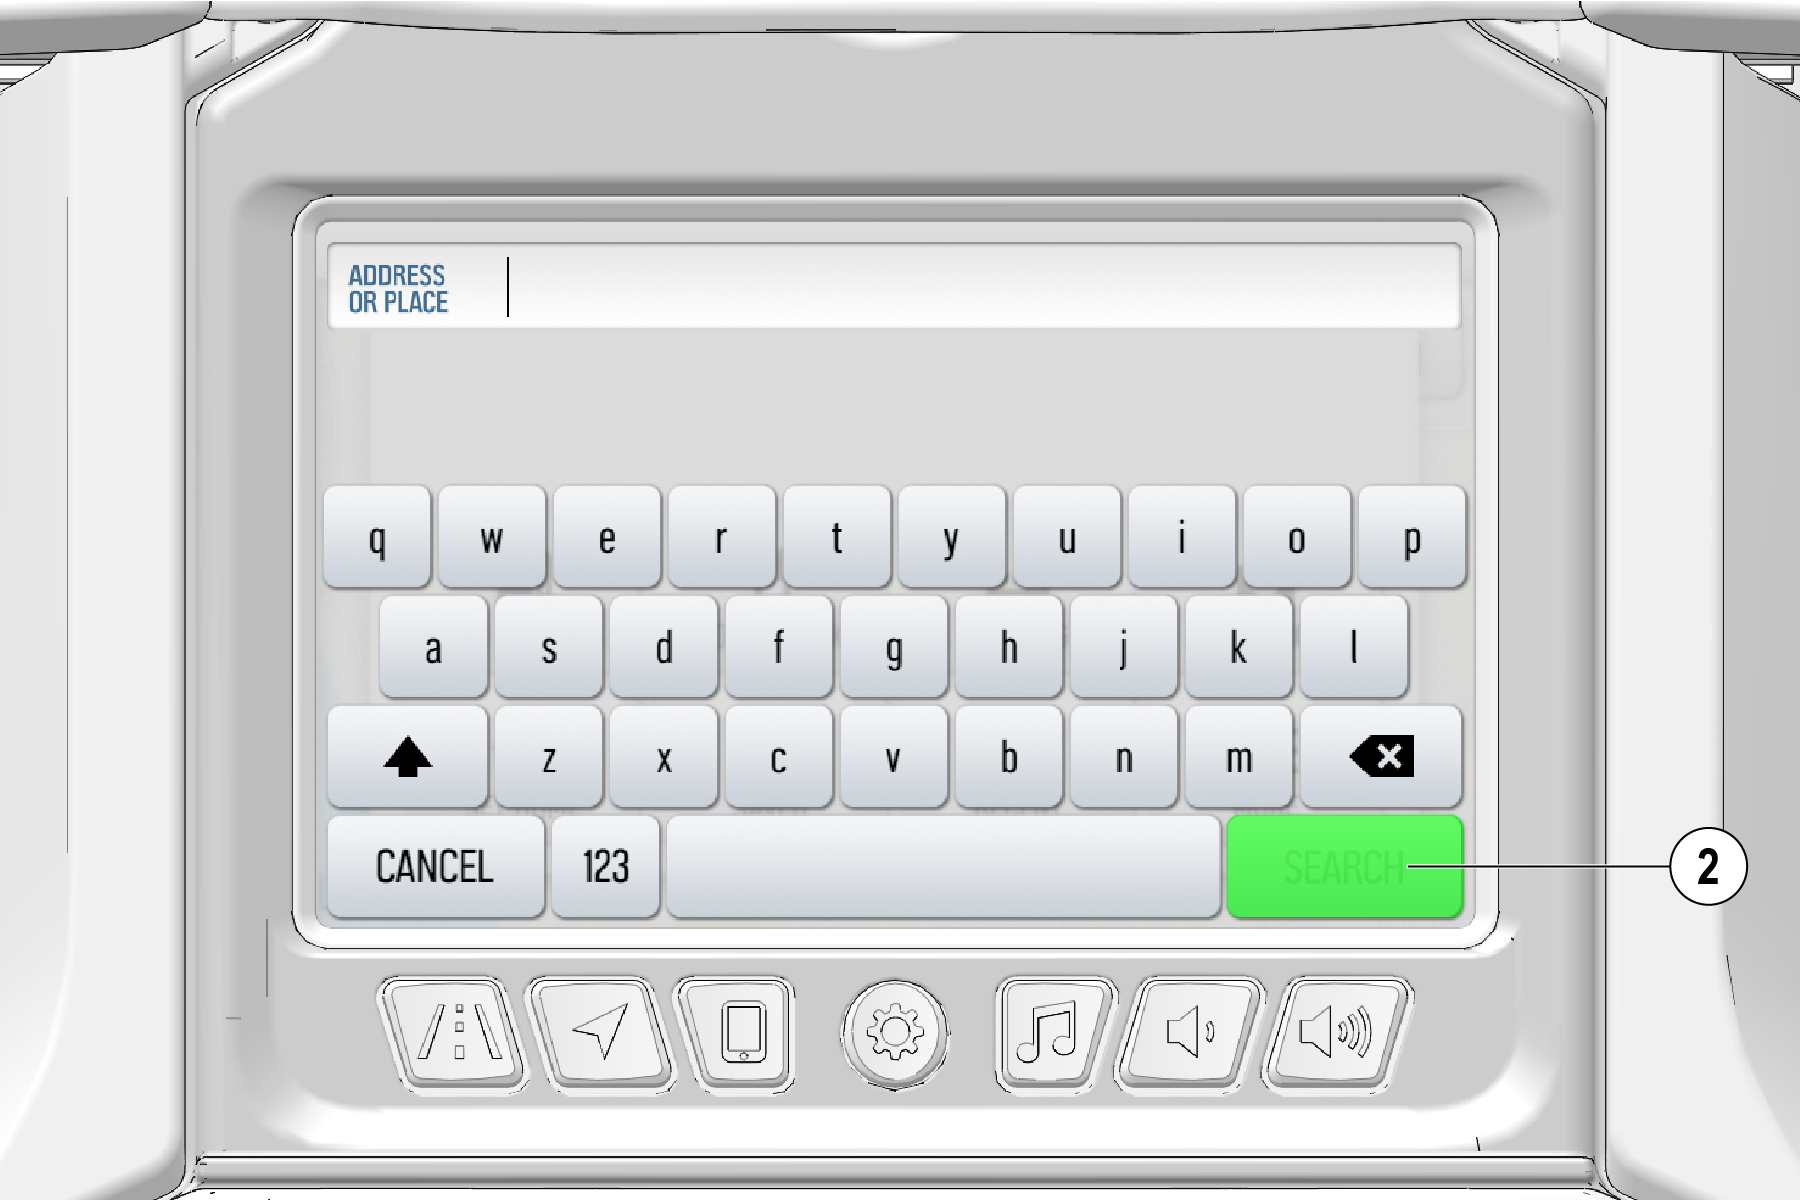
Select the Search icon from the lower right corner of the touchscreen.
Touch the Search Bar 1 from the navigation pop-up menu to bring up the keyboard.

You can enter an address or the name of the place you wish to go to in the search box and press the Search 2 button in the lower right of the screen to bring up a list of possible destinations.
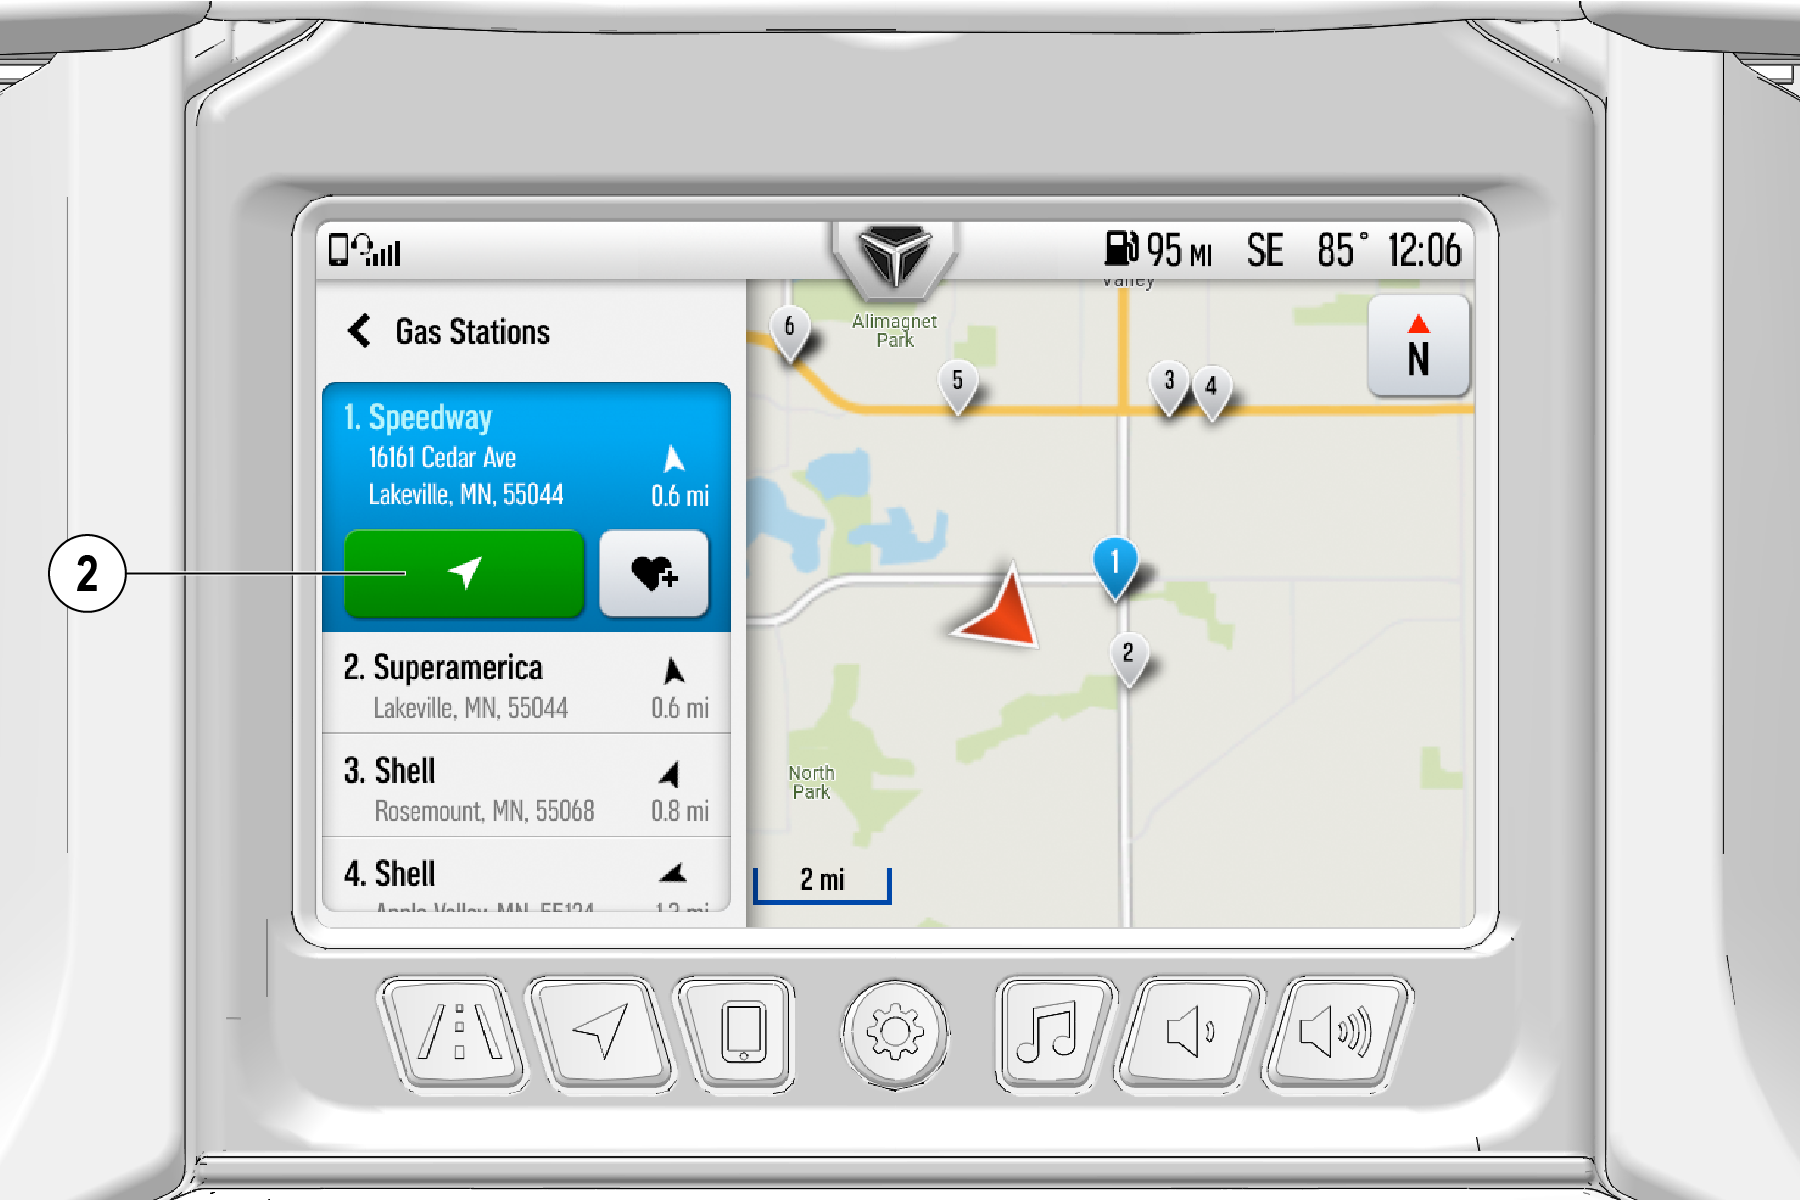
Points of Interest (POI) 1 are specific destinations you may find useful or interesting, such as gas stations and restaurants. Your Ride Command display includes a searchable list of POIs to assist you when traveling.
The example below explains how to use the Gas Station tab. The other POI button operate similarly.
The gas tab displays a list of gas stations near your vehicle’s location. To route to a gas station, complete the following steps:
Press the Navigation button.
Select the Search icon from the lower right corner of the touchscreen.
Press the Gas Stations from the navigation pop-up menu.
Select a gas station from the list of nearby stations.

Press the Route 2 button to begin navigation.
You can set a location as your “home” waypoint. Use this button to navigate to your house quickly.
Select the Set Home button to do the following:
Set a home waypoint.
Navigate to your home waypoint.

The Saved tab stores all your previously saved destinations and routes.
How to access your saved routes:
Press the Navigation button on the Ride Command display.
Press the Search icon from the lower right corner of the touchscreen.
Press the Saved 1 from the navigation pop-up menu.

Select a destination from the list and confirm route.

Select the Saved tab to do the following:
View saved destinations and routes.
Tap a destination or route to start new navigation.
Press the X button to remove routes and destinations from the Saved tab.
Edit route names.
Press the USB button to export favorite routes to an external flash drive.
The Recent tab displays a list of previously routed destinations.
To route to a recent destination, complete the following steps:
Press the Navigation button on the Ride Command display.
Press the Search icon from the lower right corner of the touchscreen.
Press Recent 1 from the navigation pop-up menu.

Once a destination has been selected, press the Route button to begin navigation.

Use the compass and full-featured GPS when the GPS receiver is installed (includes the display of latitude, longitude, and elevation). Mark and save waypoints and drives.
To clean the display shell, use a soft cloth with mild soap and water. Do not use harsh or abrasive cleaners. For best results, use a micro-fiber towel to clean the screen. Window cleaner or alcohol may also be used.
Bluetooth® pairing and use of keyboards are unavailable while Slingshot is in motion.
You can create a personalized Ride Command account either by computer at ridecommand.slingshot.polaris.com/ or in the Slingshot Ride Command app, which can be downloaded to your personal device through your phone’s application store.
Create Account
Open your preferred internet browser and navigate to ridecommand.slingshot.polaris.com/.
From the top menu bar, click Create Account.
In the popup, type your email address and password.
Accept the Terms of Service agreement.
You should receive a confirmation email from Polaris within 24 hours of creation.
Add Your Slingshot
After signing into your Ride Command account, click on Garage from the top menu bar.
Type in your vehicle’s vehicle identification number (VIN).
Add a vehicle nickname, such as My Slingshot.
Press the Add My Vehicle button.
Create Account
Download the Slingshot Ride Command app from your phone’s application store.
In the app, press the Sign Up button.
You may be prompted that “Ride Command” wants to share information between the app and website for sign on purposes. Click Continue.
Type your email address and password.
Accept the Terms of Service agreement.
You should receive a confirmation email from Polaris within 24 hours of creation.
Add Your Slingshot
Press the + button on the home screen, or select Add Slingshot from the options menu.
Connect your phone to your vehicle via Bluetooth or press the Enter Your VIN button.
Type in your vehicle’s VIN.
Add a vehicle nickname, such as My Slingshot. This is optional.
Press Next from the top ribbon.
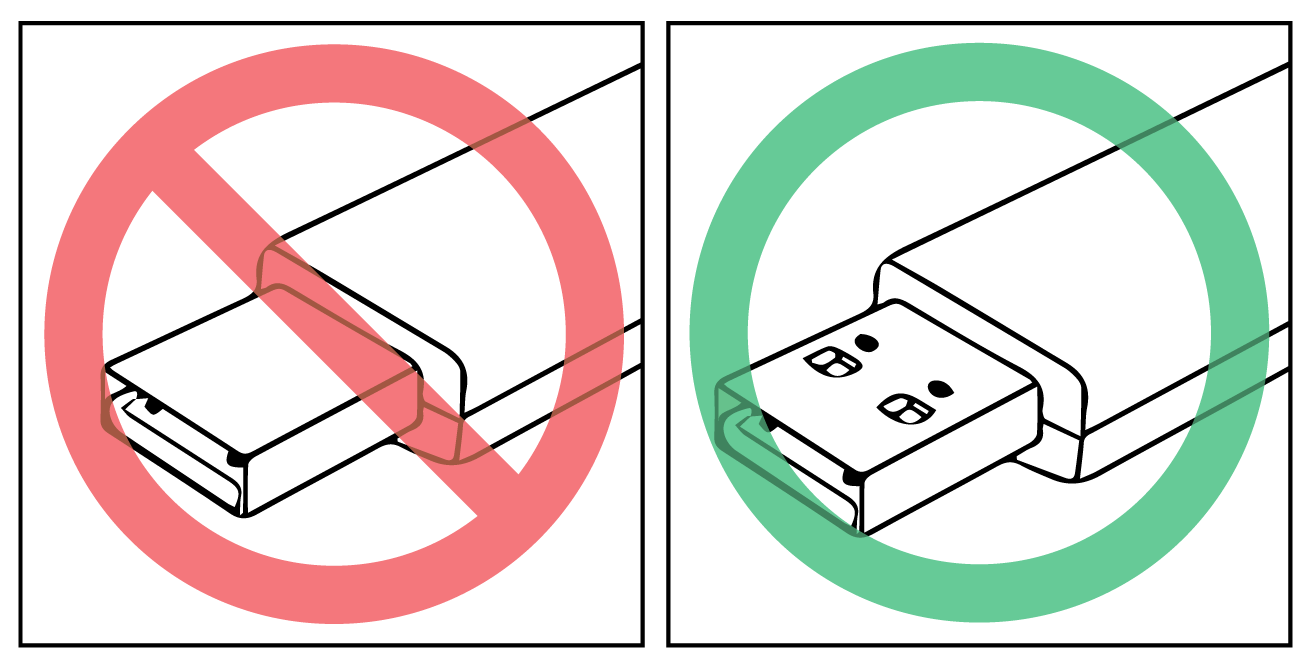
For software updates, the Slingshot Ride Command display requires the use of a USB drive and external computer. The Ride Command system functions solely with Tier 1 quality data storage. Polaris recommends using, at minimum, a Kingston®, SanDisk®, or similar Tier 1 USB flash drive between 8GB and 16GB in available memory, formatted using the FAT32 file system. Drives with higher data capacity are not compatible with the Ride Command system. For best results, remove all files from the flash drive before starting the update process.
To update the display software, complete the following steps:
Go to ridecommand.slingshot.polaris.com/en-us/ridecommand.
Log in to your account, or create a new account.
Using the Vehicle Identification Number (VIN), add your new Polaris Slingshot to your Garage.
Locate and download the latest software to a USB flash drive (8+ GB).
Connect the USB flash drive to the USB cable and power up your vehicle.
On the Ride Command display, press the Badge Panel button at the top of the screen, followed by the Gear button.
Select General Settings, then Update Software.
Select the file you wish to load (use the date listed in the file name to determine the most recent file).
Select “Yes” to restart the display (restart required).
After your display has restarted and you’ve determined the update to be successful, power down your vehicle prior to disconnecting your USB flash drive from the port in the glove box.
If an error occurs while updating your software, perform one or all of the following measures to resolve the issue:
Ensure you are using a Tier 1 USB flash drive. Using the Slingshot-branded USB drive included with your Slingshot is recommended. For more information on USB requirements, see USB Hardware.
Remove and reconnect the USB flash drive securely.
Ensure display files are not inside a folder on the flash drive.
Only Slingshot display files should be on the flash drive while performing updates. Remove other files, if necessary.
Ensure the capacity of data on the flash drive is not exceeding 16GB.
Format the USB drive on your personal computer using the FAT32 formatting system.
Try a different USB flash drive.
For information on how to update your display’s map data, please visit ridecommand.slingshot.polaris.com/en-us/ridecommand/map for detailed instructions.
How do I know whether my software is up-to-date?
Open Settings from the Badge Panel. Navigate to the General Settings tab. Press Update Software.
How do I update my display software?
If your software is out-of-date, log in to your Ride Command account at ridecommand.slingshot.polaris.com to download the latest software data. Transfer files to the display using a USB flash drive. For detailed instructions, see Update Maps. For detailed instructions for updating display software, see Update Software.
How do I update my map on the display?
Map data is only considered valid for up to one year. It is important to keep the map data on your display up-to-date to ensure driver safety and prevent getting lost while driving. Log in to your Ride Command account at ridecommand.slingshot.polaris.com to download the latest map data. Transfer the files to the Display using your Slingshot-provided USB flash drive. For detailed instructions, see Update Maps.
Why can’t my display acquire a satellite signal?
Drive the vehicle to an area free of overhead obstructions.
The GPS may take several minutes to lock on signal if the vehicle has been sitting cold. Let the system warm up for a few moments before troubleshooting.
My phone is Bluetooth-enabled. How do I connect it to my Ride Command display?
Depending on the brand or model of phone, there are varying processes to connect to Bluetooth® on the display. See Device Manager Button for detailed instruction on pairing your mobile device. For specific Bluetooth® functionality related to your smartphone, refer to your device’s user manual.
How do I adjust the screen brightness on my display?
To adjust the brightness of your screen, tap the Slingshot icon at the top of the display screen. Adjust the slider to the desired brightness.
How do I set the clock?
Press the Time tab of the Settings menu to get started. Set the time zone for your location. GPS automatically sets the clock when there is a locked GPS signal.
Why is navigation not working on my display?
The navigation kit does not come standard on select Slingshot models. To purchase a navigation kit, visit your authorized Polaris dealer or visit slingshot.polaris.com/en-us/shop/accessories to get started.
Was this helpful?