i Winch User Guide

|
| Winch User Guide |
The Owner's Manual for this vehicle contains warnings, instructions and other information you must read and fully understand before safely riding or performing maintenance on this vehicle. Always follow the warnings and instructions in Owner's Manual.
Click the link above for the Table Of Contents, or download a full PDF of the Owner Manual in the Owner Support area of Polaris.com.
|
|
| Winch User Guide |
Unless noted, trademarks are the property of Polaris Industries Inc.
Copyright 2025 Polaris Industries Inc. All information contained within this publication is based on the latest product information at the time of publication. Due to constant improvements in the design and quality of production components, some minor discrepancies may result between the actual vehicle and the information presented in this publication. Depictions and/or procedures in this publication are intended for reference use only. No liability can be accepted for omissions or inaccuracies. Any reprinting or reuse of the depictions and/or procedures contained within, whether whole or in part, is expressly prohibited.
The original instructions for this vehicle are in English. Other languages are provided as translations of the original instructions.
Printed in U.S.A.
The following signal words and symbols appear throughout this manual and on your vehicle. Your safety is involved when these words and symbols are used. Become familiar with their meanings before reading the manual.
DANGER indicates a hazardous situation which, if not avoided, WILL result in death or serious injury.
WARNING indicates a hazardous situation which, if not avoided, COULD result in death or serious injury.
CAUTION indicates a hazardous situation which, if not avoided, COULD result in minor to moderate injury.
NOTICE provides key information by clarifying instructions.
IMPORTANT provides key reminders during disassembly, assembly, and inspection of components.
The Prohibition Safety Sign indicates an action NOT to take in order to avoid a hazard.

The Mandatory Action Sign indicates an action that NEEDS to be taken to avoid a hazard.

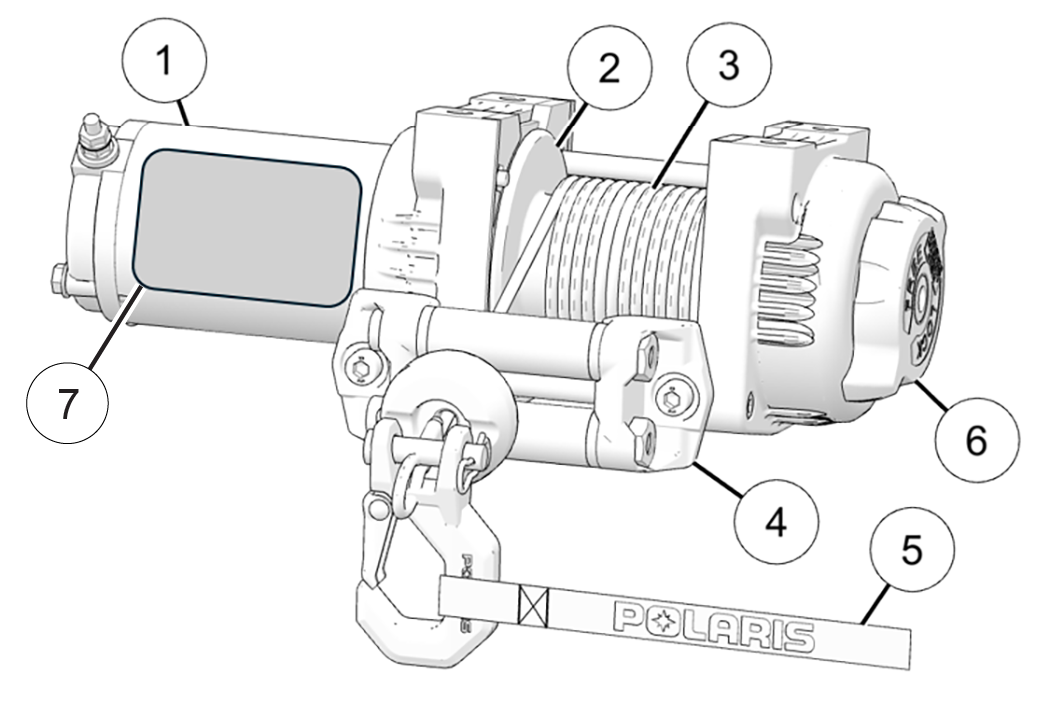
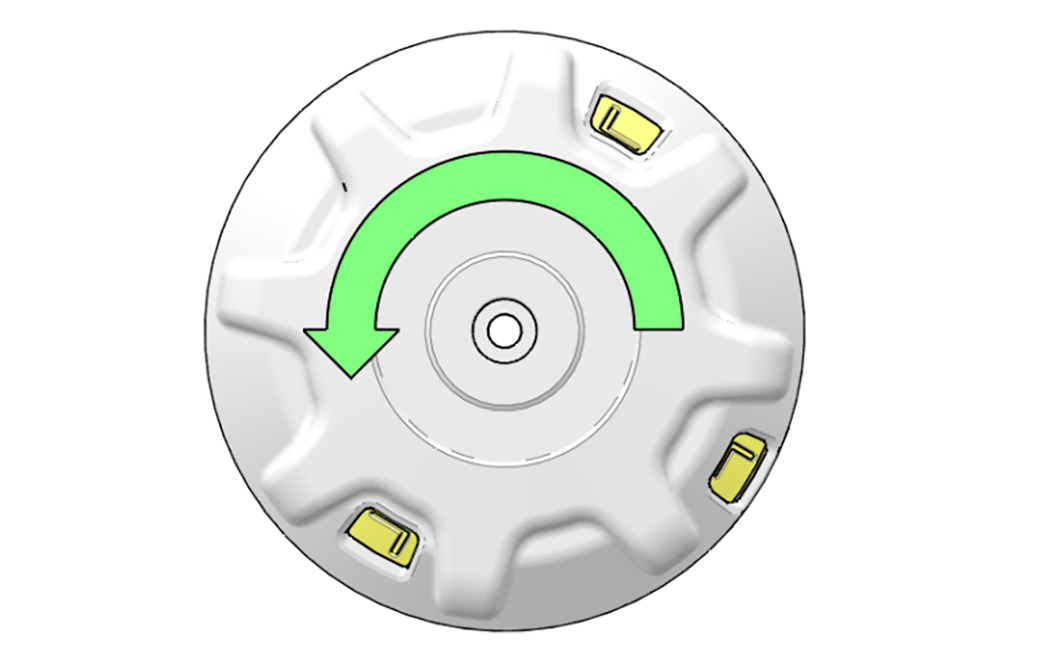
Motor – Electrical power applied to the motor operates the winch.
Winch Drum – The winch drum rotates to pull the rope; rope is gathered on the drum.
Winch Rope – Winch rope (synthetic or steel) connects the load to the powered winch drum.
Fairlead – The fairlead guides the rope onto the winch drum.
Hook Strap – The hook strap is used by the operator to spool rope on and off the winch drum.
Gear Selector – The gear selector couples and uncouples the motor to the drum.
Winch Capacity Label – Label indicates rated capacity of the winch.
The wireless remote control allows the operator to control the winch via a wireless connection.
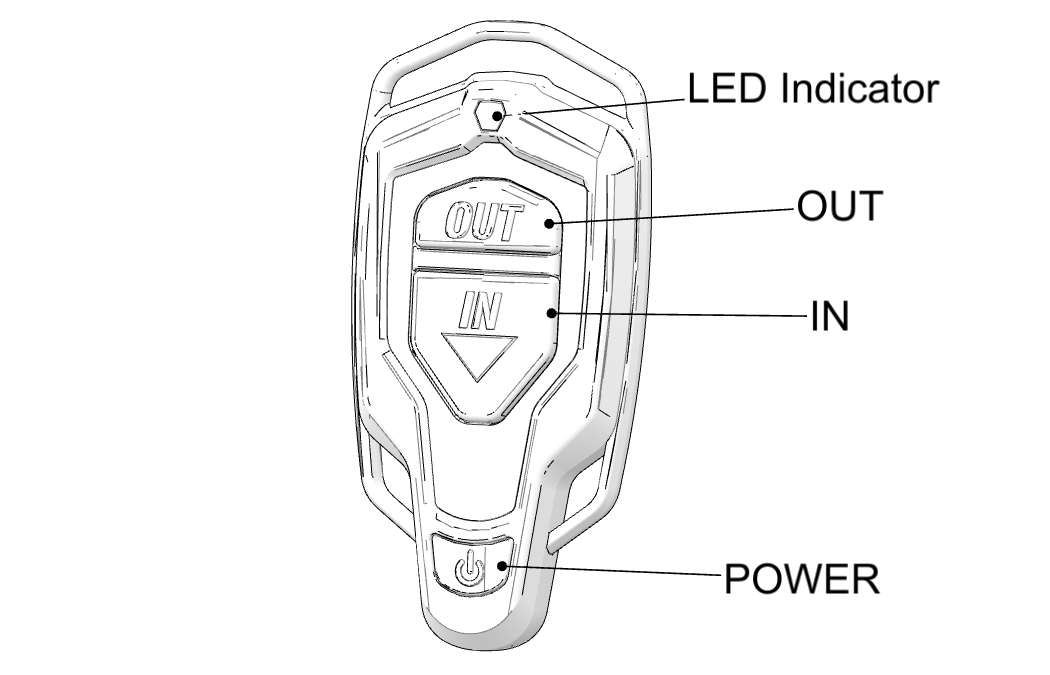
| Power | Press and hold the power button until the LED indicator lights up. The LED indicator means the remote is enabled and can be used to operate the IN and OUT function of the winch. To turn the remote off, press and hold the power button until the LED indicator is off. |
| OUT | Press and hold to unspool rope from the winch drum. |
| IN | Press and hold to pull a load, or to spool the winch rope onto the drum. |
The wired remote control allows the operator to control the winch via a wired connection.
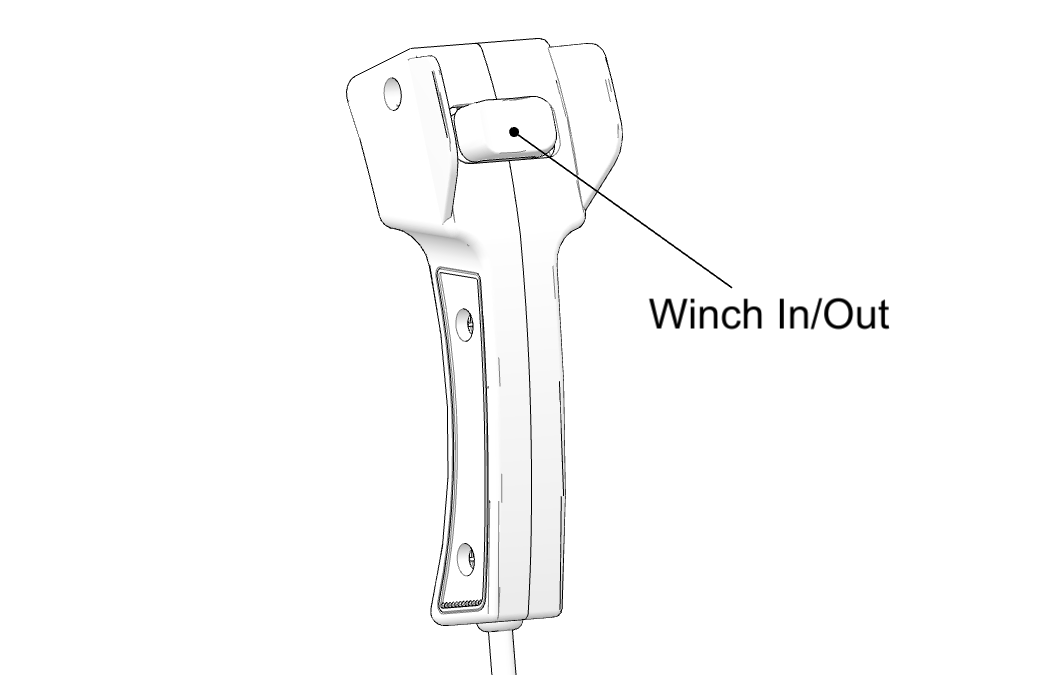
| OUT | Press and hold to unspool rope from the winch drum. |
| IN | Press and hold to pull a load, or to spool the winch rope onto the drum. |
The rocker switch allows the operator to control the winch while inside the vehicle.
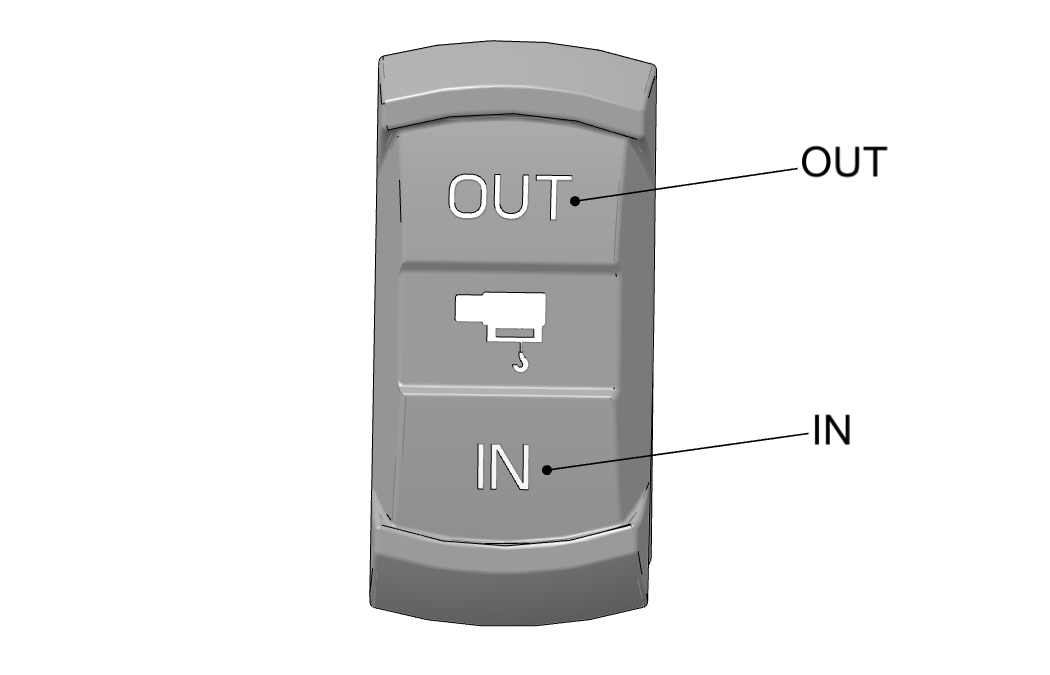
| OUT | Press and hold to unspool rope from the winch drum. |
| IN | Press and hold to pull a load, or to spool the winch rope onto the drum. |
Snatch Block Pulley – Pulley used to increase winching efficiency, change winching angle or guide rope around obstacles.
D-Shackle – Connects rigging components with looped ends (winch ropes, tree trunk protectors, snatch block pulleys).
Tree Trunk Protector – Used to wrap around trees and other anchor points without damaging them. The strap is usually made of tough, high-quality nylon, and is designed to handle the winching load.
Wheel Chock – Wedge placed on the ground against the wheel to keep the vehicle from moving.
Damper – A piece of heavy, flexible material used to drive rope into the ground and absorb kinetic energy if the rope fails under tension.
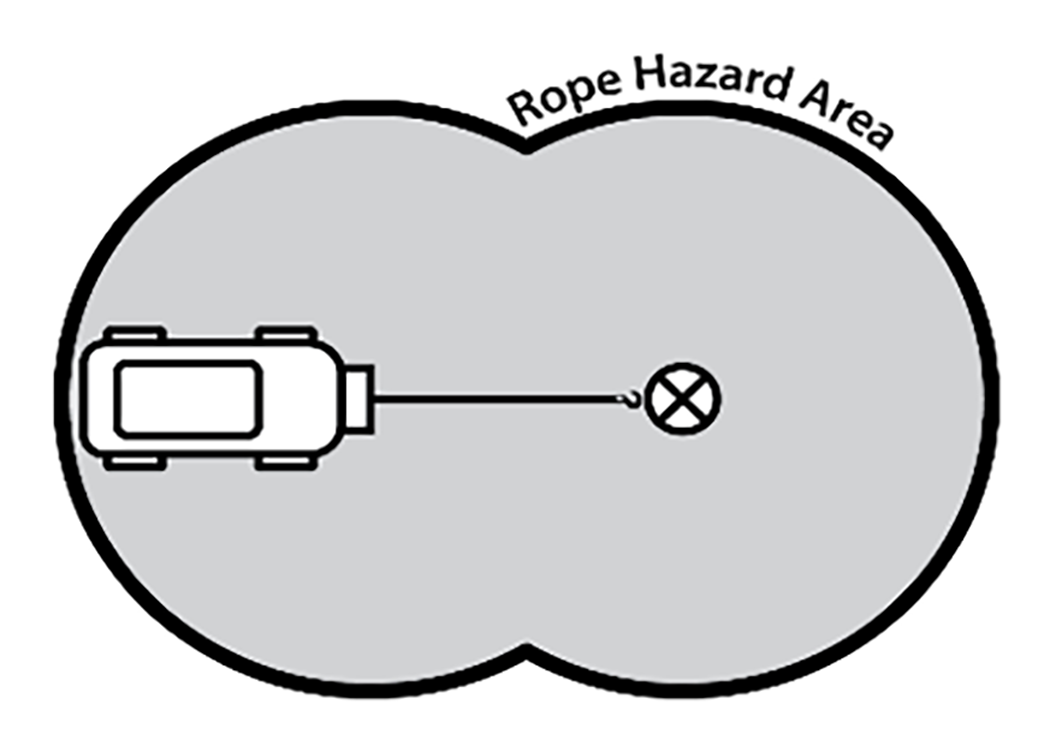
A rope connection that fails under tension can strike people causing serious injury or death.
The rope hazard area is anywhere within the length of the rope. A rope connection that fails under tension can strike people within the length of the rope in any direction from the winch or attachment point. The rope hazard area depends on the length of the rope and rigging items under tension and the location of the failure. Make sure to stay outside the range of the rope in case it fails under tension. If a rope fails, anyone within the rope hazard area is in danger. Polaris recommends always using a damper when winching.
Never attempt to winch loads in excess of the rated capacity of the winch. Rope and rigging accessories must be rated at a higher capacity than the winch.
Never use the winch to lift or suspend a vertical load. Do not connect the rope to a person.
Never use the winch or rope for towing a vehicle. Even at slow speeds, towing can suddenly load the winch rope and cause failure.
Do not allow children under 16 to be involved in winch operation.
Do not let people operate, assist, or supervise a winching operation after using alcohol or drugs.
Always wear eye protection such as VESC 8, V-8, Z87.1, or CE.
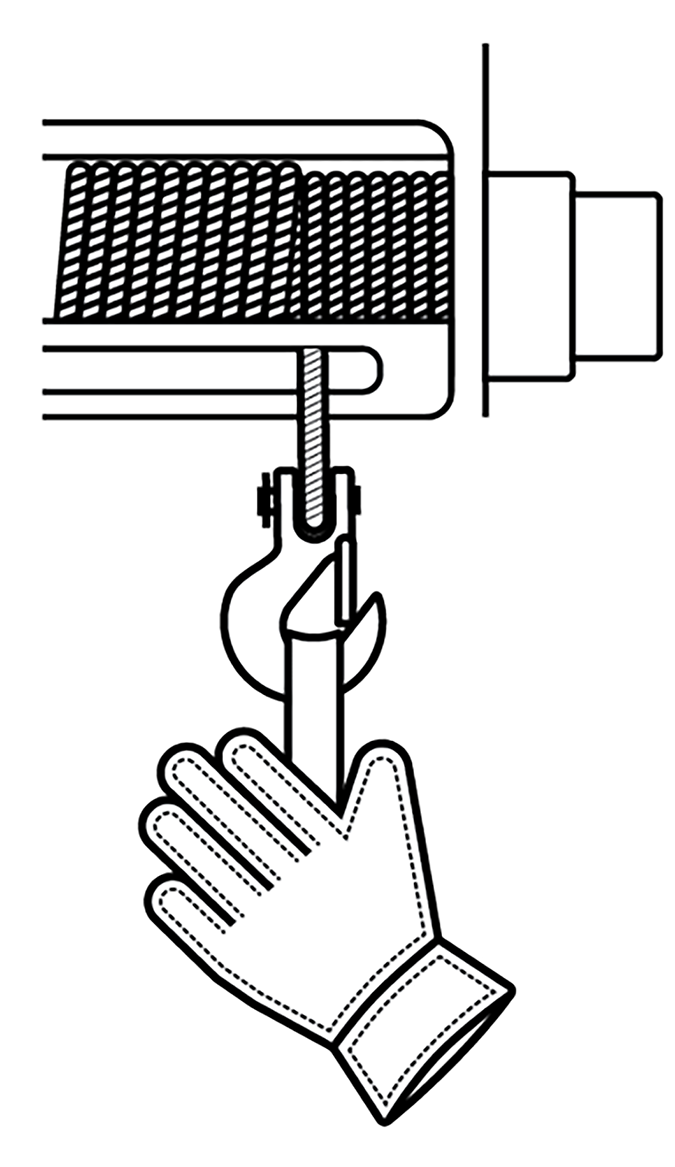
Always wear heavy leather gloves when handling the winch rope. Do not handle the rope when wearing riding gloves or other types of gloves as they could become entangled by the rope or moving parts.
Keep hands clear of hook and fairlead. Even if wearing gloves, do not use hands to guide rope during winching or spooling.
Keep body parts, hair, clothing, and jewelry clear of rope, fairlead and hook when operating the winch. Avoid wearing loose clothing when operating winch.
Always guide the rope using the hook strap. Never guide the rope at the fairlead.
Every winching situation involves an anchor point and a load. The anchor point and the load are connected via the winch rope. The winch pulls the load toward the anchor point using the winch rope.
Anchor Point: The object that bears the load and remains stationary. It can be a natural anchor (trees, stumps, rocks), the winching vehicle, or a second vehicle.
Load Vehicle: The vehicle that is meant to be moved toward the anchor point. (Other objects may be loads, however this guide only addresses how to use the winch to move a vehicle.)
Winching Vehicle: The vehicle equipped with the winch. This vehicle pulls the load toward the anchor point.
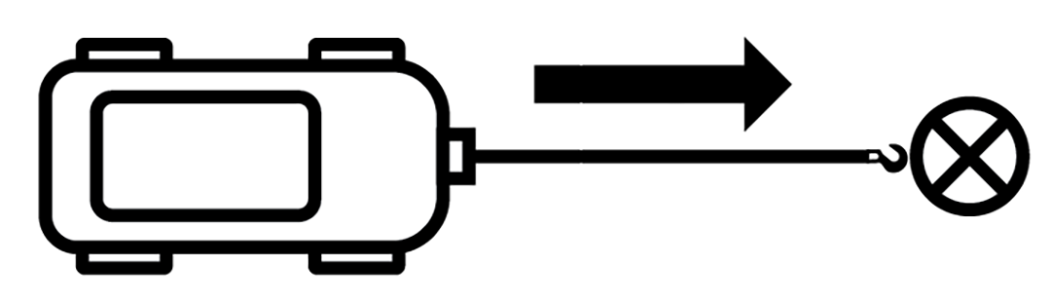
Example 1: The winching vehicle is also the load vehicle and pulls itself toward an anchor point.
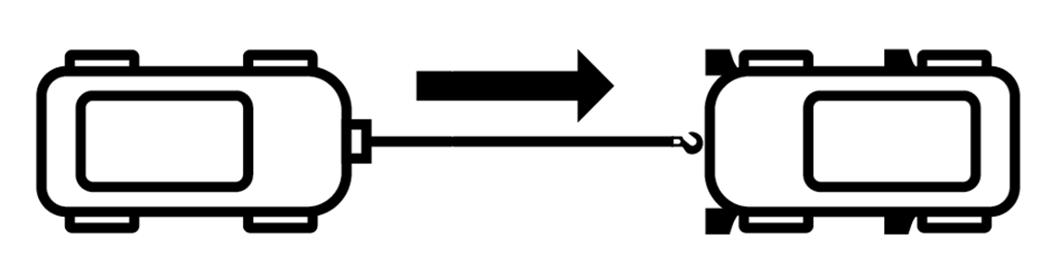
Example 2: The winching vehicle is also the load vehicle and pulls itself toward another vehicle that is acting as the anchor point (shown using wheel chocks).
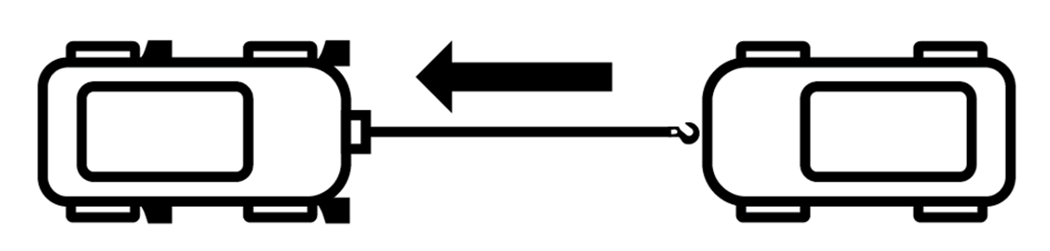
Example 3: The winching vehicle acts as the anchor point (shown using wheel chocks) and pulls a load vehicle.
Inspect the rope for damage before use. Depending on the type of winch rope being used (wire or synthetic), there are different indicators for whether the rope is in good condition or needs to be replaced.
Kinks and/or frays in a wire rope are an indication that a wire rope is in poor condition and may break under tension. A kinked wire rope is permanently damaged. Do not use or attempt to straighten a kinked wire rope.
Examples that indicate a synthetic rope should be replaced include:
Powdered fibers in the inner layers of the rope.
Localized discoloration (indicates the rope has been exposed to chemicals from the vehicle such as oil or coolant).
Rope fibers are frayed (fuzzy), or cut.
Visual damage such as abrasion or cuts.
Flat areas or lumps on the rope that cannot be eliminated by flexing the rope.
Glazed or stiff areas caused by fused or melted fibers.
During the first uses of a synthetic rope, outer fibers will break and roughen the surface of the rope and appear to fuzz up. Slight roughness is normal, but if a synthetic rope continues to roughen or abrade it is an indication the rope is damaged and may break under tension.
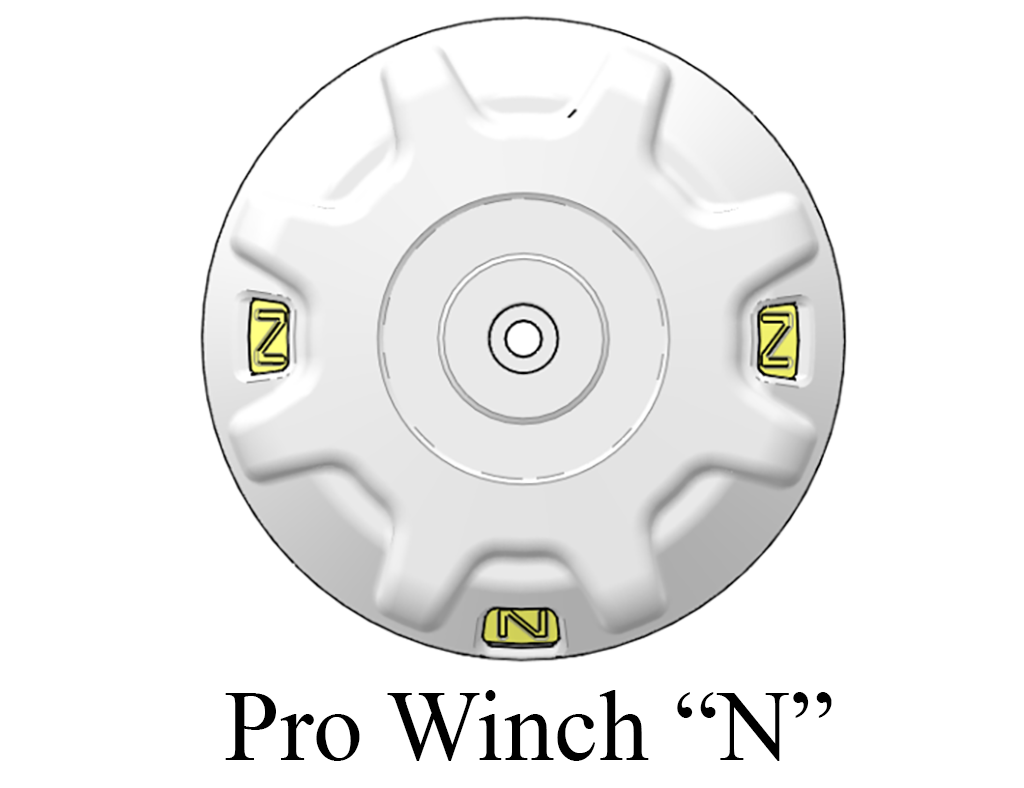
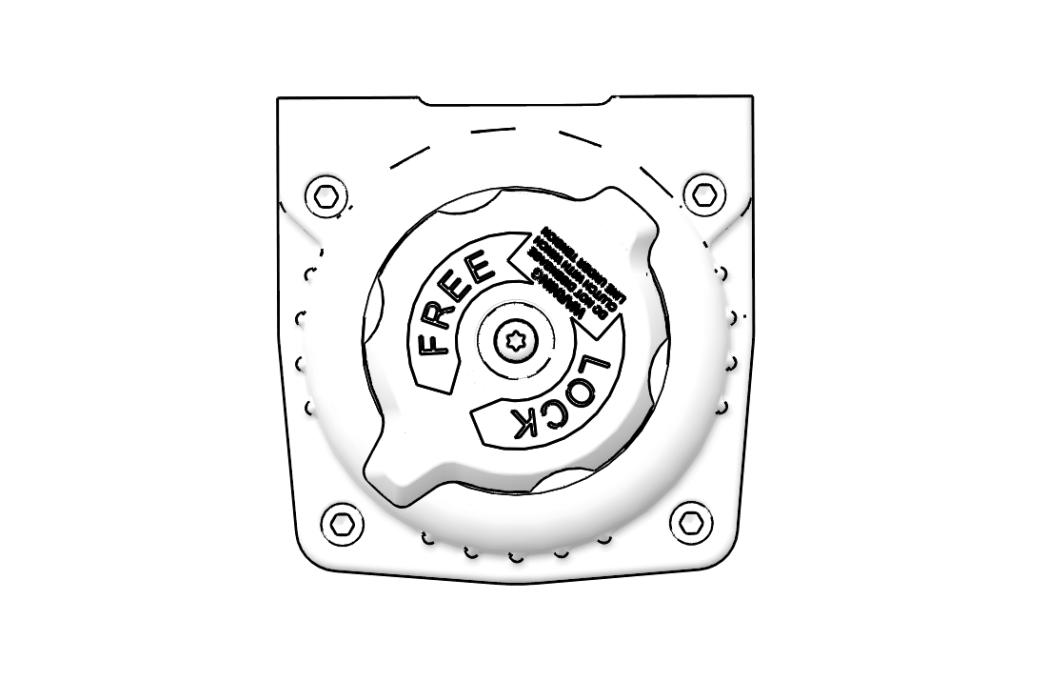
Turn the clutch lever on the winch to disengage the clutch and allow free spooling. On Pro winches, the correct position will be marked with an N (Neutral) visible through the clutch engagement knob. Other winches will be marked “LOCK” and “FREE.” Manual unspooling using this method conserves battery power.
Grab the hook strap, do not grab the hook or the rope. Use the strap to pull the rope to the load or anchor point. Avoid pulling out more rope than necessary.
Use an anchor point aligned directly in front of the vehicle whenever possible. Avoid winching with the winch rope at an angle to the center line.
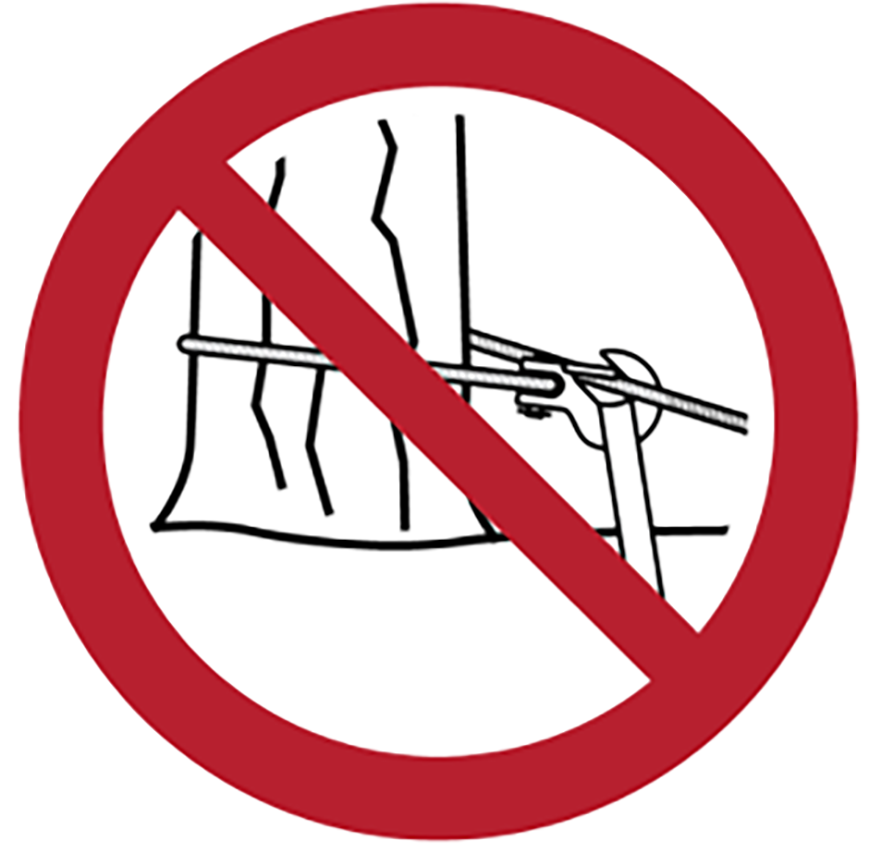
When attaching the hook to a natural anchor point, use additional rigging components such as a tree trunk protector so the winch rope remains completely straight.
When attaching the hook to a vehicle, attach to a part of the frame intended for towing such as a tow loop, tow hook or hitch.
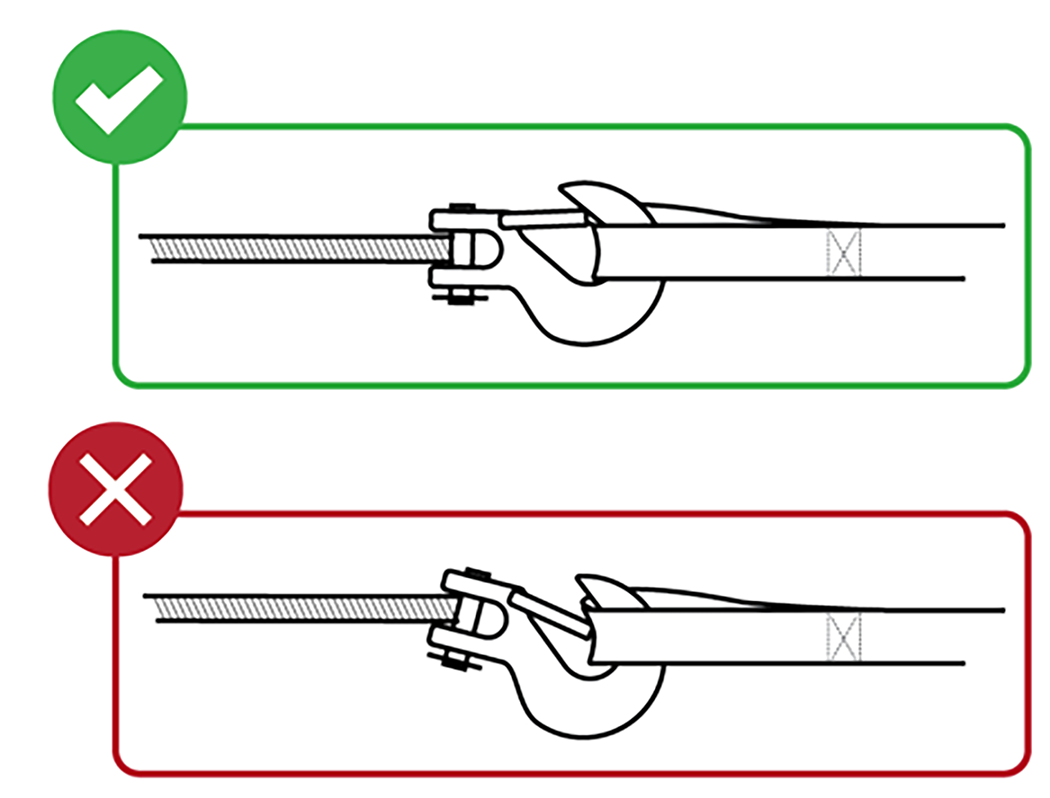
Make sure the hook latch is fully closed. Do not load at the hook tip or latch.
Never attach the hook back onto the rope.
Never attach the hook to a suspension component, brush guard, bumper, hitch ball or cargo rack.
Make sure no people are within rope hazard area when winching a load.
Turn the clutch lever on Pro winches winch from N (Neutral) to L (Low) to engage the clutch. On standard winches move clutch from FREE to LOCK.
Use the winch control to remove slack.
Put the winch rope under light tension. Press and hold the IN button on the remote control to wind the rope until no slack remains. Do not start pulling the load. Once slack is removed, do not step over the rope.
Winching involves significant energy consumption. Running the winch too long can cause the motor to overheat and fail. Keep the duration of winch operation as short as possible.
Allow the motor to cool between uses to prevent overheating.
The winch can be run for up to five minutes without load (spooling rope in or out).
The winch should not be run for more than 30-seconds under load. Allow the winch to rest for three minutes between 30-second pulls.
Stop winching occasionally and check the rope on the winch drum.
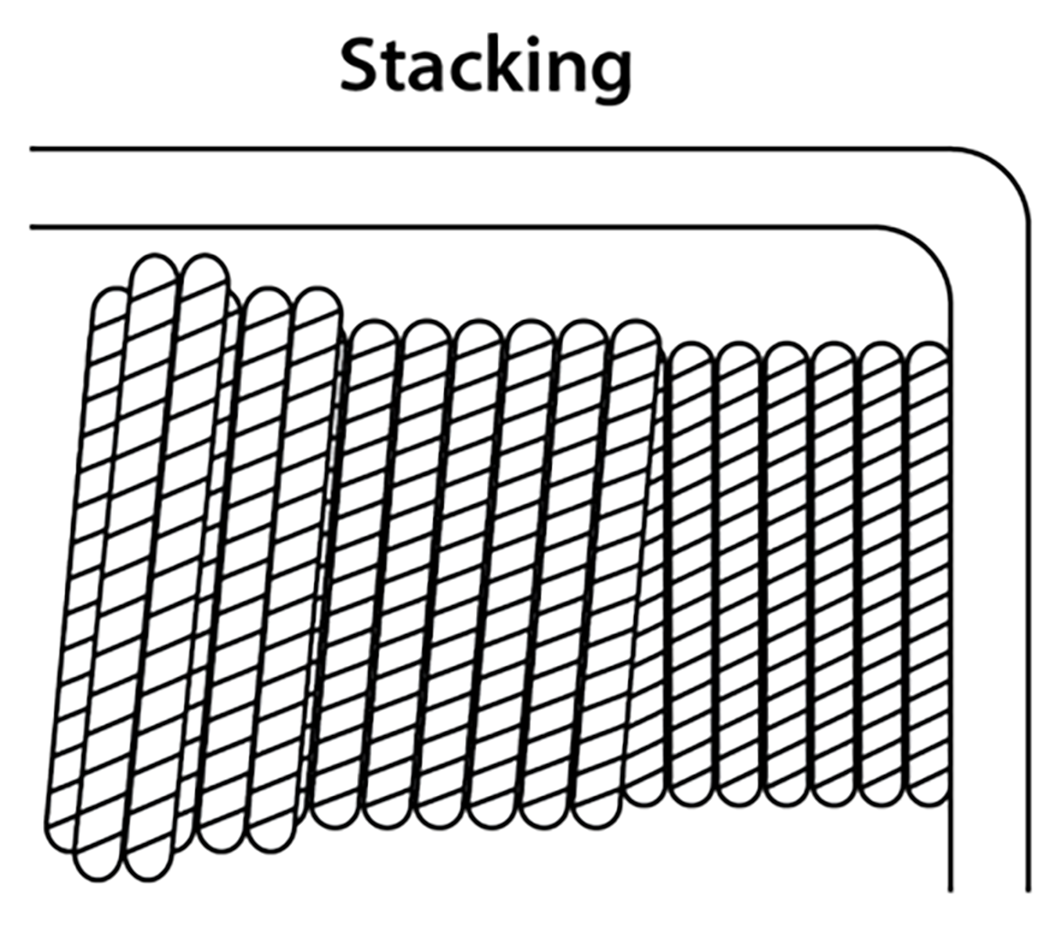
Never let the winch rope “stack” or accumulate at one end of the winch drum. Too much winch cable at one end of the winch drum can damage the winch and the winch rope. If stacking occurs, stop winching. Rewind the rope evenly before continuing winch operation.
Never winch up or down at sharp angles. This can destabilize the winching vehicle and cause it to move without warning.
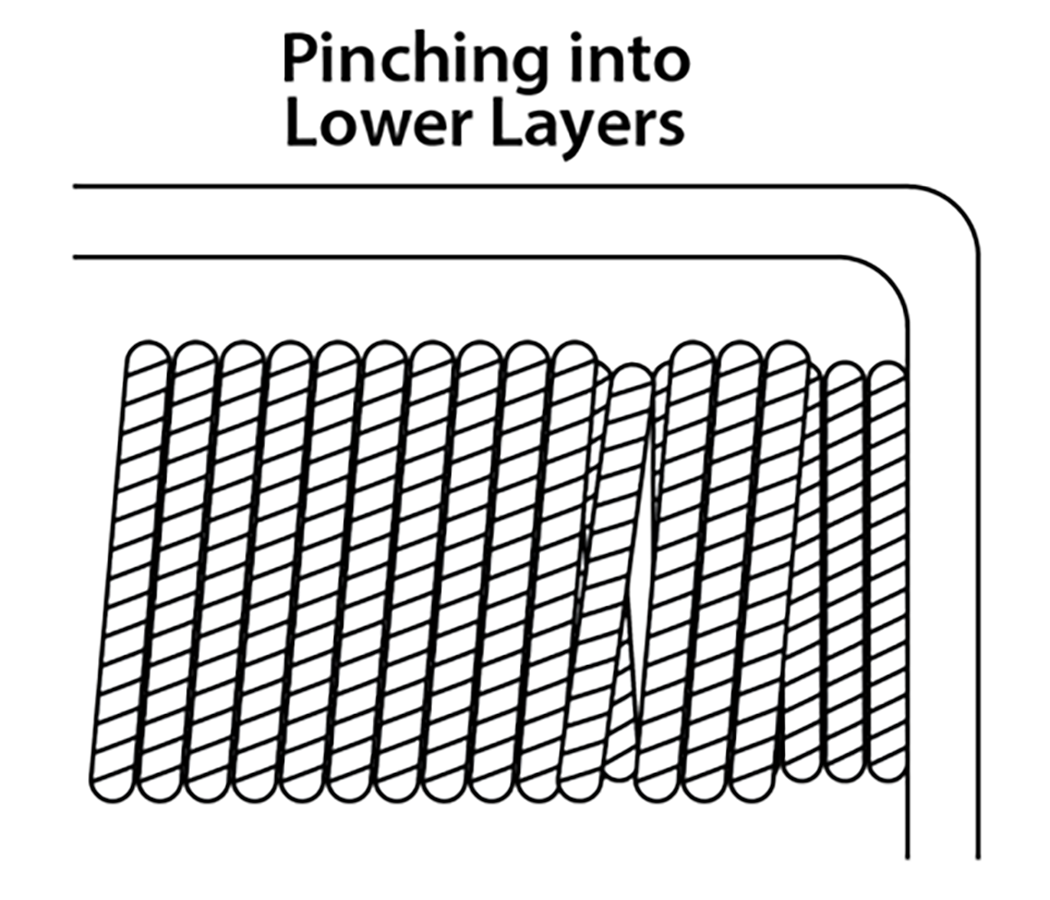
Pinched Rope: If the rope becomes pinched or wedged between other portions of the rope on the drum, do not attempt to fix the rope while under tension. Alternate powering the winch in and out until the rope is no longer pinched.
Stacked Rope: When winching at an angle the rope can stack up at one end of the drum and damage the winch. Spool out the rope and respool it evenly on the drum. If the rope continues to stack, try a different anchor point or a new winching strategy.
If the winch slows down significantly or stalls, stop winching, relieve tension on the rope, and allow the winch to rest. Consider a different winching strategy so the load does not exceed the pulling capacity of the winch.
On a long pull it may be necessary to stop winching and reposition the damper to the mid-point of the rope. Always relieve tension on the rope before repositioning the damper.
Running the winch too long can drain the battery. Even if the engine is idling during winch operation the battery may drain faster than the vehicle can recharge. Make sure vehicle stays running during winch operation to prevent loss of battery charge and possible non-start condition.
Stop winching before the hook reaches the fairlead.
When the load vehicle is on stable ground and able to be driven, put its transmission in Park (P).
Press and hold the OUT button on the winch control until tension is relieved. Disconnect rigging components.
If the rope became stacked during winching, unspool the stacked portion before respooling.
If the rope became pinched or wedged into lower rope layers during winching, unspool the pinched or wedged portion before respooling.
Spool the rope so it winds evenly across the drum. Keep hands away from fairlead and spool.
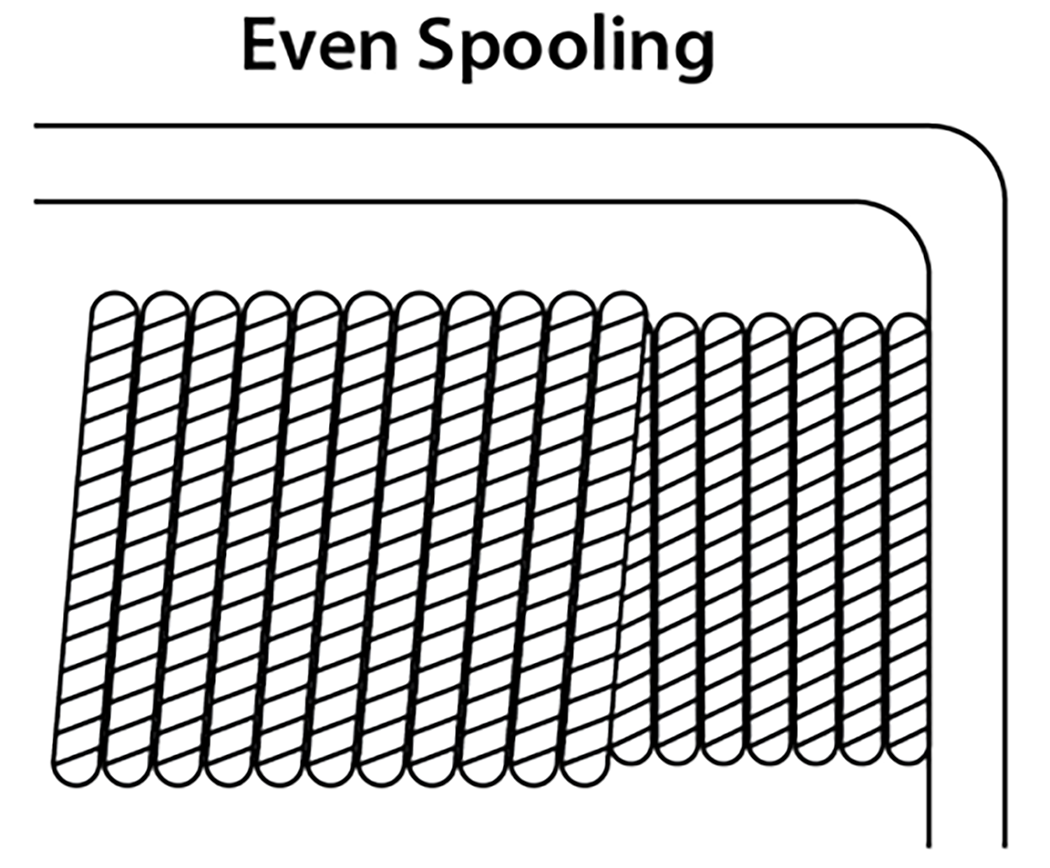
When spooling the rope, walk the rope in while holding by the winch strap. Do not let the rope run through a person’s hands. Guide the rope using light tension. A second person is recommended when spooling and unspooling rope.
Store the hook under light tension at the fairlead, or connect to a suitable location on the vehicle.
Was this helpful?