en
IMPORTANT

The Owner's Manual for this vehicle contains warnings, instructions and other information you must read and fully understand before safely riding or performing maintenance on this vehicle. Always follow the warnings and instructions in Owner's Manual.

Click the link above for the Table Of Contents, or download a full PDF of the Owner Manual in the Owner Support area of Polaris.com.

2019 Slingshot Owner’s Manual

P/N 9928978

2019 Owner’s Manual

SLINGSHOT® S
SLINGSHOT® SL
Slingshot ® SLR
SLINGSHOT® Grand Touring

NOTICE
The SLINGSHOT vehicle is NOT a car. The SLINGSHOT vehicle complies with Federal Motor Vehicle Safety Standards (FMVSS) and regulations of the United States Department of Transportation (DOT) applicable to motorcycles in the USA. The SLINGSHOT vehicle does NOT comply with Federal Motor Vehicle Safety Standards (FMVSS) and regulations of the United States Department of Transportation (DOT) applicable to passenger cars in the USA.

Copyright Information

Copyright 2018 Polaris Industries Inc.

All information contained within this publication is based on the latest product information available at the time of publication. Product improvements or other changes may result in differences between this manual and the vehicle. Depictions and/or procedures in this publication are intended for reference use only.

No liability can be accepted for omissions or inaccuracies. Polaris Industries reserves the right to make changes at any time, without notice and without incurring obligation to make the same or similar changes to vehicles previously built. Any reprinting or reuse of the depictions and/or procedures contained within, whether whole or in part, is expressly prohibited.

Trademarks

POLARIS® and SLINGSHOT® are trademarks of Polaris Industries Inc.

dexos® and dexos1® are registered trademarks owned by General Motors, LLC

DEX-COOL® is a registered trademark of General Motors Corporation

iPhone®, iPod®, iPod nano®, and iPod touch® are trademarks of Apple Inc., registered in the U.S. and other countries.

The Bluetooth® word mark and logos are registered trademarks owned by Bluetooth SIG, Inc. and any use of such marks by POLARIS is under license. Other trademarks and trade names are those of their respective owners.

Pandora®, the Pandora logo and the Pandora trade dress are trademarks or registered trademarks of Pandora Media, Inc. Used with permission.

Printed in U.S.A.

i Welcome

Welcome to our world-wide family of riding enthusiasts. Be sure to visit us online at www.polaris.com for the latest news, new product introductions, upcoming events, career opportunities and more.

Here at POLARIS we proudly produce an exciting line of utility and recreational products.

  • Snowmobiles

  • SPORTSMAN® All-terrain vehicles

  • Low emission vehicles (LEVs)

  • RANGER® utility vehicles

  • BRUTUS® work vehicles

  • SLINGSHOT® three wheel motorcycles

  • RZR® sport vehicles

  • GEM® vehicles

  • INDIAN® motorcycles

  • POLARIS POWER® generators

  • POLARIS DEFENSE® combat vehicles

  • Timbersled® Snow Bikes

For the safe and enjoyable operation of your SLINGSHOT vehicle, be sure to follow the instructions and recommendations in this manual. Keep this manual with the vehicle, especially when ownership changes. If your owner’s manual is misplaced or damaged, please purchase a replacement from your authorized SLINGSHOT dealer (referred to as “dealer” in the remainder of this manual).

All references in this manual to RIGHT, LEFT, FRONT or REAR are from the operator’s perspective when seated in a normal driving position. If you have questions about the operation or maintenance of your SLINGSHOT vehicle after you’ve read this manual, please see your authorized SLINGSHOT dealer. To locate your nearest authorized dealer, call 1-800-POLARIS (765-2747) or visit www.polaris.com.

This vehicle complies with all federal, state and local safety and emission regulations for the area of intended sale.

ii Safety Symbols and Signal Words

The following signal words and symbols appear throughout this manual and on your vehicle. Your safety is involved when these words and symbols are used. Become familiar with their meanings before reading the manual.

DANGER

DANGER indicates a hazardous situation which, if not avoided, WILL result in death or serious injury.

WARNING

WARNING indicates a hazardous situation which, if not avoided, COULD result in death or serious injury.

CAUTION

CAUTION indicates a hazardous situation which, if not avoided, COULD result in minor to moderate injury.

NOTICE

NOTICE provides key information by clarifying instructions.

IMPORTANT

IMPORTANT provides key reminders during disassembly, assembly, and inspection of components.

The Prohibition Safety Sign indicates an action NOT to take in order to avoid a hazard.

The Mandatory Action Sign indicates an action that NEEDS to be taken to avoid a hazard.

Table Of Contents

Chapter 1: Introduction

1.1.2: Accessories

For a complete listing of the accessories that are available for your vehicle, please contact your authorized dealer or visit the online store web site.

Web Address (United States):

https://slingshot.polaris.com/en-us/shop/accessories/

As the owner, it is your obligation to ensure that the following criteria are met. It may be a violation of the Clean Air Act and the NHTSA regulations to disregard these requirements.

  • When adding accessories, equipment, passengers and luggage to your vehicle, do not exceed the total weight capacity of the vehicle or of the front or rear axle (GVWR or GAWR as indicated on the Safety Compliance Certification label). Ask an authorized dealer for specific weight information.

  • It is the owner’s responsibility to use the POLARIS Slingshot Accessories website as a tool for limiting the amount of accessories, based on maximum allowable vehicle weight requirements.

Chapter 2: Safety

2.2.1: Safety Guidelines

WARNING
Improper vehicle use can result in SERIOUS INJURY or DEATH.

ALWAYS WEAR AN APPROVED FULL-FACE HELMET (DOT-certified in USA).

ALWAYS WEAR EYE PROTECTION AND A SEAT BELT.

NEVER USE WITH DRUGS OR ALCOHOL.

READ OWNER’S MANUAL. FOLLOW ALL INSTRUCTIONS AND WARNINGS.

NEVER Operate:

  • If you are under the age of 16 and without a driver’s license. In some states, a motorcycle endorsement is also required. For more information on motorcycle endorsements, see the Safety Warnings section.

  • Under the influence of drugs or alcohol.

  • Unless all occupants are able to sit with back against the seat and feet firmly on the floorboard.

  • With a child safety seat installed in this vehicle.

  • While using a mobile phone or other handheld device.

  • Off-road.

  • With more than one passenger. Allow a passenger to ride only in the passenger seat.

  • With weight (riders and cargo) that exceeds the maximum weight rating of the vehicle. See the Manufacturing Information Label.

ALWAYS:

  • Wear a full-face helmet (DOT-certified in USA) and eye protection that meets or exceeds established safety standards. This vehicle is not equipped with airbags.

  • Wear your seat belt.

  • Reduce speed on wet or slippery surfaces.

  • Keep both hands on the steering wheel when driving.

  • Make sure passenger reads and understands all safety labels.

  • Be aware of your surroundings and driving conditions.

  • Be prepared for changing weather conditions and dress accordingly.

  • Use only genuine SLINGSHOT accessories designed for your SLINGSHOT vehicle.

WARNING
Be aware that placing hands, arms or feet outside the vehicle could result in serious injury or death. Always keep hands, arms and feet inside the vehicle at all times.

2.2.2: Safety Warnings

WARNING
Failure to follow recommended precautions and procedures could result in serious injury or death. Always heed all safety precautions and follow all operation, inspection and maintenance procedures outlined in this manual.

This owner’s manual contains information that is essential to the safe use and proper maintenance of your SLINGSHOT vehicle. Anyone who operates the SLINGSHOT vehicle must read the owner’s manual and all safety labels on the vehicle before operating.

  • Anyone who operates the SLINGSHOT vehicle must have a valid driver’s license. In some states, SLINGSHOT vehicle operators must have a valid driver’s license with a motorcycle endorsement. Never allow anyone to operate this vehicle without the appropriate state license(s). More information on state driver’s license requirements to operate the SLINGSHOT vehicle can be found at https://slingshot.polaris.com/en-us/license-requirements/ .

  • Never allow anyone under the age of 16 to operate this vehicle.

  • Never install a child safety seat in this vehicle. All riders must be tall enough to sit with backs against the seat, both feet flat on the floor and seat belts properly secured.

  • The driver and passenger must wear a full-face helmet (DOT-approved in US), eye protection, and seat belt at all times.

  • Avoid wearing long scarves and clothing that may trail outside the rider compartment.

  • Always make sure all cargo and other items in the rider compartment are properly secured before operating.

  • The SLINGSHOT 3–wheel motorcycle handles differently than 2-wheel motorcycles and other on-road vehicles. Read the section in this manual entitled SLINGSHOT Vehicles vs. Other On-Road Vehicles.

  • This manual was written in North America, where vehicle operation is in the right driving lane. You may need to adapt some of the instructions to the driving conditions (such as left-lane operation) and regulations in your area of operation.

  • Carefully read and understand the information found in this Safety section of the owner’s manual.

  • Understand and follow the procedures outlined in the Maintenance section to keep your vehicle in peak condition on the road or in storage.

  • Bring this manual with you when you ride. Following the precautions and procedures in the manual will add to your enjoyment and help keep you riding safely.

  • If you lose or damage this manual, you can purchase a new one through any authorized dealer. The owner’s manual should be considered part of the vehicle and remain with it if the vehicle is sold. This manual is also available online at www.polaris.com.

  • If you experience a wheel impact, such as hitting a curb, a large pothole or road debris, have your tires and rims inspected immediately. These types of impacts may cause hidden tire/rim damage that may not be noticeable during operation. This damage could cause tire or rim failures and result in accidents causing serious personal injury or death. If you are in doubt, have the wheel checked by your authorized SLINGSHOT dealer or tire professional. Exercise care when parking along curbs and reduce speed if possible when approaching unavoidable potholes and/or road debris.

WARNING
Be aware that placing hands, arms or feet outside the vehicle could result in serious injury or death. Always keep hands, arms and feet inside the vehicle at all times.

2.2.3: Safe Driving Practices

2.2.3.1: Operating a SLINGSHOT vehicle has
inherent risks.

You can minimize those risks, but you can’t eliminate them completely. Even if you’re an experienced 3-wheel motorcycle operator or passenger, read all of the safety information in this manual before operating this SLINGSHOT vehicle.

  • Take a 3-wheel motorcycle rider course from the Motorcycle Safety Foundation or another qualified instructor. The course will help you learn effective turning and braking techniques, traffic strategies and evasive maneuvers, in addition to general safe riding habits. To locate a rider course in your area, contact the Motorcycle Safety Foundation at 1-800-446-9227 or visit their web page at www.msf-usa.org. You may also contact your dealer or the motorcycle regulatory agency in your area of operation.

  • Observe all maintenance requirements specified in this manual. See the SLINGSHOT Service Manual for assistance. Your authorized SLINGSHOT dealer can also provide assistance.

2.2.3.2: Design characteristics affect how you should operate the SLINGSHOT vehicle:

  • The SLINGSHOT is a lightweight 3-wheel motorcycle. As such, it will respond differently than other on-road vehicles in various road and weather conditions. Thoroughly read your owner’s manual and take safety training before operating the SLINGSHOT.

  • The SLINGSHOT vehicle is designed for on-road use by one operator with one passenger. The Manufacturing Information label placed on the vehicle contains the Vehicle Identification Number (VIN), Gross Vehicle Weight Rating (GVWR) and Gross Axle Weight Rating (GAWR) information. Never exceed the GVWR or the GAWR.

  • Driving off-road, driving at excessive speeds, driving with more than one passenger or carrying weight exceeding the maximum weight rating can make handling difficult, which could cause loss of control resulting in serious injury or death.

  • Since the SLINGSHOT has a single, centered rear wheel, “straddling” obstacles with the front tires increases the likelihood that you will encounter the obstacles with the rear tire.

  • Read the section in this manual entitled SLINGSHOT Vehicles vs. Other On-Road Vehicles.

  • During the first 500 miles (800 km) of operation, follow all break-in procedures as outlined in the owner’s manual. Failure to do so can result in serious engine damage.

2.2.3.3: Wear protective apparel to decrease the risk of injury and increase riding comfort.

  • Always wear a full-face helmet that meets or exceeds established safety standards. Approved helmets in the USA and Canada bear a U.S. Department of Transportation (DOT) label. Laws in some areas require that riders wear an approved helmet. Head injuries are the leading cause of fatalities in accidents involving vehicles such as the SLINGSHOT vehicle. Statistics prove that an approved helmet is the most effective protection in preventing or reducing head injuries.

  • Wear eye protection to protect eyes from wind or airborne particles and objects. Laws in some areas require that you wear eye protection. POLARIS recommends that you wear approved Personal Protective Equipment (PPE) bearing markings such as VESC 8, V-8, Z87.1, or CE. Make sure protective eyewear is kept clean.

  • Be prepared for changing weather conditions and dress accordingly.

2.2.3.4: Follow these general safe driving practices:

  • Always inspect the vehicle before each use to make sure it’s in safe operating condition. Failure to do so may result in vehicle damage or an accident.

  • Until you’re thoroughly familiar with the SLINGSHOT and all of its controls, practice driving where there is little or no traffic. Practice driving at a moderate speed on various road surfaces and in different weather conditions. Practice braking in a safe area to become familiar with the feel of the SLINGSHOT brakes before driving in traffic.

  • Know your skills and limits, and ride within them.

  • Allow only licensed, experienced operators to operate your SLINGSHOT, and then only after they have become familiar with its controls and operation. Make sure all riders read and understand this owner’s manual before riding.

  • Do not ride when you’re fatigued or under the influence of alcohol, prescription drugs, over-the-counter drugs or any other drugs. Fatigue, alcohol and drugs can cause drowsiness, loss of coordination and loss of balance. They can also affect your awareness and judgment.

  • If your vehicle operates abnormally, cease operation and correct the problem immediately. Refer to the SLINGSHOT Service Manual, or an authorized SLINGSHOT dealer can assist.

  • Ride defensively, as if you are invisible to other motorists, even in broad daylight. Smaller profile vehicles, such as 2-wheel motorcycles and 3-wheel motorcycles such as the SLINGSHOT vehicle may not be immediately seen and recognized by some motorists, which can lead to accidents. Ride where you’re clearly visible to other motorists, and observe their behavior carefully. Always be prepared to take evasive action.

  • Be especially cautious at intersections, where accidents often occur.

  • To prevent loss of control, keep both hands on the steering wheel unless you’re shifting gears.

  • Obey the speed limit and adjust your speed and driving technique based on road, weather and traffic conditions. As you travel faster, the influence of all other conditions increases, which can increase the possibility of losing control.

  • Driving while distracted can result in loss of vehicle control, accident and injury. Do not use a mobile phone or other handheld device while operating the vehicle.

  • Improper braking may cause loss of control. Apply the brakes gradually when the road is wet, rough or slippery. Allow for a greater braking distance in these conditions. If possible, avoid applying the brakes while making a turn.

  • Reduce speed in wet conditions. Pay particular attention if water is beginning to pool on the road. Three-wheeled motorcycles behave differently than other vehicles when driving over deep water. Your SLINGSHOT vehicle may hydroplane, which could result in loss of control, if operating speed is too high for the depth of water on the road.

  • Always ensure that your tires have sufficient tread depth and are inflated to the correct tire pressure. See Tire Tread Depth for recommended tire depth.

  • Avoid operating in icy or snowy conditions. Use caution when driving in temperatures at or below 40° Fahrenheit (4° Celsius). Leave more room to stop, reduce cornering speeds, and accelerate gradually. Failure to do so could result in serious injury or death.

2.2.4: Modifications

Modifying this vehicle by removing any equipment or by adding equipment not approved by SLINGSHOT may void your warranty. Such modifications could also make the vehicle unsafe and could result in serious injury to operator or passenger, as well as damage to the vehicle. Some modifications may not be legal in your area of operation. If in doubt, your authorized dealer can answer any questions.

2.2.5: Use of Accessories

  • Never modify this vehicle through improper installation or use of accessories that are not SLINGSHOT-approved. Use only genuine SLINGSHOT accessories designed for your SLINGSHOT vehicle.

  • Do not install electrical accessories that exceed the capacity of the vehicle’s electrical system. Never install higher wattage light bulbs than those supplied as original equipment. An electrical failure could result and cause hazardous loss of engine power or lights, or damage to the electrical system.

2.2.6: Parking the SLINGSHOT Vehicle

To help prevent rolling, engage the park brake when the vehicle is parked. See Park Brake Lever. When leaving the vehicle unattended, turn the engine off and engage the park brake. Remove the ignition key to prevent unauthorized use.

2.2.7: Fuel and Exhaust Safety

Always heed these fuel safety warnings when refueling or servicing the fuel system. For fuel recommendations and fueling procedures, see Fuel Recommendation.

WARNING
Gasoline is highly flammable and explosive under certain conditions.

  • Always exercise extreme caution whenever handling gasoline.

  • Always turn off the engine before refueling.

  • Always refuel outdoors or in a well-ventilated area.

  • Open the fuel cap slowly. Do not overfill the tank. Do not fill the tank neck.

  • Do not smoke or allow open flames or sparks in or near the area where refueling is performed or where gasoline is stored.

WARNING
Gasoline and gasoline vapors are poisonous and can cause serious injury.

  • Do not swallow gasoline, inhale gasoline vapors, or spill gasoline. If you swallow gasoline, inhale more than a few breaths of gasoline vapor, or get gasoline in your eyes, see a physician immediately.

  • If gasoline spills on your skin or clothing, immediately wash it off with soap and water and change clothing.

WARNING
Exhaust gases contain carbon monoxide, a colorless, odorless gas that can cause loss of consciousness or death in a short time.

  • Never start the engine or let it run in an enclosed area.

  • Never inhale exhaust gases.

CAUTION
Use of after-market exhaust components is not recommended.

2.2.8: Safety Maintenance

Careful periodic maintenance will help keep your vehicle in the safest, most reliable condition. Perform all periodic maintenance at the recommended intervals outlined in the Periodic Maintenance section beginning on Maintenance Chart Key. Record maintenance and service in the Maintenance Log on Maintenance Log.

Inspect, clean, lubricate, adjust and replace parts as necessary. When inspection reveals the need for replacement parts, genuine SLINGSHOT parts are available from your SLINGSHOT dealer.

NOTICE
Service and adjustments are important for proper vehicle operation. If you're not familiar with safe service and adjustment procedures, have your authorized dealer or another qualified person perform these operations.
  • Before each ride, perform the steps outlined in the Pre-Ride Inspections chapter.

  • Always maintain proper tire pressure, tread condition and wheel and tire balance. Inspect tires regularly and replace worn or damaged tires promptly. Use only SLINGSHOT-approved replacement tires.

  • Fasteners must meet original specifications for quality, finish and type to ensure safety. When inspection reveals the need for replacement parts, use genuine SLINGSHOT parts available from your SLINGSHOT dealer. Ensure that all fasteners are tightened to the proper torque.

2.2.9: Electromagnetic Interference

This vehicle complies with European directive 97/24/EC Chapter 8 requirements, which is equivalent to Canadian ICES-002.

2.2.10: Industry Canada ICES-002
(Interference-Causing Equipment Standard)

This vehicle complies with the Canadian standard ICES-002.

Ce véhicule est conforme à la norme NMB-002 du Canada.

2.2.11: CMVSS 208 Waiver

This vehicle does not conform to the requirements of the dynamic or static tests set out in Canada CMVSS 208 - Occupant Protection in Frontal Impacts.

Ce véhicule n’est pas conforme aux exigences des essais dynamiques ou statiques prévues par la NSVAC 208 du Canada (Systèmes de retenue des occupants en cas de collision frontale).

2.2.12: Gross Vehicle Weight Rating (GVWR)

WARNING
Exceeding the gross vehicle weight rating of your vehicle can reduce stability and handling and could cause loss of control. NEVER exceed the GVWR of your vehicle.

The maximum load capacity of your vehicle is the maximum weight you may add to your vehicle without exceeding the GVWR. This capacity is determined by calculating the difference between your vehicle’s GVWR and wet weight. Refer to the Specifications chapter for details.

Refer to the manual’s Specifications section or the Manufacturing Information/VIN label on the vehicle frame for model-specific information. See the Safety and Information Labels section for details.

When determining the weight you will be adding to your vehicle, and to ensure you do not exceed the maximum load capacity, include the following:

  • operator body weight

  • passenger body weight

  • weight of all riders’ apparel and items in or on apparel

  • weight of any non-factory-installed accessories

  • weight of any additional cargo on the vehicle

2.2.13: Reporting Safety Defects

If you believe that your vehicle has a defect that could result in a crash or cause injury or death, you should immediately inform the National Highway Traffic Safety Administration (NHTSA) in addition to notifying POLARIS in writing.

If NHTSA receives similar complaints, it may open an investigation, and if it finds that a safety defect exists in a group of vehicles, it may order a recall and remedy campaign. However, NHTSA cannot become involved in individual problems between you, your dealer or POLARIS.

To contact NHTSA, or obtain other information about motor vehicle safety, you may either call the Vehicle Safety Hotline toll-free at 1-888-327-4236 (TTY: 1-800-424-9153), visit the NHTSA website at www.safercar.gov, or write to:

ADMINISTRATOR, NHTSA

1200 New Jersey Avenue, SE

West Building

Washington, DC 20590

2.2.14: Safety and Information Labels

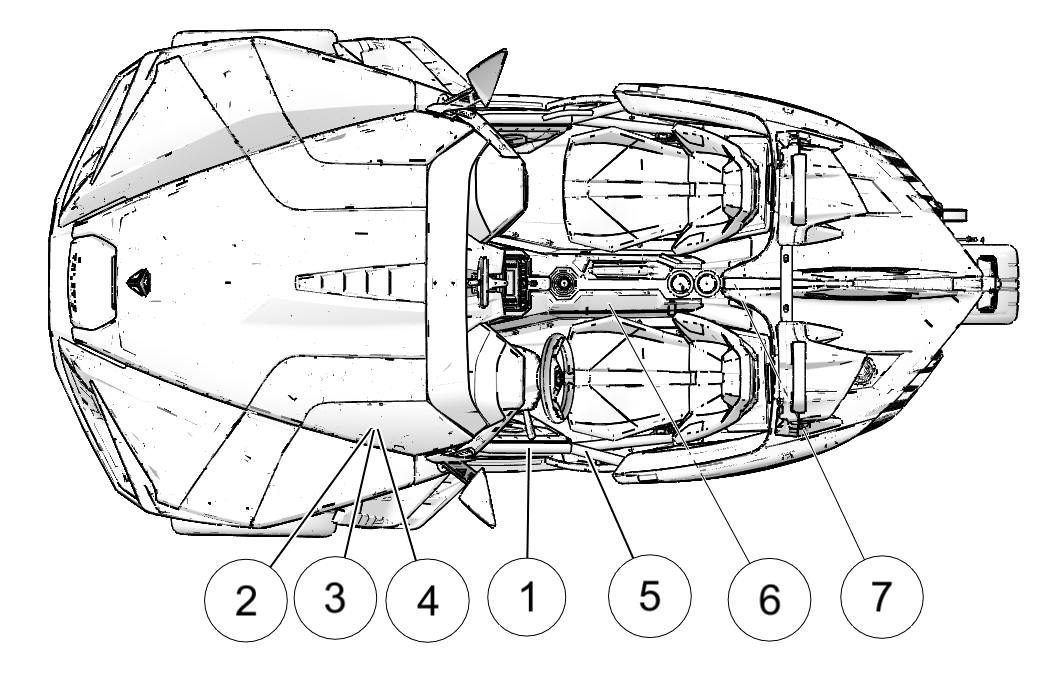
Labels are model-specific and market-specific. Your vehicle may not contain all of the labels shown.

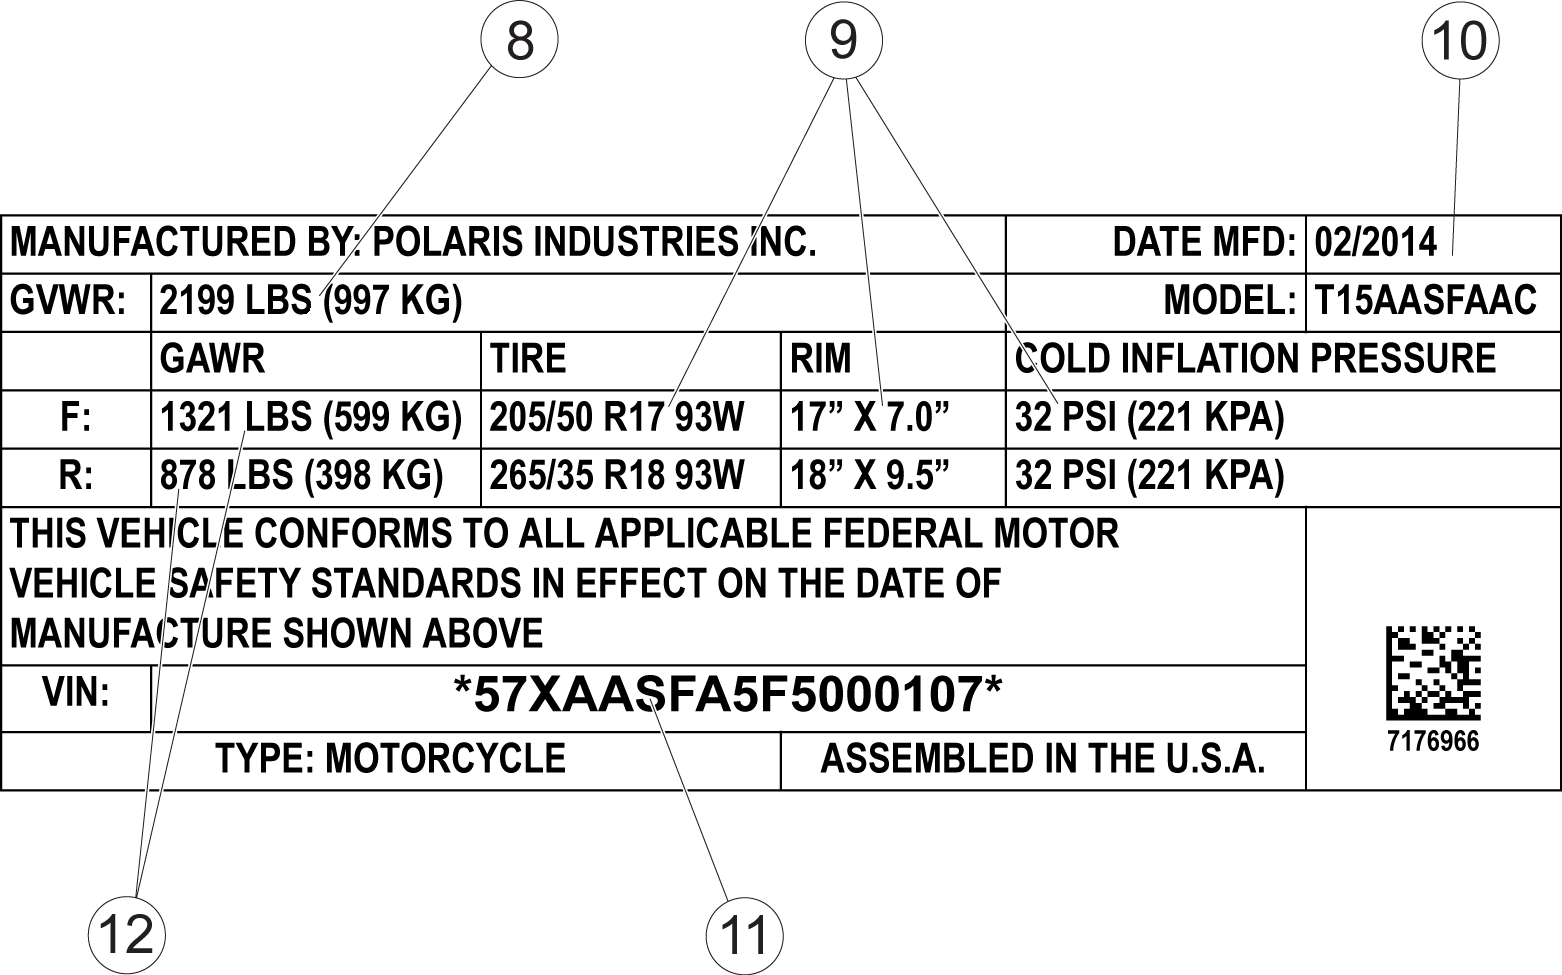
1 Manufacturing Information/Vehicle Identification Number Label/ICES-002

2 Vehicle Emission Control Information (VECI) Label

3 Evaporative Hose Routing Label (California)

4 Service Information Label

5 Tire Information Label (Canada only)

6 Frontal Crash (CMVSS 208) Waiver Label

  • 7 Operation Warning Label

  • 8 GVWR Information

  • 9 Tire & Wheel Information

  • 10 Date of Manufacture

  • 11 VIN Number

  • 12 GAWR Information

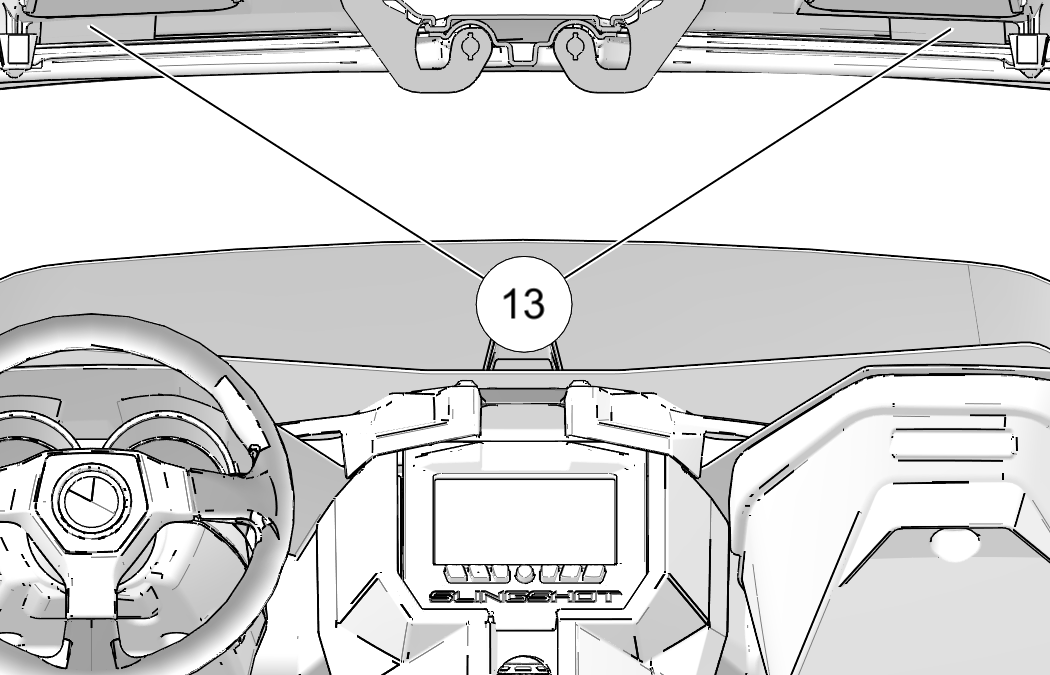
  • 13 Latch Warning Label (if equipped)

Chapter 3: Features and Controls

3.3.1: Ignition Key Number

The ignition key number is stamped on the small metal tag attached to the key ring. Remove the tag and record the number on Identification Number Record. Store the tag in a safe place.

Additional keys can be copied from one of the original keys. A key blank from your dealer is required. If you lose both original keys, you will need the following:

  • Key number (recorded on Identification Number Record)

  • A new key blank from your dealer

  • Proof of ownership

  • A locksmith or dealer with the equipment necessary to cut a new key

3.3.2: Engine Identification Number

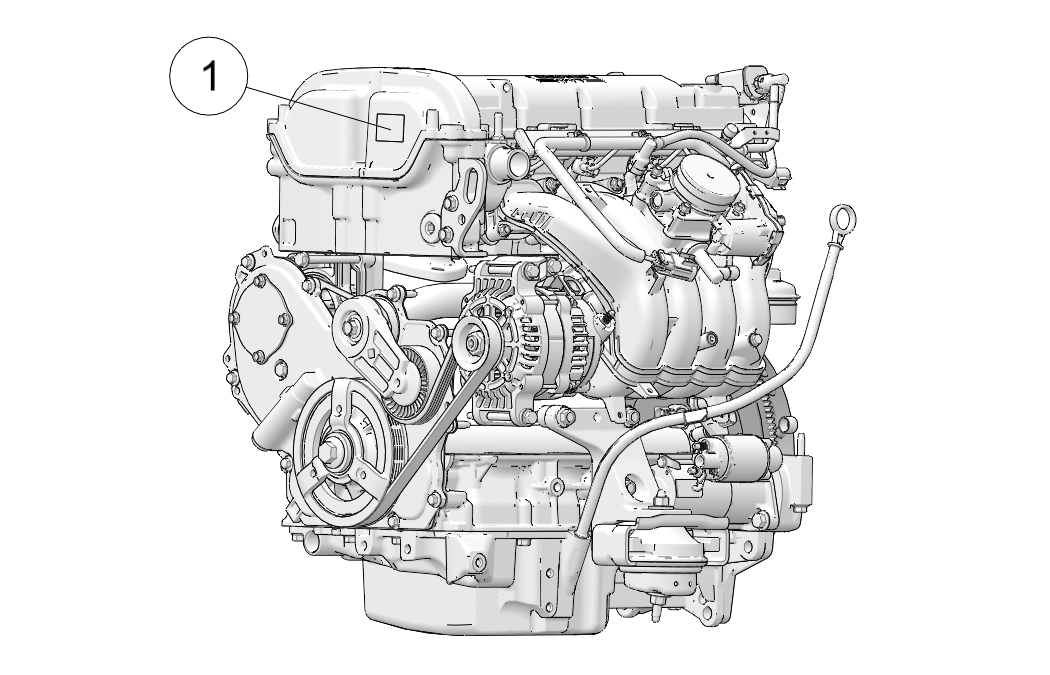
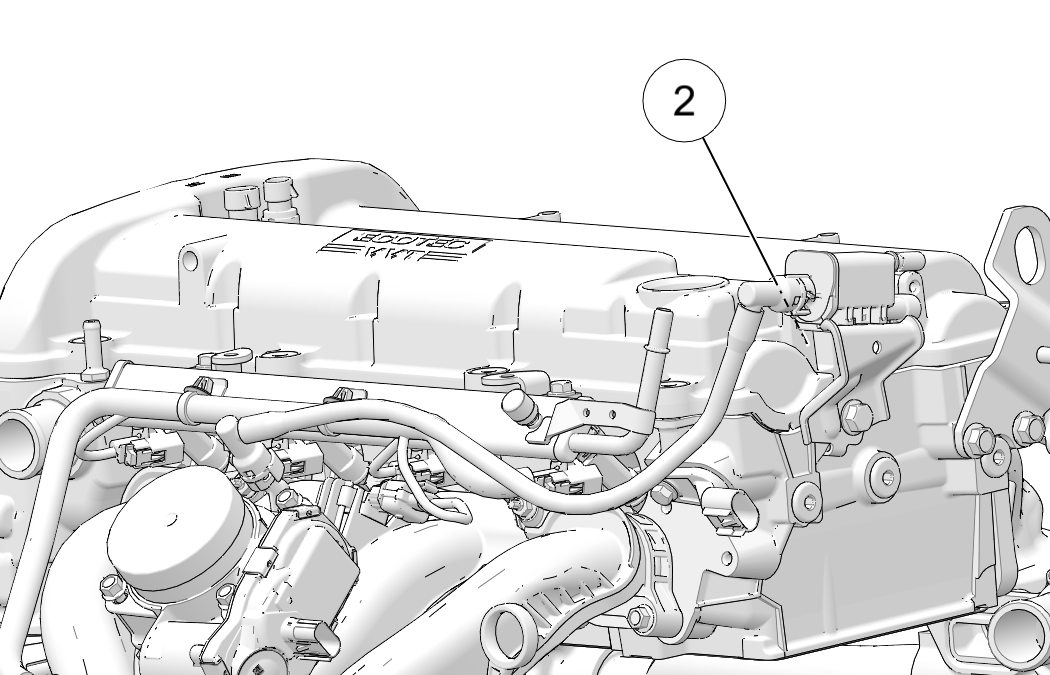
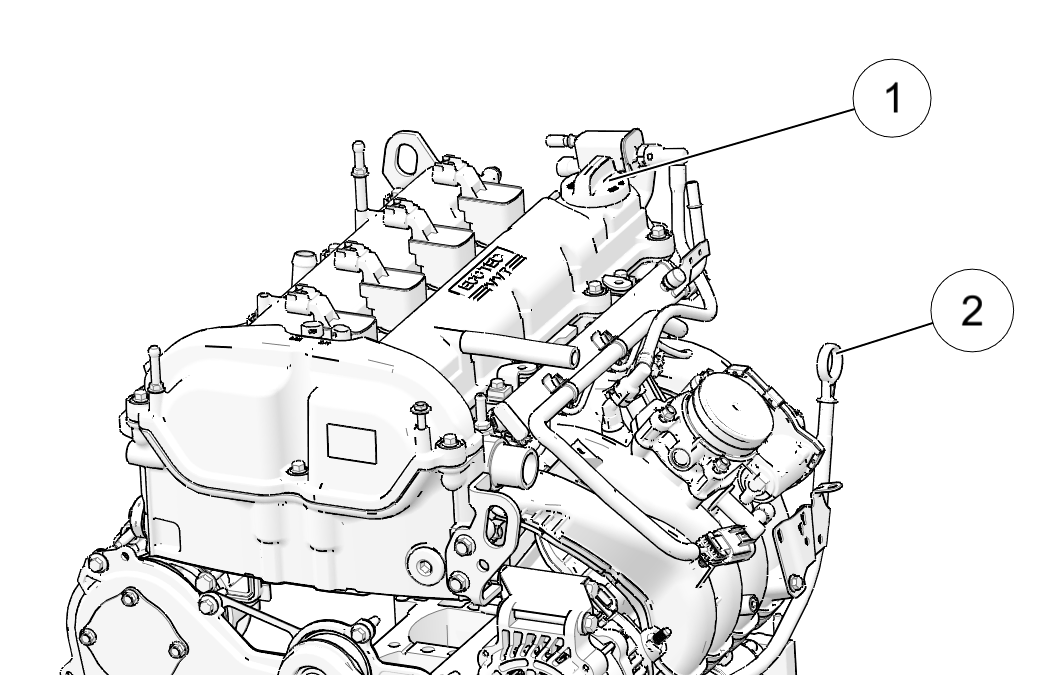
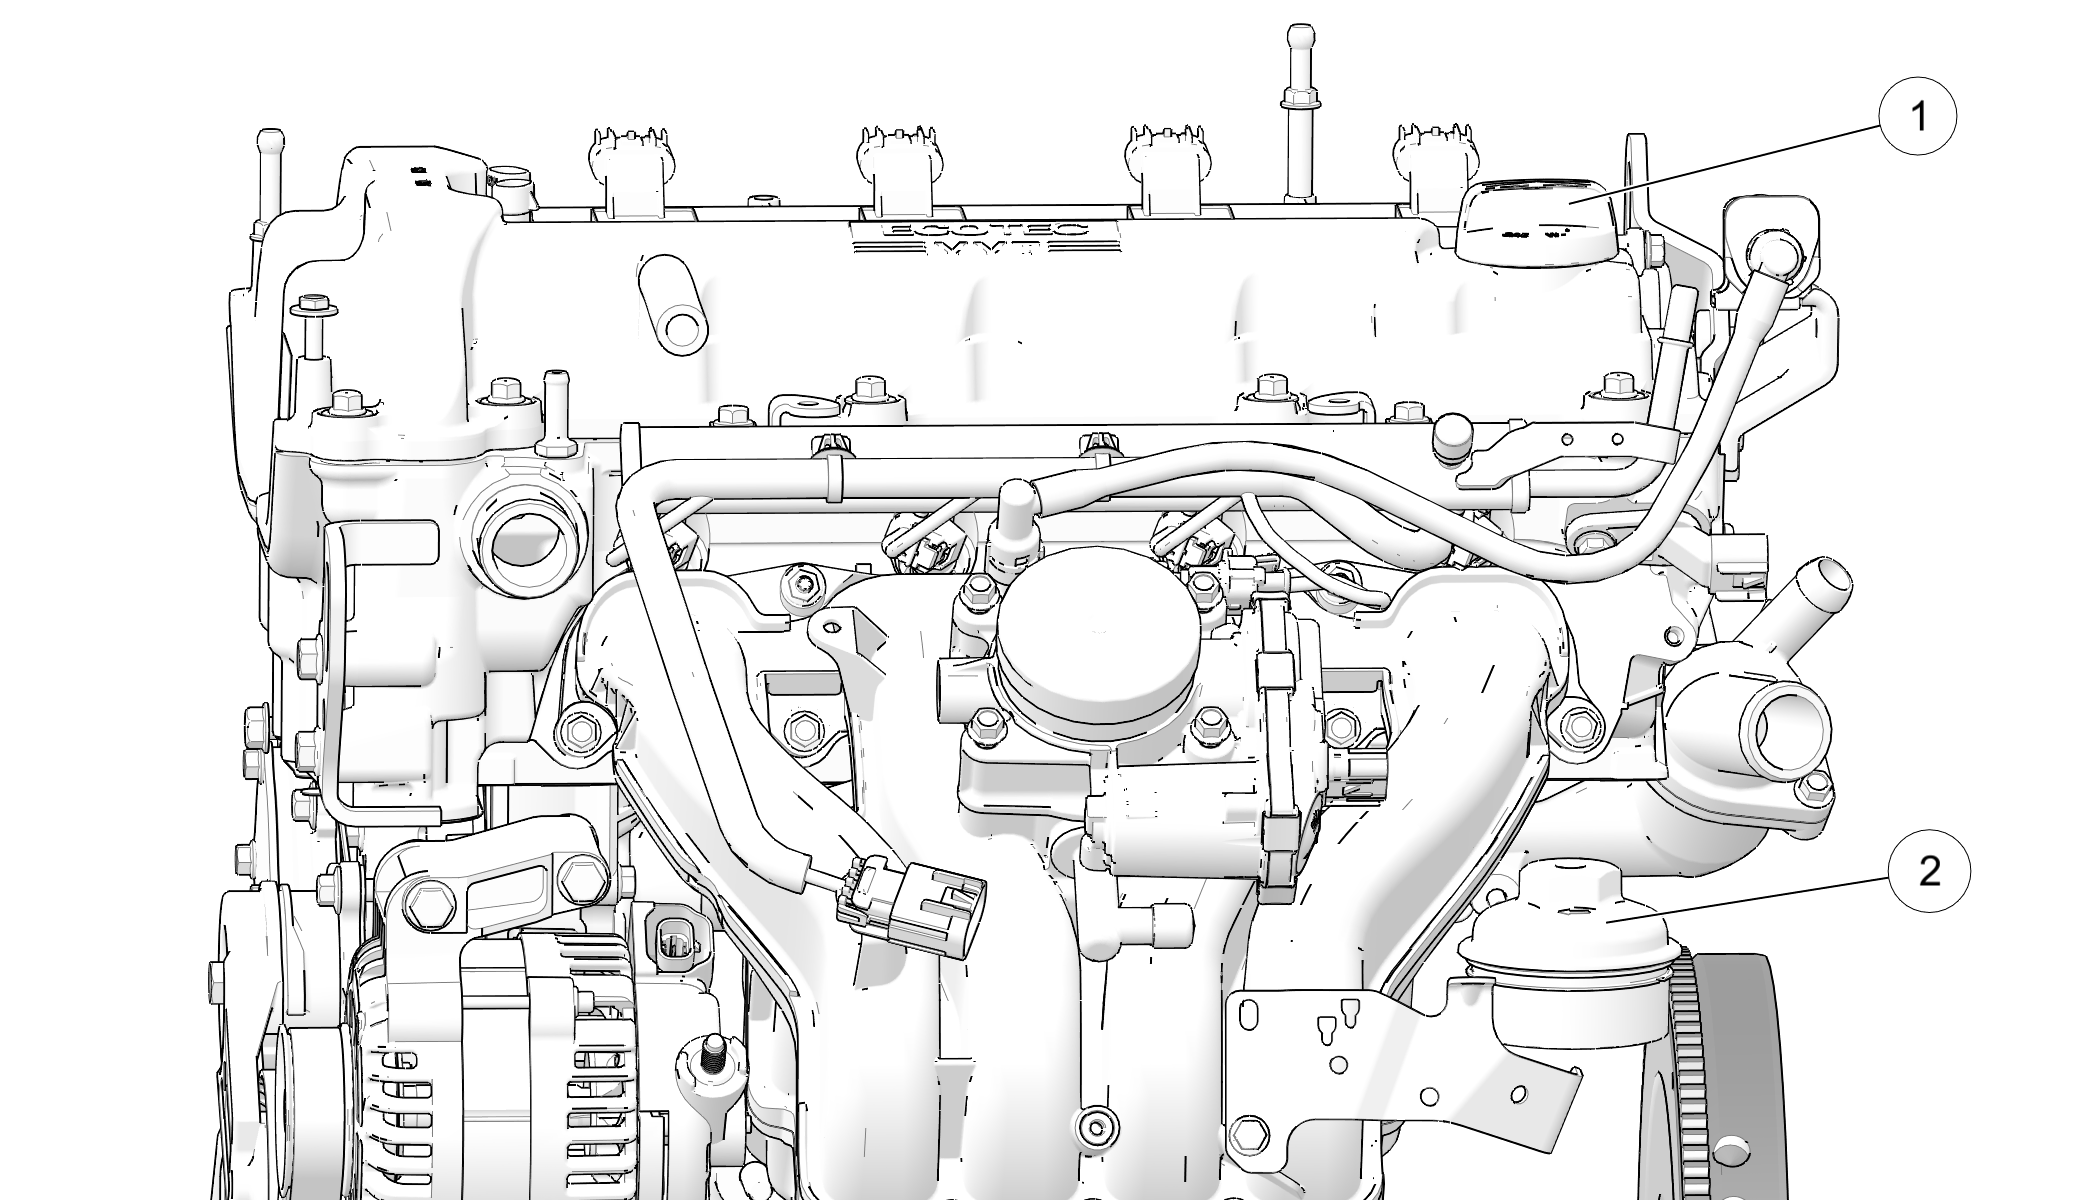
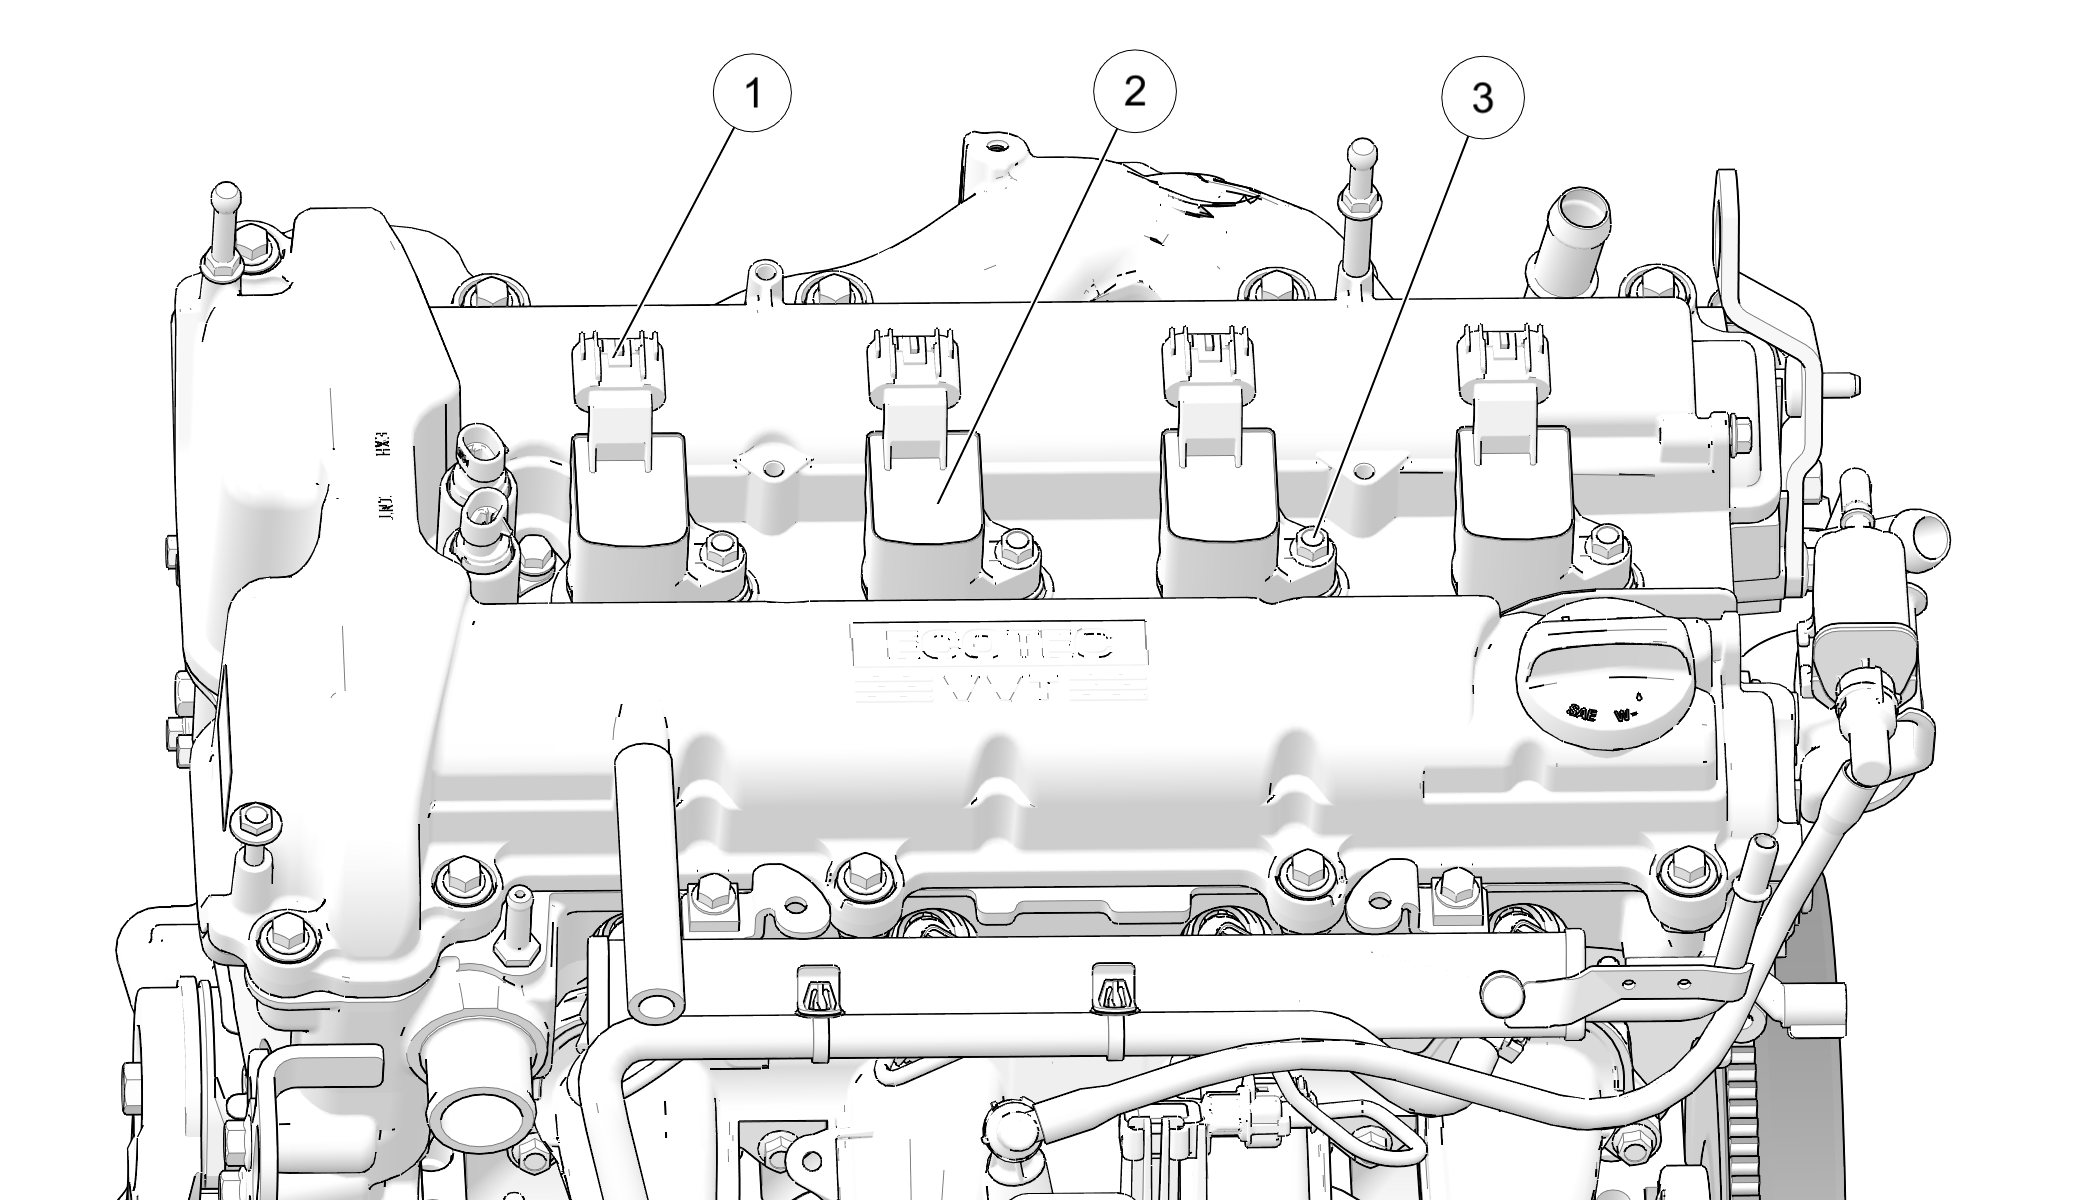
The engine identification number 1 is stamped on a pad on the oil filter bowl. The number is also provided on labels located on the front and rear of the cam cover 2. Record the number in the space provided on Identification Number Record.

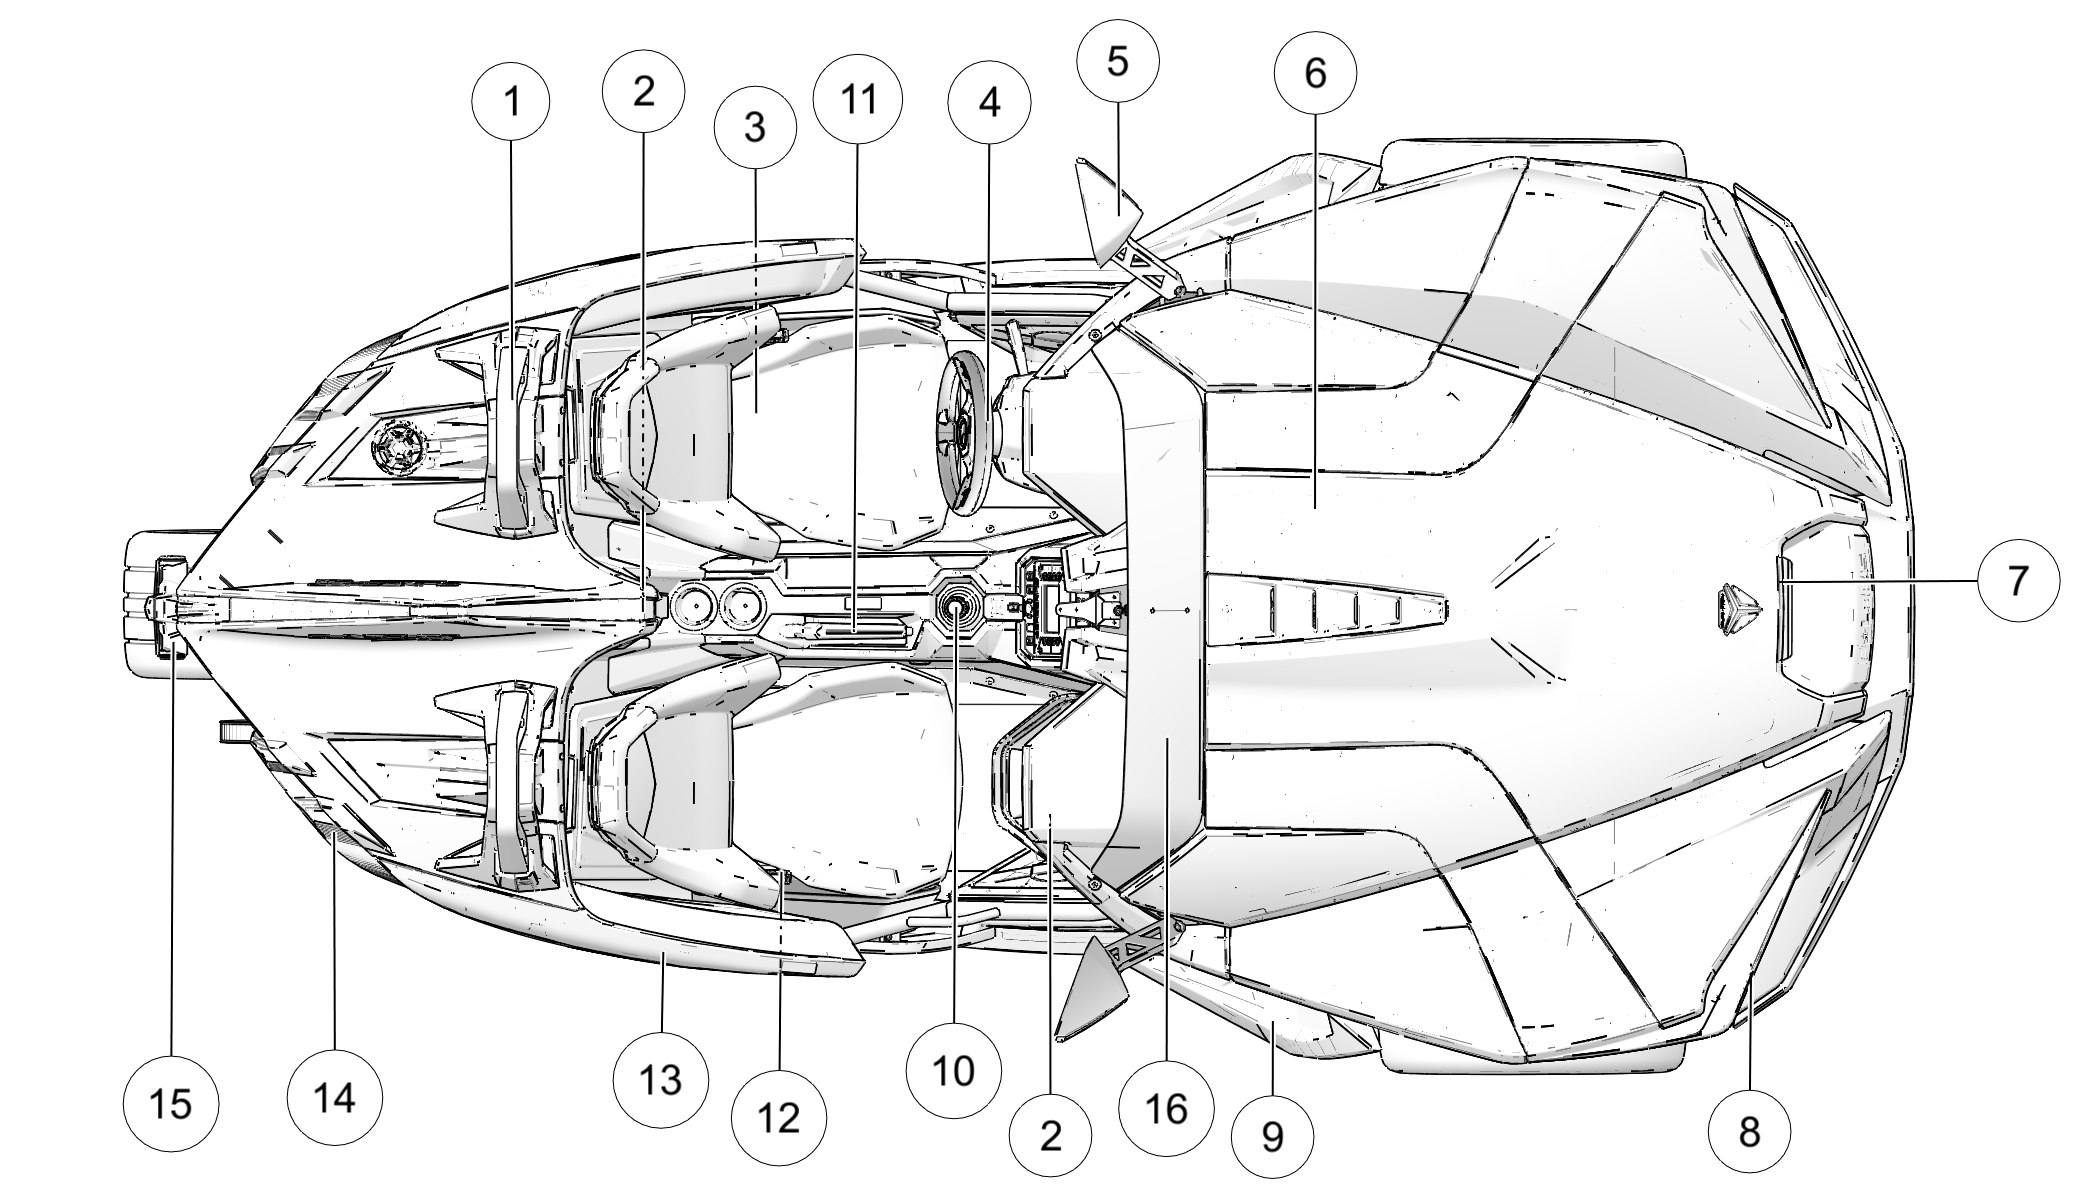
3.3.3: Component Locations


  • 1 Roll Hoop

  • 2 Auxiliary 12V Outlets (between seats and in glove box)

  • 3 Seat

  • 4 Steering Wheel

  • 5 Side-View Mirror

  • 6 Hood

  • 7 Center Main Headlight (USA)

  • 8 Headlight/Front Turn Signal Light

  • 9 Splash Guard

  • 10 Gear Shifter

  • 11 Park Brake Lever

  • 12 Seat Belts

  • 13 Rear Side Panel

  • 14 Taillight/Brake Lights/Rear Turn Signal Lights

  • 15 Rear Fin/Center High Mounted Stop Light

  • 16 Windshield (if equipped)

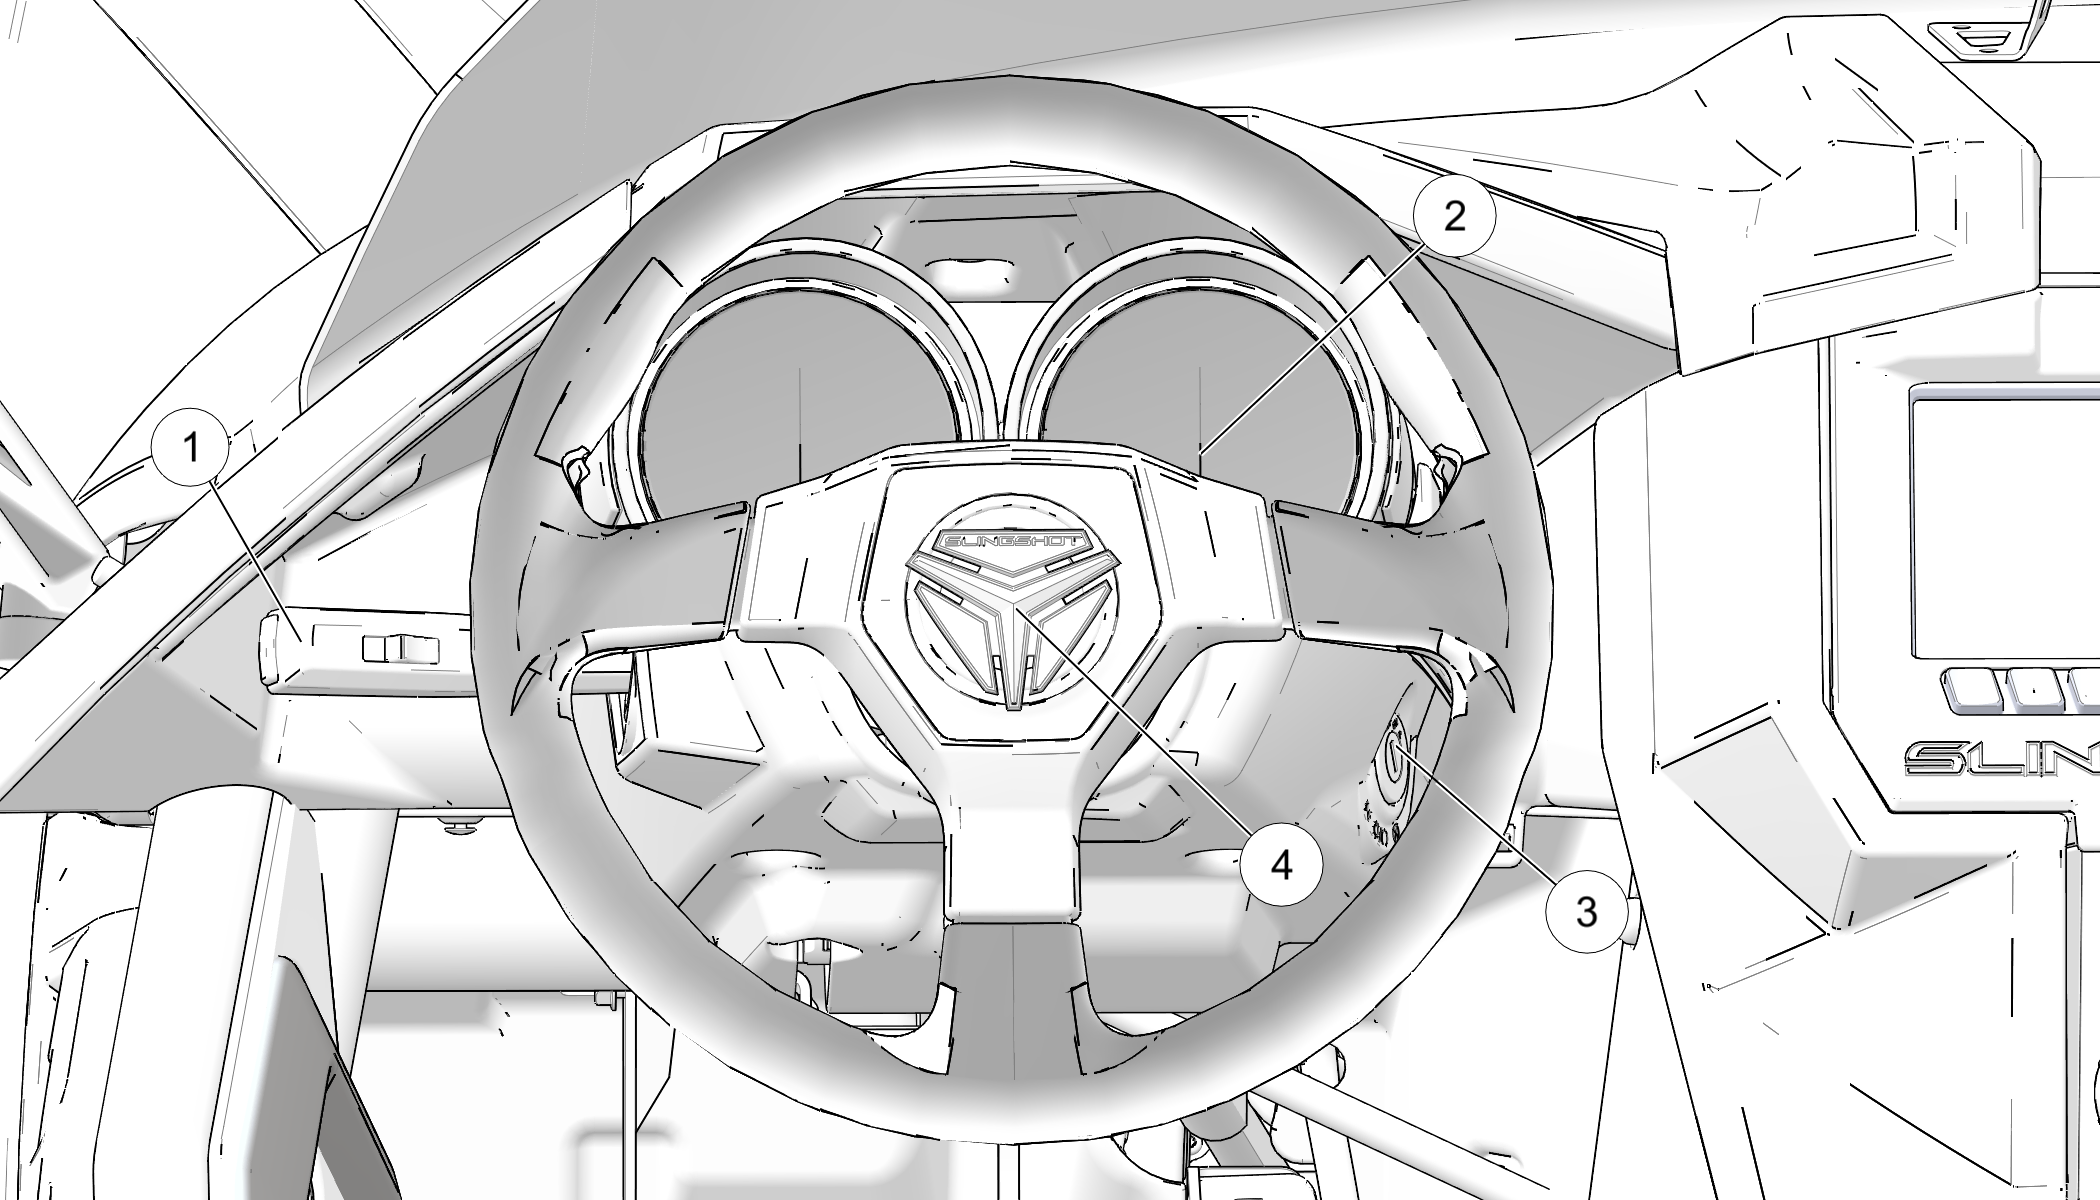
3.3.4: Console and Switches

  • 1 Turn Signal Lever; Cruise Control Switches; Headlight High/Low Beam Switch

  • 2 Instrument Cluster

  • 3 Ignition Switch

  • 4 Horn Button

3.3.4.1: Horn

Press the horn button to sound the horn. The ignition switch must be in the ON position.

3.3.4.2: Ignition Switch

The ignition key operates the ignition switch, glove box lock and storage compartment locks (behind seats). Read the engine starting procedures beginning on Starting the Engine before starting the engine. Store the spare key in a safe place separate from the main key.

Place the ignition key in the ignition switch to operate the following functions of the switch.

OFF All electrical circuits are off. Hazard signals can be activated. The key can be removed.
ON All electrical circuits are on. The ignition key cannot be removed. Headlight, taillight, running lights, turn signals, horn, radio and instrument lights are powered.
ACC Power is supplied to accessory circuits, radio, instruments and hazard signals. The key can be removed.

3.3.4.3: Headlight High/Low Beam Switch

The headlights are always on when the ignition switch is in the ON position. To switch the headlights between low beam and high beam, tap the turn signal lever forward, toward the steering wheel. The master lighting switch (Canada) must be in the ON position to allow operation of the high beam headlights. See Master Lighting Switch (Canada).

3.3.4.4: Turn Signal Lever

Before turning, activate a turn signal to alert others of your intentions. Check turn signal lamps before each ride.

NOTE
The key must be in the ON position to activate the turn signals.
  1. Move the turn signal lever downward to signal a left turn. The left turn signal lamps at the front and rear of the vehicle will flash. The indicator arrows on the console will flash when a turn signal or hazard signal is activated.

  2. Move the lever upward to signal a right turn. The right signal lamps and indicator will flash.

  3. The turn signal automatically cancels and the lever returns to the center position when the turn is completed.

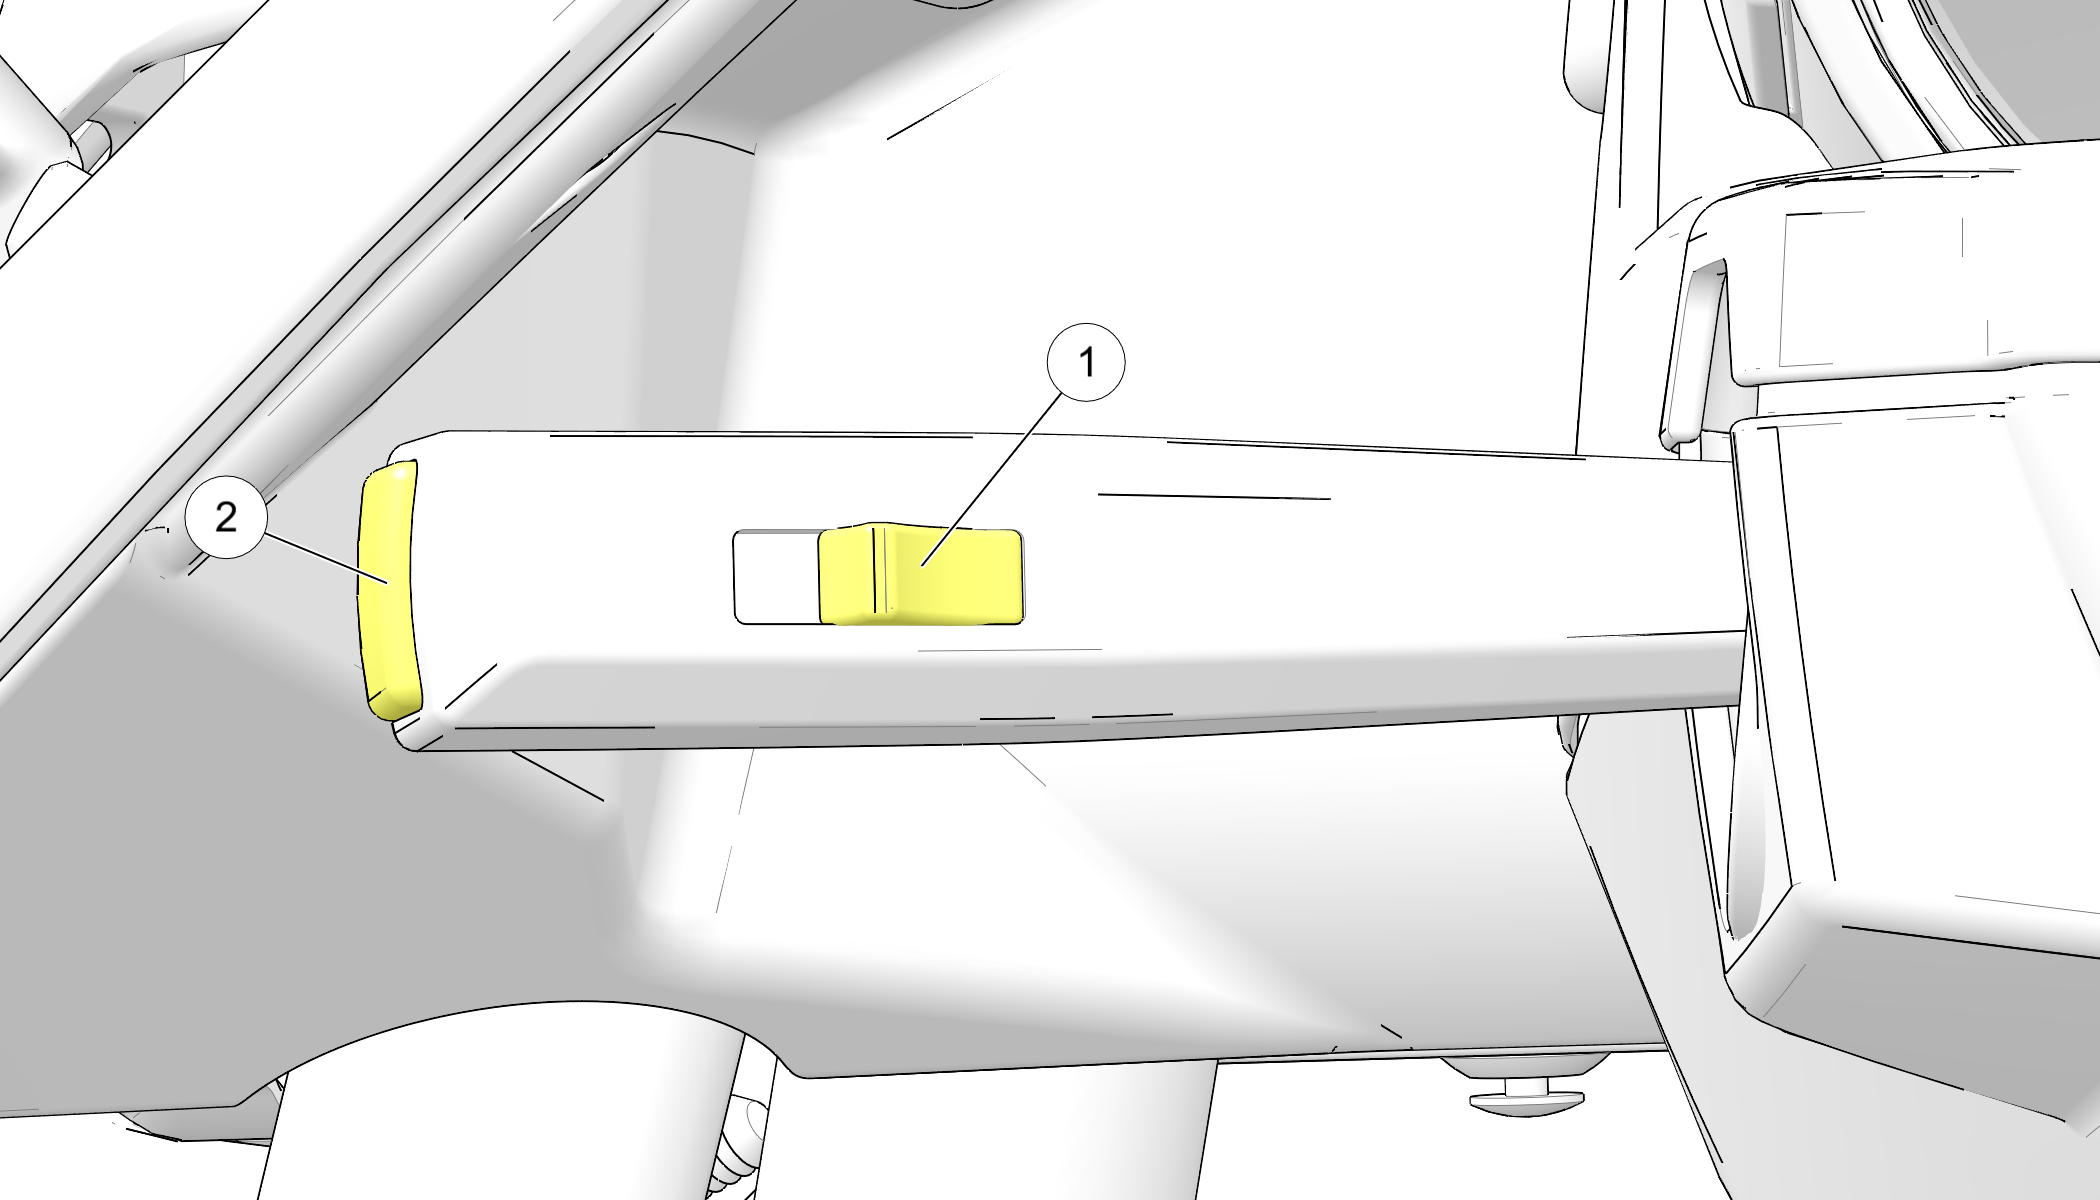
3.3.4.5: Cruise Control Switches

The cruise control switch 1and set button 2 are located on the turn signal lever. Before using the cruise control, read the safety and operation procedures. See Using Cruise Control.

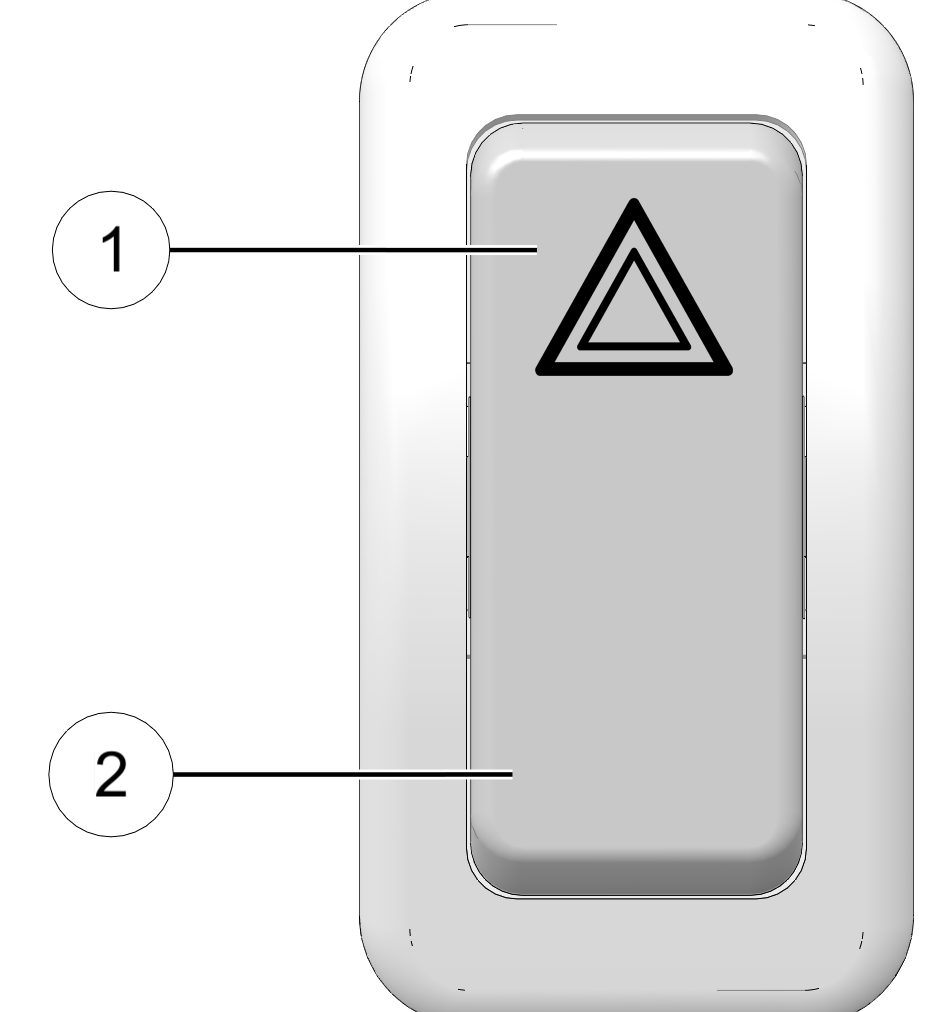
3.3.4.6: Hazard Switch/Emergency Flashers

All turn signals flash when the emergency flashers are activated. Press the top of the hazard switch 1 to turn the flashers on. Press the bottom of the switch 2 to turn the flashers off. The ignition switch does not have to be on to activate the flashers.

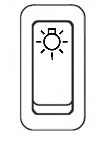
3.3.4.7: Master Lighting Switch (Canada)

The master lighting switch must be in the ON position to allow operation of the high beam headlights.

3.3.4.8: One-Touch Starter Switch

Use the one-touch starter switch to start the engine. Read the engine starting procedures before starting the engine. See the Starting the Engine section for details.

3.3.4.9: Mode Button

The mode button is located on the dashboard near the instrument cluster.

Use the mode button to toggle through the modes of the multi-function display. See Multi-Function Display. Use the mode button to set the display units to either standard or metric units of measurement. See Display Units (Standard/Metric).

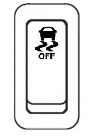
3.3.4.10: Electronic Stability Program (ESP) Switch

The ESP is active by default. This feature helps reduce the risk of accident by providing traction control and stability control. If ESP senses a loss of stability due to loss of traction (skidding) the ESP intervenes by automatically applying brakes to one or more wheels and reducing power to the rear wheel.

WARNING
No stability control, traction control or anti-lock braking system can fully protect you from every situation. Always be mindful of road conditions. Always drive safely and within the limits of the driver, vehicle and road conditions.
WARNING
Stability control, traction control and anti-lock braking systems rely on grip between the tires and the road to function properly. In a hydroplane situation, tires lose contact with the road and the effectiveness of these features may be diminished.
WARNING
Operating the vehicle under normal riding conditions with the ESP disabled could result in an increased risk of loss of vehicle control, rollover, personal injury and death.

  • The electronic stability control system does not compensate for or reduce the risks associated with:

  • excessive speed

  • reduced traction on rough, uneven or loose surfaces

  • poor judgment

  • improper operation

  • hydroplaning

  • Under certain circumstances, such as when the vehicle is stuck in a low traction situation, it may be necessary to disable the ESP temporarily. Always enable the ESP for normal operation.

ESP Switch Operation
Objective Action Comments
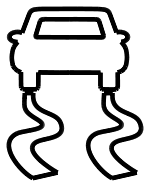
Disable Traction Control Press and release switch Traction Control indicator illuminates in tachometer
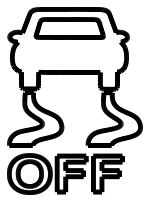
Disable ESP (Traction Control and Stability Control) Press and hold switch for 5 seconds Traction Control indicator and ESP OFF indicator illuminate in tachometer
Enable ESP (if disabled) Press and release switch Traction Control indicator and ESP OFF indicator extinguish

3.3.5: Instrument Cluster

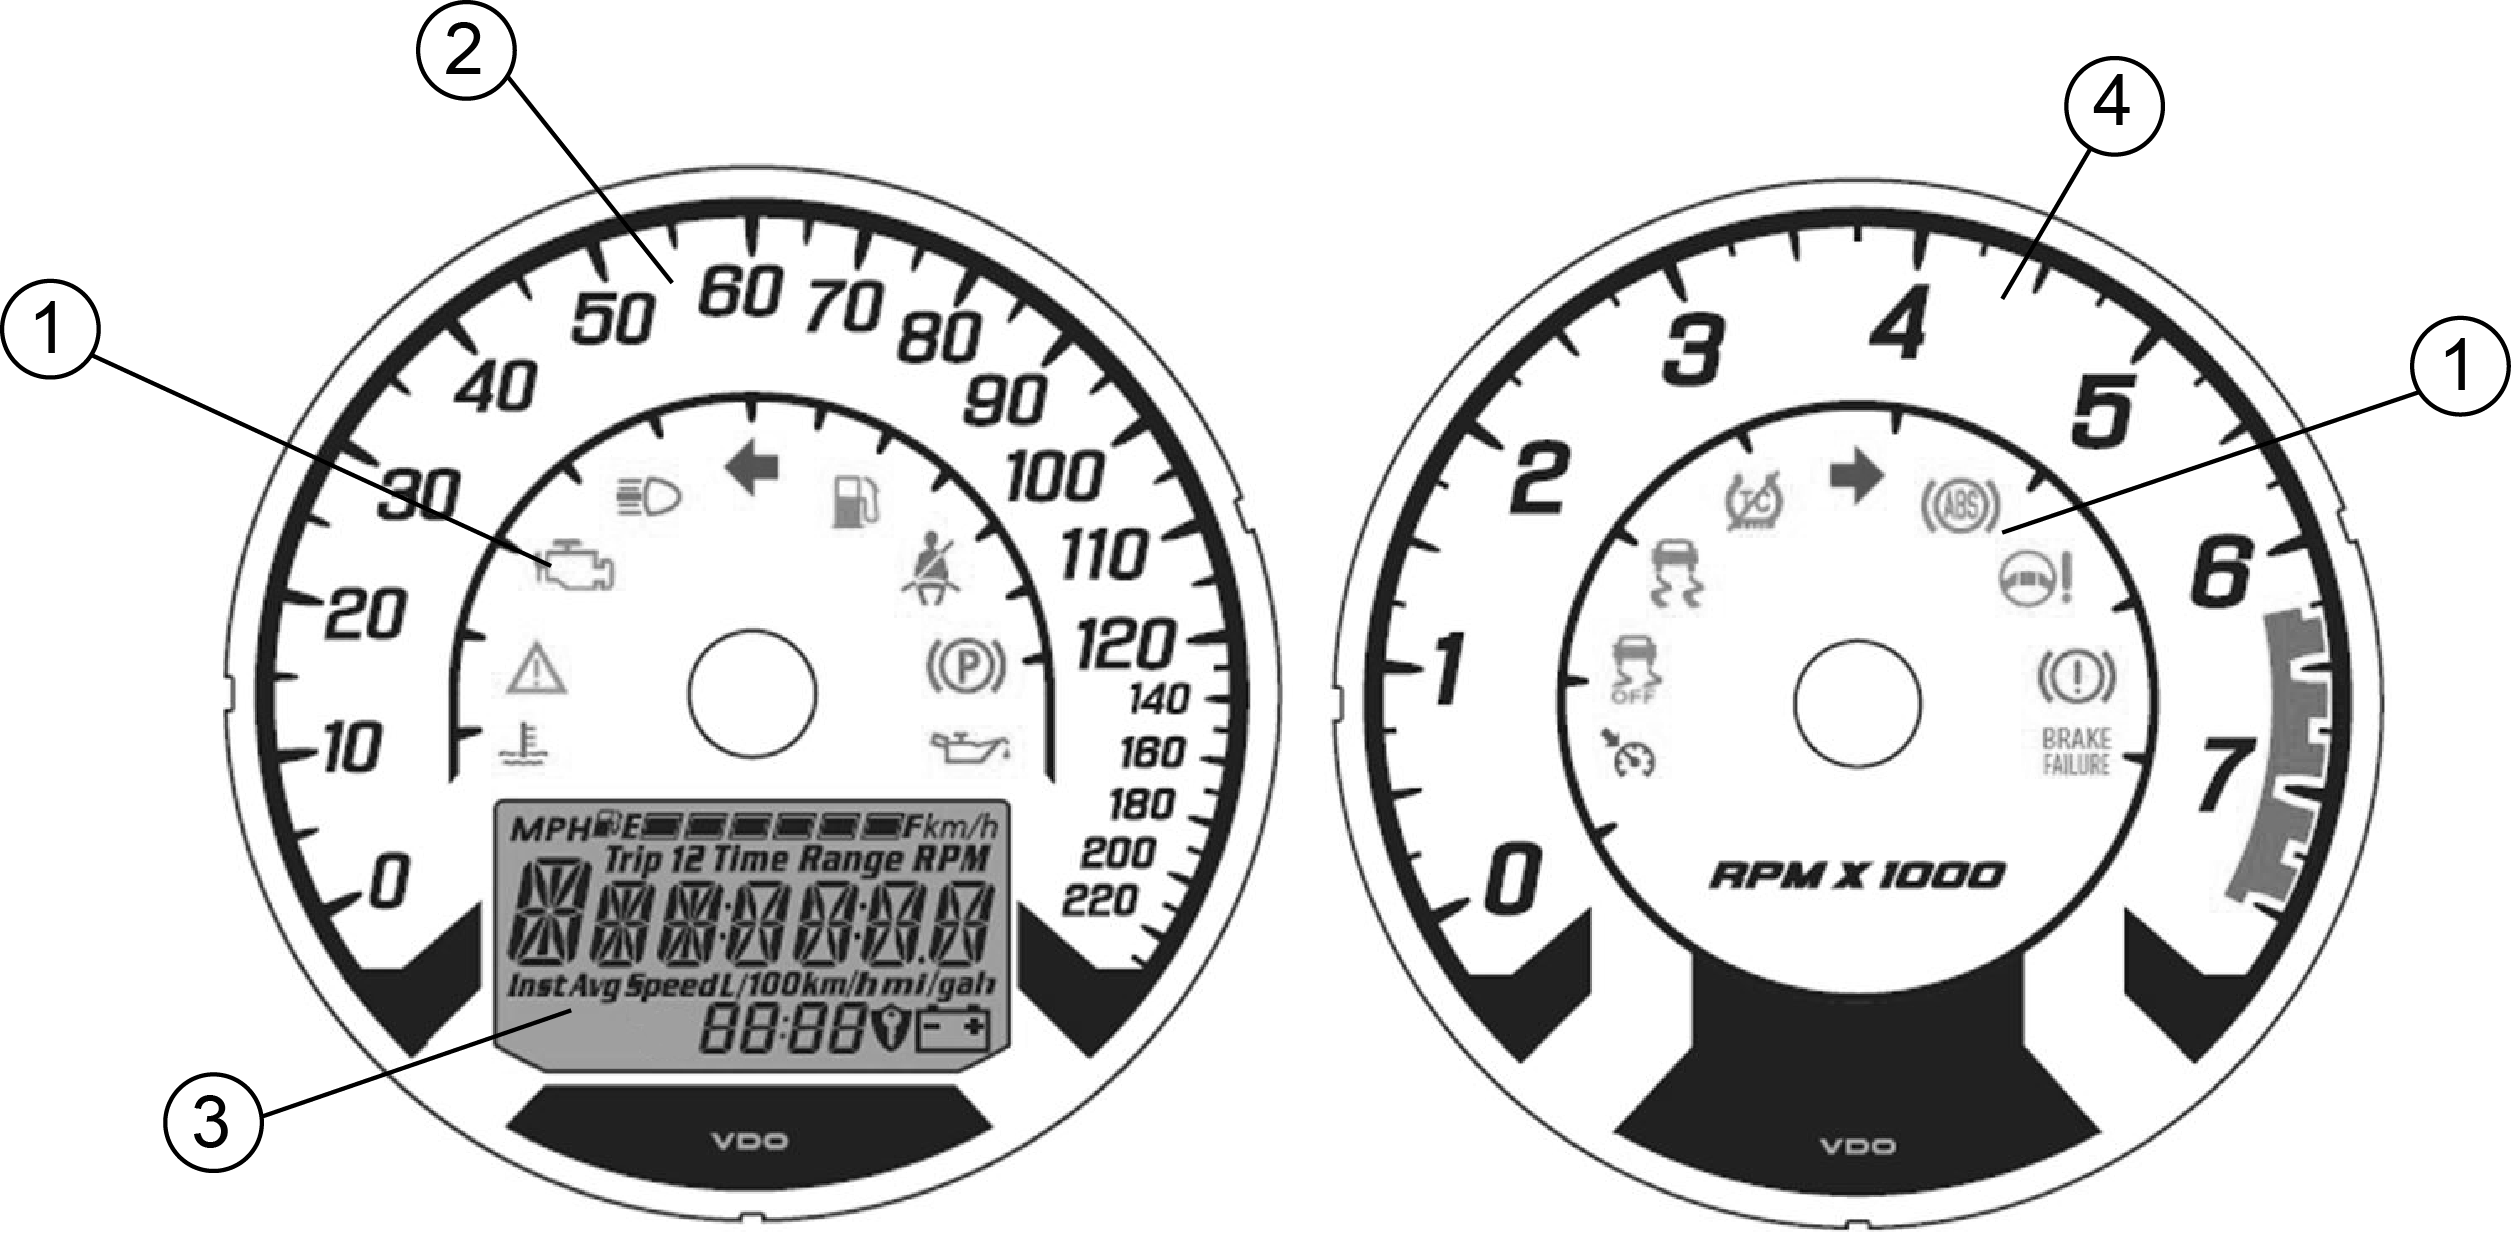
The instrument cluster includes the indicator lamps 1, speedometer 2, multi-function display 3 and tachometer 4.

3.3.5.2: Tachometer

The tachometer displays engine speed in revolutions per minute (RPM). A red line on the face of the gauge indicates the maximum safe engine speed.

WARNING
Excessive engine speed can cause engine damage or failure, which could result in serious injury or death. Do not allow engine speed to exceed the red line.

3.3.6: Indicator Lamps

Lamp Indicates Condition
Cruise Control Engaged Before using the cruise control, read the safety and operation procedures. See Using Cruise Control.
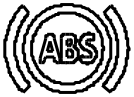
Anti-Lock Brake System Your dealer can assist if this lamp remains on. When the lamp is illuminated, the anti-lock brakes will not activate, but the conventional brake system will continue to operate normally.
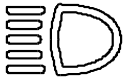
High Beam This lamp illuminates when the headlamp switch is set to high beam.
Turn Signal Hazard Signals The left turn signal is on the speedometer. The right turn signal is on the tachometer. Both arrows flash when either a turn signal or the hazard signal is activated. If a lamp fails, or if there is a short circuit in the signal system, the lamp flashes at more than twice the normal rate.
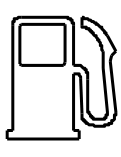
Low Fuel This lamp illuminates when approximately one gallon (3.8 liters) of fuel remains in the fuel tank.
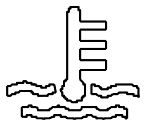
Hot Engine This lamp illuminates to indicate an overheated engine. If the indicator flashes, the overheating condition remains, and the system will automatically reduce engine power.
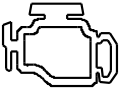
Check Engine If this lamp illuminates while the engine is running, promptly contact an authorized dealer or another qualified person who can assist with diagnosis. If abnormal engine operation is detected the light will remain on as long as the fault condition exists. Retrieve the error codes for diagnosis. See Engine Error Codes. This lamp is also known as a malfunction indicator lamp (MIL).
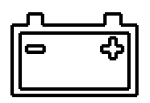
Low Battery Voltage This lamp illuminates when battery voltage is low (or when voltage is above the normal range). Turn non-essential accessories off to conserve power. Make sure the charging system is operating properly.
Traction Control This lamp illuminates if the user disables traction control with the ESP Switch. See Electronic Stability Program (ESP) Switch.
ESP Disabled This lamp illuminates if the user disables the ESP with the ESP Switch. Always enable the ESP for normal operation. See Electronic Stability Program (ESP) Switch.
ESP Intervention The ESP Intervention lamp flashes when the ESP is actively assisting. The lamp illuminates solid to indicate a system failure. If the lamp illuminates solid, your dealer can inspect the vehicle and perform service.
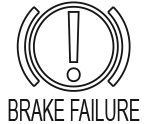
Brake Failure This lamp illuminates if a brake component is not operating properly. Do not operate the vehicle. Inspect brake fluid levels. Your dealer can inspect the vehicle and perform service.
Seat Belt The seat belt lamp illuminates whenever the key is in the ON position and the driver’s seat belt is not fastened.
EPAS Warning This lamp illuminates briefly when the key is turned to the ON position. If the ignition is left on for 5 minutes without starting the engine, the lamp illuminates to indicate that the EPAS has shut down to conserve battery power. If the lamp illuminates after starting the engine, the power steering system is inoperative. Your dealer can inspect the vehicle and perform service if the lamp illuminates after starting the engine.
Park Brake Engaged This lamp illuminates when the park brake is engaged. If it illuminates when the park brake is NOT engaged, your dealer can inspect the vehicle and perform service
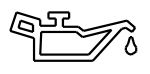
Low Oil Pressure This lamp illuminates if engine oil pressure drops below safe operating pressure. If this lamp illuminates while the engine is running, turn the engine off as soon as safely possible and check the oil level. If the oil level is correct and the lamp remains on after the engine is restarted, turn the engine off immediately.
Chassis Warning The chassis warning lamp is meant for other POLARIS vehicles, and will not illuminate on a SLINGSHOT.

3.3.7: Multi-Function Display

WARNING
Driving while distracted can result in loss of vehicle control, crash and serious injury or death. Use extreme caution when using any device that may take your focus off the road.

Use the mode button to toggle through the modes of the multi-function display. See Mode Button. Press and hold the mode button to reset the trip odometers and average fuel economy.

Modes Available
Fuel Level Gauge Fuel Range
Trip Odometer 1 Average Fuel Economy
Trip Odometer 2 Clock
Ambient Air Temperature  


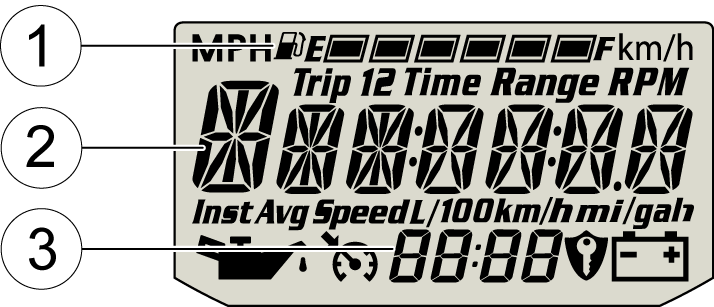
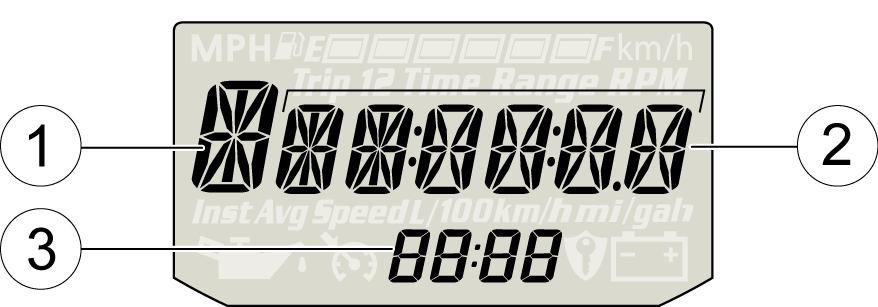
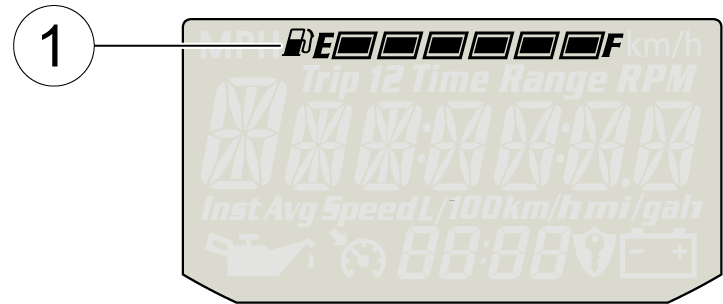
Fuel Gauge Display 1 - The segments of the fuel gauge show the level of fuel in the fuel tank. When the last segment clears, a low fuel warning is activated. All segments including the fuel icon will flash. Refuel immediately

TIP
If the fuel icon fails to display, an open or short circuit has occurred in the fuel sensor circuit. Your dealer can inspect the vehicle and perform service.

Information Display 2 - This area displays odometer, trip meters (2), air temperature and fuel economy.

Clock Display 3 - The clock displays time in a 12-hour or 24-hour format. See Display Units (Standard/Metric) for resetting instructions.

3.3.7.1: Display Units (Standard/Metric)

The display can be changed to display either standard or metric units of measurement.

NOTE
To exit the set-up mode at any time, wait 10 seconds. The display automatically exits and returns to the odometer display.
  Standard Display Metric Display
Distance Miles Kilometers
Fuel U.S. Gallons I = Imperial Gallons Liter = Liters
Temperature Fahrenheit Celsius
Time 12-Hour Clock 24-Hour Clock
  1. Turn the key to the OFF position.

  2. Press and hold the mode button while turning the key to the ON or ACC position.

  3. When the display flashes the distance setting, tap the mode button to advance to the desired setting.

  4. Press and hold the mode button to save the setting and advance to the next display option.

  5. Repeat the procedure to change remaining display settings.

3.3.7.2: Clock Mode

WARNING
The clock must be reset any time the battery has been disconnected or discharged.
  1. Turn the key to the ON position. Use the MODE button to toggle to the odometer display.

  2. Press and hold the MODE button until the hour segment flashes. Release the button.

  3. With the segment flashing, tap the MODE button to advance to the desired setting.

  4. Press and hold the MODE button until the next segment flashes. Release the button.

  5. Repeat steps 3–4 twice to set the 10-minute and 1-minute segments. After completing the 1-minute segment, step 4 will save the new settings and exit the clock mode.

  6. Turn the key to the OFF position.

3.3.7.3: Odometer/Trip Meter Mode

The odometer displays the total distance traveled by the vehicle. Each trip odometer displays distance traveled since the trip odometer was reset. To view the trip odometer, turn the key to the ON position. Use the mode button to toggle to the trip odometer.

To reset the trip odometer, toggle to the trip odometer, then press and hold the mode button until the trip odometer resets.

3.3.7.4: Engine Error Codes

The error screen displays only when the CHECK ENGINE light is on or when it goes on and off during one ignition cycle. Error codes are not stored. When the key is turned OFF, the code and message is lost, but will reappear if the fault reoccurs after restarting the engine.

If the CHECK ENGINE indicator lamp illuminates, retrieve the error codes from the display.

  1. If the error codes are not displayed, use the MODE button to toggle until “Ck ENG” displays on the main line of the display.

  2. Press and hold the MODE button to enter the diagnostics code menu.

  3. Record the numbers displayed in the gear position (if any), clock and odometer displays.

  4. Press the MODE button to advance to the next error code.

  5. Press and hold the MODE button to exit the diagnostics code menu.

  6. See your authorized dealer for code details and diagnosis.

  • 1 Error Code Number (0-9)

  • 2 Suspect Parameter Number (SPN)

  • 3 Failure Mode Indicator (FMI)

3.3.8: Display Screen

WARNING
Driving while distracted can result in loss of vehicle control, crash, and injury. We strongly recommend that you use extreme caution when using any device that may take your focus off the road. Your primary responsible is the safe operating of your vehicle. We recommend against the use of any hand-held device while driving and encourage the use of voice-operated systems when possible. Make sure you are aware of all applicable local laws that may affect the use of electronic devices while driving.

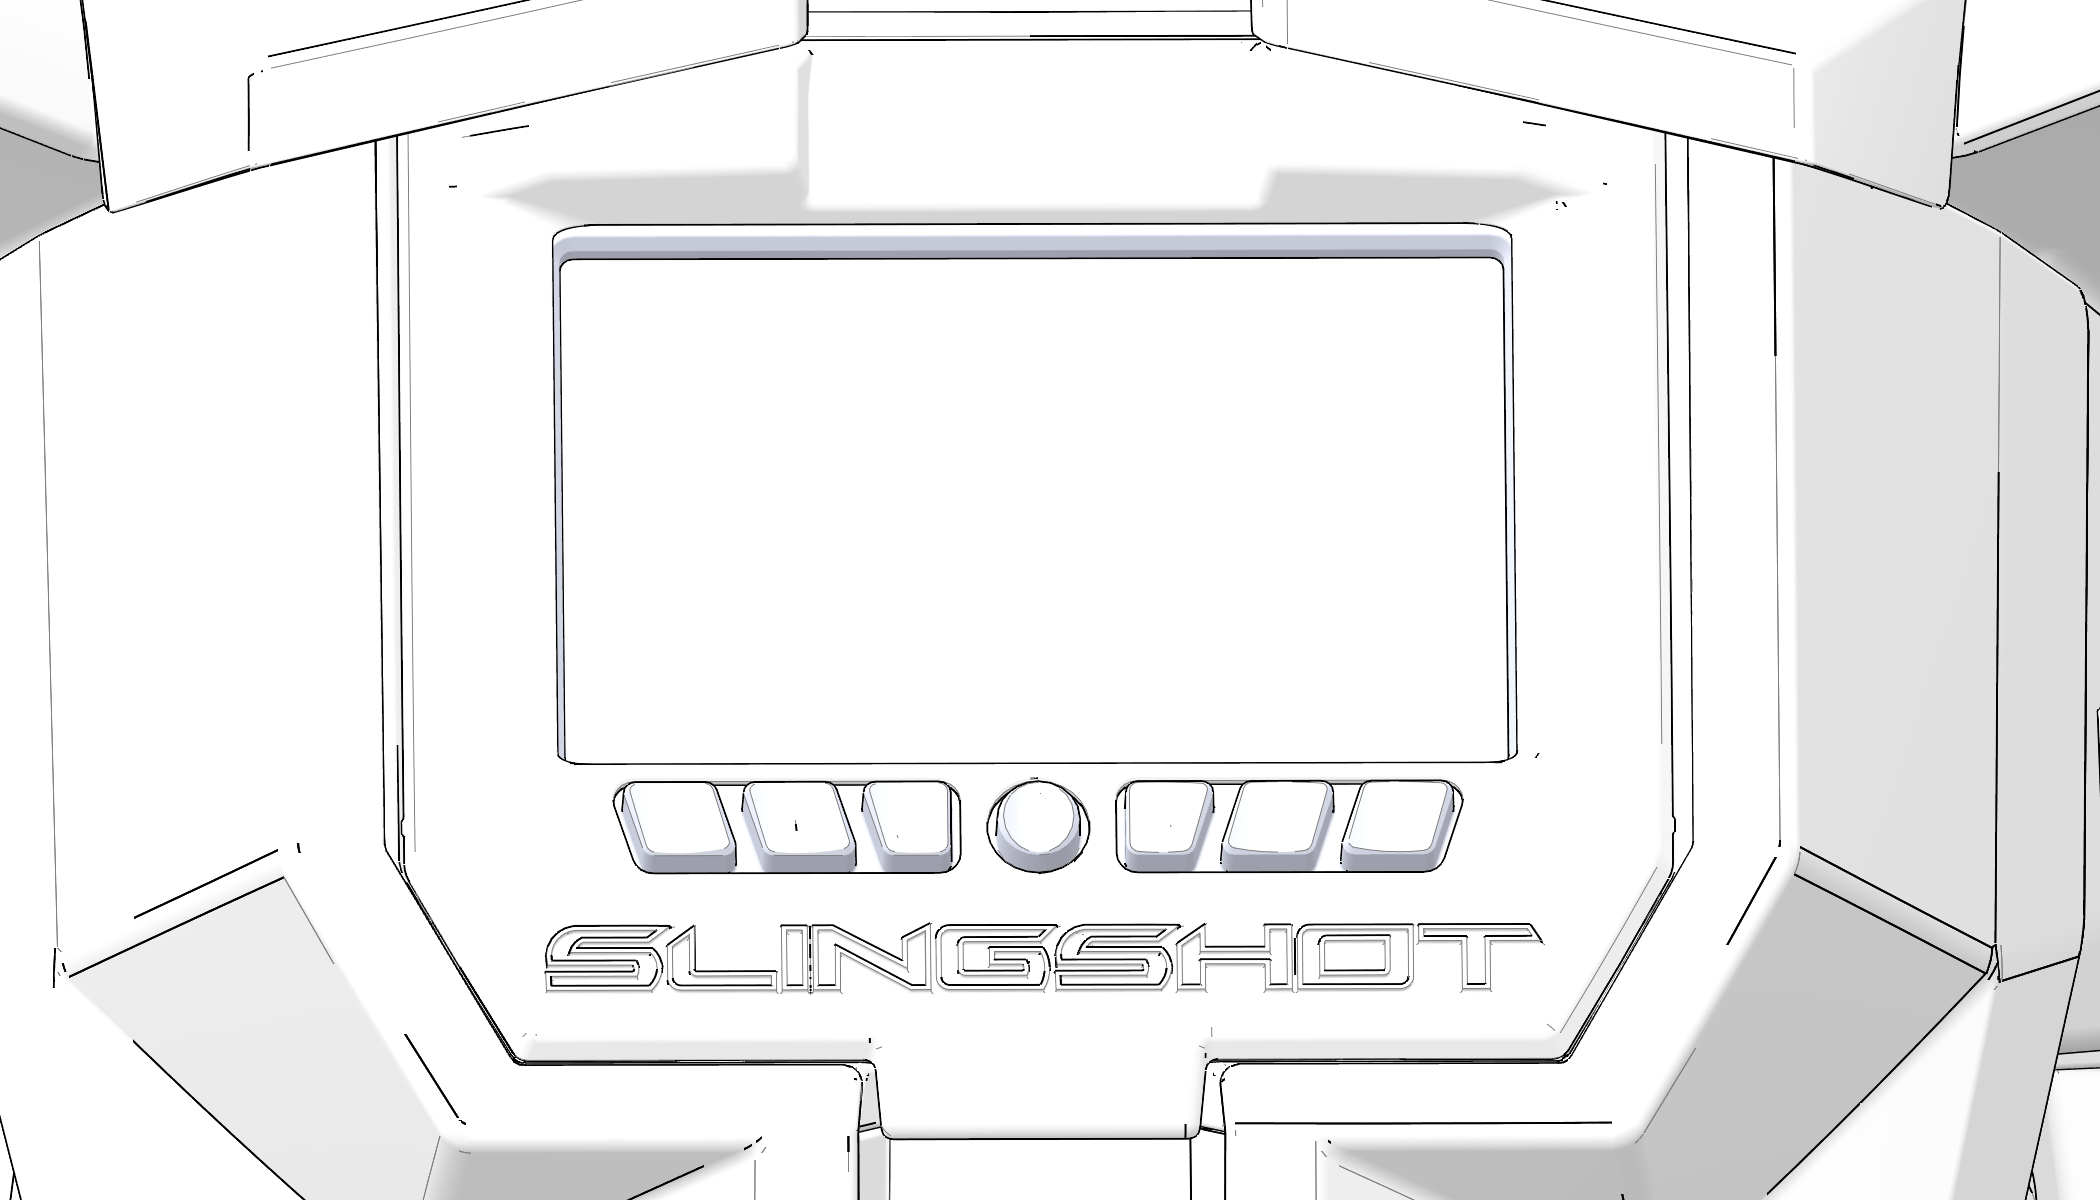
3.3.8.1: Ride Command™ Buttons

Button Function
Rider Screen Button

Press the Rider Screen button to access the customizable split screen menu system, access to ride data, vehicle status, and vehicle information.

Navigation Button

Press the Navigation button to access Ride Command™ navigation features (if equipped), find directions, and look up addresses, gas stations, and other points of interest.

Bluetooth Button

Press the Bluetooth button to pair a phone or headset to the Ride Command™ display.

Power Button

Press the Display On/Off button to turn the Ride Command™ display on and off while motorcycle is in use.

Audio Button

Press the Audio Button to change the audio source, and set radio presets.

Volume Decrease Button

Press the Volume Decrease Button to adjust the volume downward.

Volume Increase Button

Press the Volume Increase Button to adjust the volume upward.

3.3.8.2: Ride Command™ Settings

The Settings Menu is where you can personalize your Navigation System. You can configure settings, such as Language, Speed Units, Time Formats, as well as audio and vehicle settings. The Settings Menu is composed of 4 categories that allow you to customize your screens; General, Time, Audio, and Vehicle.

General

From the General settings menu you can do the following:.

  • Change the Language

  • Set the Speed Units (MPH or KPH)

  • Set the Temperature Units (F or C)

  • Set the Volume Units (Gal or L)

  • Set the Pressure Units (PSI or Bar)

  • Update Software

  • Update Maps

Time

From the Time Settings you can do the following:

  • Set the Time Format (12 hour or 24 hour)

  • Enable GPS Time, which automatically sets the time to the time zone you are currently in

  • Set the time

  • Enable/Disable Daylight Saving Time

Audio

From the Audio Settings you can do the following:

  • Enable Automatic Volume Control

  • Set the Equalizer settings

  • Adjust the Fade and Balance

  • Clear AM/FM Presets

  • Set the Radio Tuner Region

Vehicle

From the Vehicle Settings you can do the following:

  • Oil Life/ Service Reset

  • Access Vehicle Diagnostics

  • View GPS Status

  • Override Automatic Power Down

NOTICE
More information about the Ride Command display can be found on the Polaris website: www.polaris.com/en-us/slingshot/ride-command.

3.3.8.3: Back-Up Camera (if equipped)

Some SLINGSHOT vehicles are equipped with an accessory back-up camera. The back-up camera is not intended to replace standard driving practices of checking your surroundings before operating in reverse. Always check for pedestrians, vehicles and other obstacles before operating in reverse.

If your vehicle is equipped with a back-up camera, view the image on the display screen as needed while operating in reverse. See Reverse Operation(Manual Transmission). The camera and display screen automatically activate when the transmission is shifted to reverse gear.

3.3.9: Starter Interlock Switch

The starter interlock switch prevents the electric starter from operating when the clutch is engaged (pedal released). Read the procedure outlined in the Starting the Engine section before starting the engine.

WARNING
Never start the engine with the transmission in gear and the clutch disengaged unless you are properly seated with helmet on, seat belt secured and brakes applied.

3.3.10: Electronic Power-Assisted Steering

Electronic power-assisted steering engages when the ignition key is turned to the ON position. EPAS remains engaged whether the vehicle is moving or idle.

See Indicator Lamps for EPAS warning indicator information.

3.3.11: Foot Controls (Pedals)

3.3.11.1: Clutch Pedal

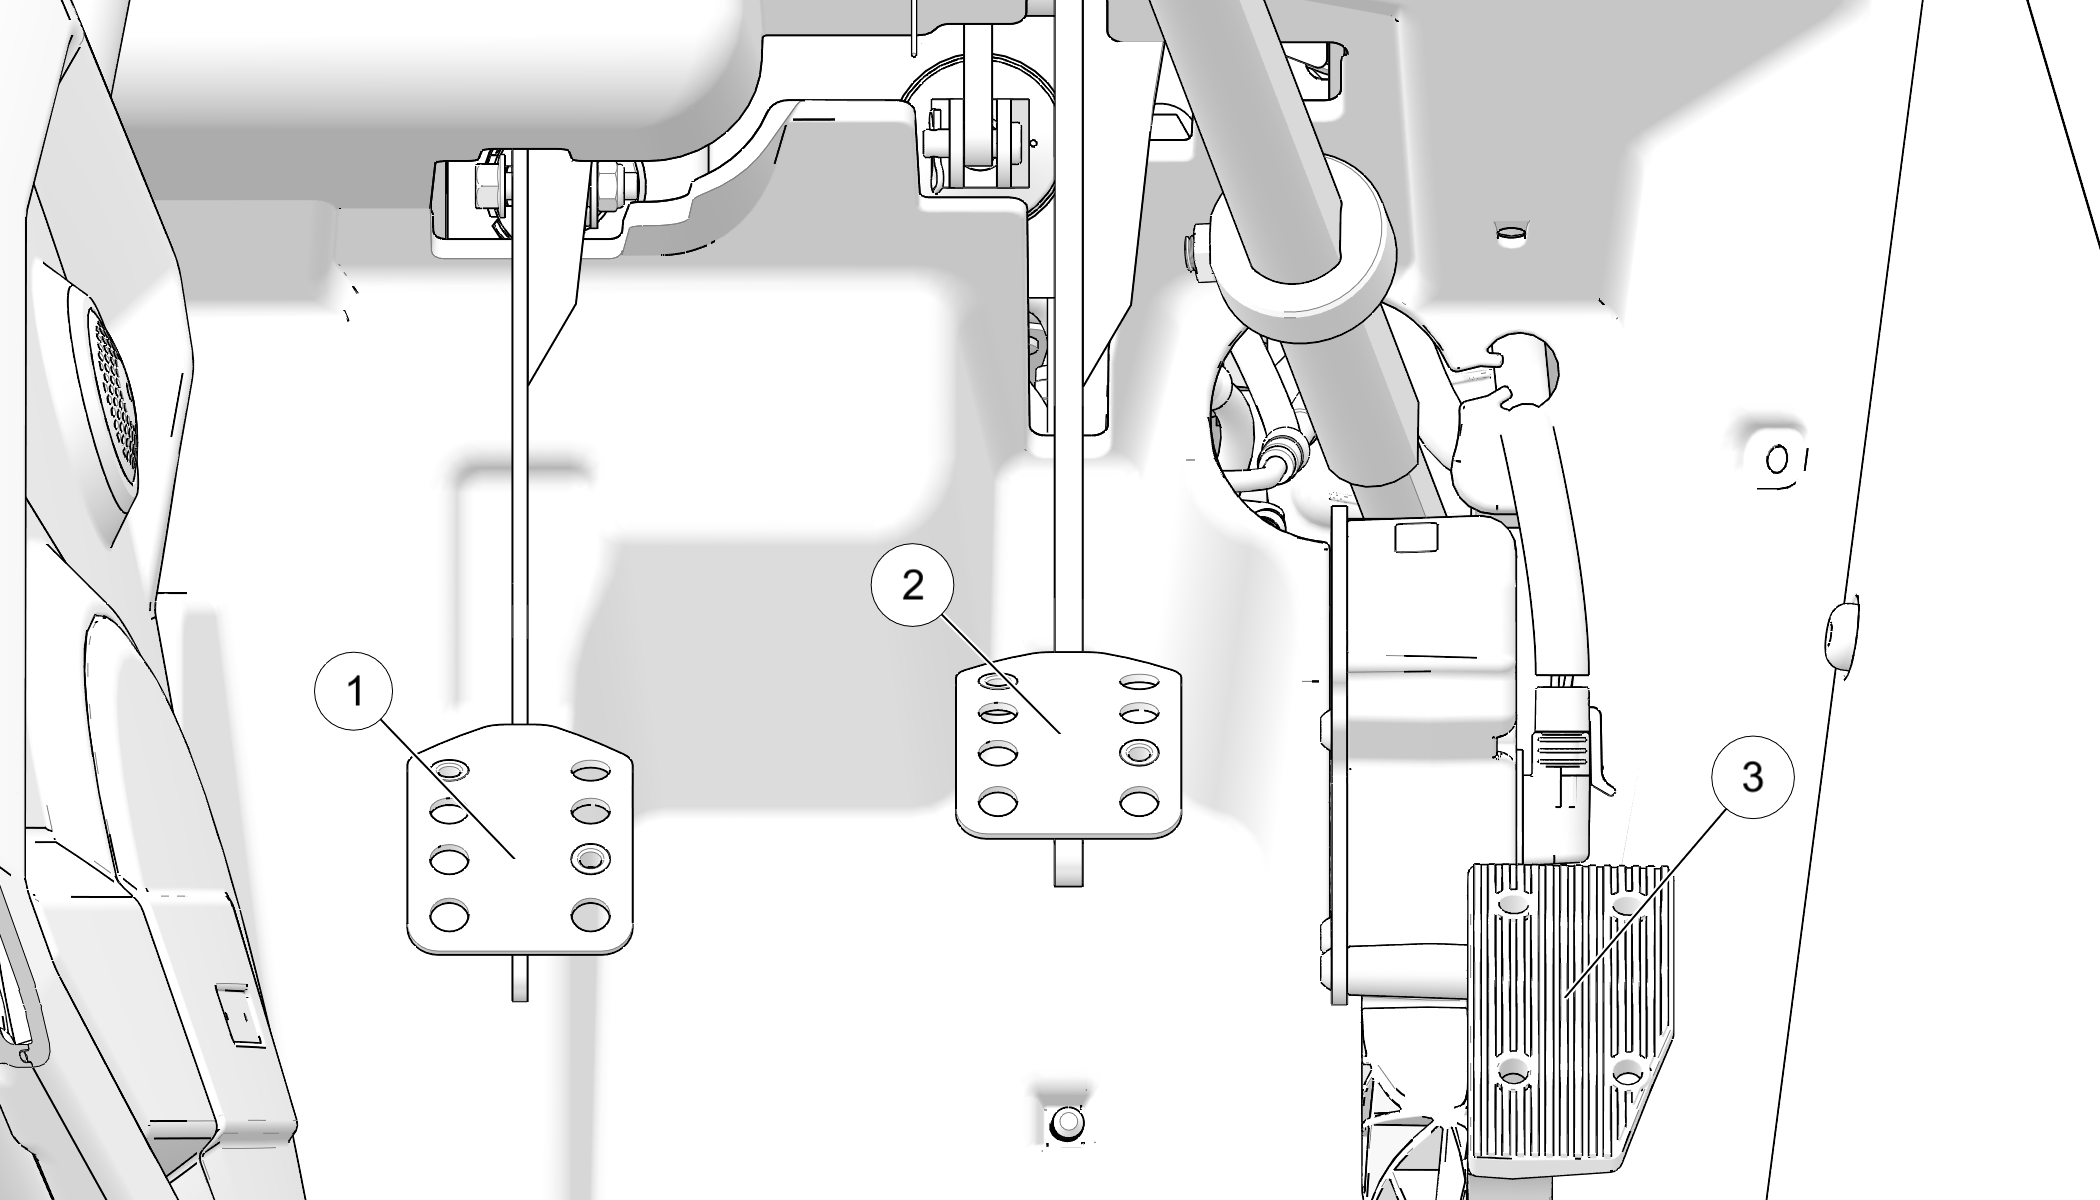
Depress the clutch pedal 1 (disengage the clutch) before shifting gears. For smooth clutch operation, depress the pedal quickly and release it gradually.

  • To disengage the clutch, press the pedal toward the floor.

  • To engage the clutch, gradually release the clutch pedal.

3.3.11.2: Brake Pedal

Depress the brake pedal 2 to slow or stop the vehicle. Apply the brakes while starting the engine.

NOTE
The SLINGSHOT brakes are not power-assisted. Braking the SLINGSHOT may feel different than braking other types of vehicles. Practice braking in a safe area to become familiar with the feel of the SLINGSHOT brakes before driving in traffic.

3.3.11.3: Throttle Pedal

Depress the throttle pedal 3 to increase engine speed and (when the transmission is in gear) vehicle speed. Spring pressure returns the pedal to the rest position when released. Always check that the throttle pedal returns normally before starting the engine.

3.3.12: Brakes

3.3.12.1: Anti-Lock Brake System (ABS)

The anti-lock brake system automatically adjusts the brake pressure as needed to provide optimum braking control, reducing the chance of wheel lock-up during hard braking events or when braking on rough, uneven, slippery or loose surfaces.

WARNING
No stability control, traction control or anti-lock braking system can fully protect you from every situation. Always be mindful of road conditions. Always drive safely and within the limits of the driver, vehicle and road conditions.
WARNING
Stability control, traction control and anti-lock braking systems rely on grip between the tires and the road to function properly. In a hydroplane situation, tires lose contact with the road and the effectiveness of these features may be diminished.
IMPORTANT
When operating the vehicle in wet or reduced traction conditions, always leave the traction control and stability control enabled.
  • The anti-lock brake system cannot be turned off.

  • When the lamp is illuminated, the anti-lock brakes will not activate, but the conventional brake system will continue to operate normally. See your dealer or another qualified person promptly for service.

  • Operating with non-recommended tires or improper tire pressure may reduce the effectiveness of the anti-lock brake system. Always use the recommended size and type of tires specified for your vehicle. Always maintain the recommended tire pressure.

  • Always ensure that your tires have sufficient tread depth. See Tire Tread Depth for recommended tire depth.

  • The anti-lock brake system will not prevent wheel lockup, loss of traction or loss of control under all conditions. Always adhere to all safe operating practices as recommended.

  • It is not unusual to leave tire marks on the road surface during a hard braking event.

  • The anti-lock brake system does not compensate for or reduce the risks associated with:

    • excessive speed

    • reduced traction on rough, uneven or loose surfaces

    • poor judgment

    • improper operation

    • hydroplaning

    • wet or slippery road conditions

    • unforeseen hazards

3.3.13: Park Brake Lever

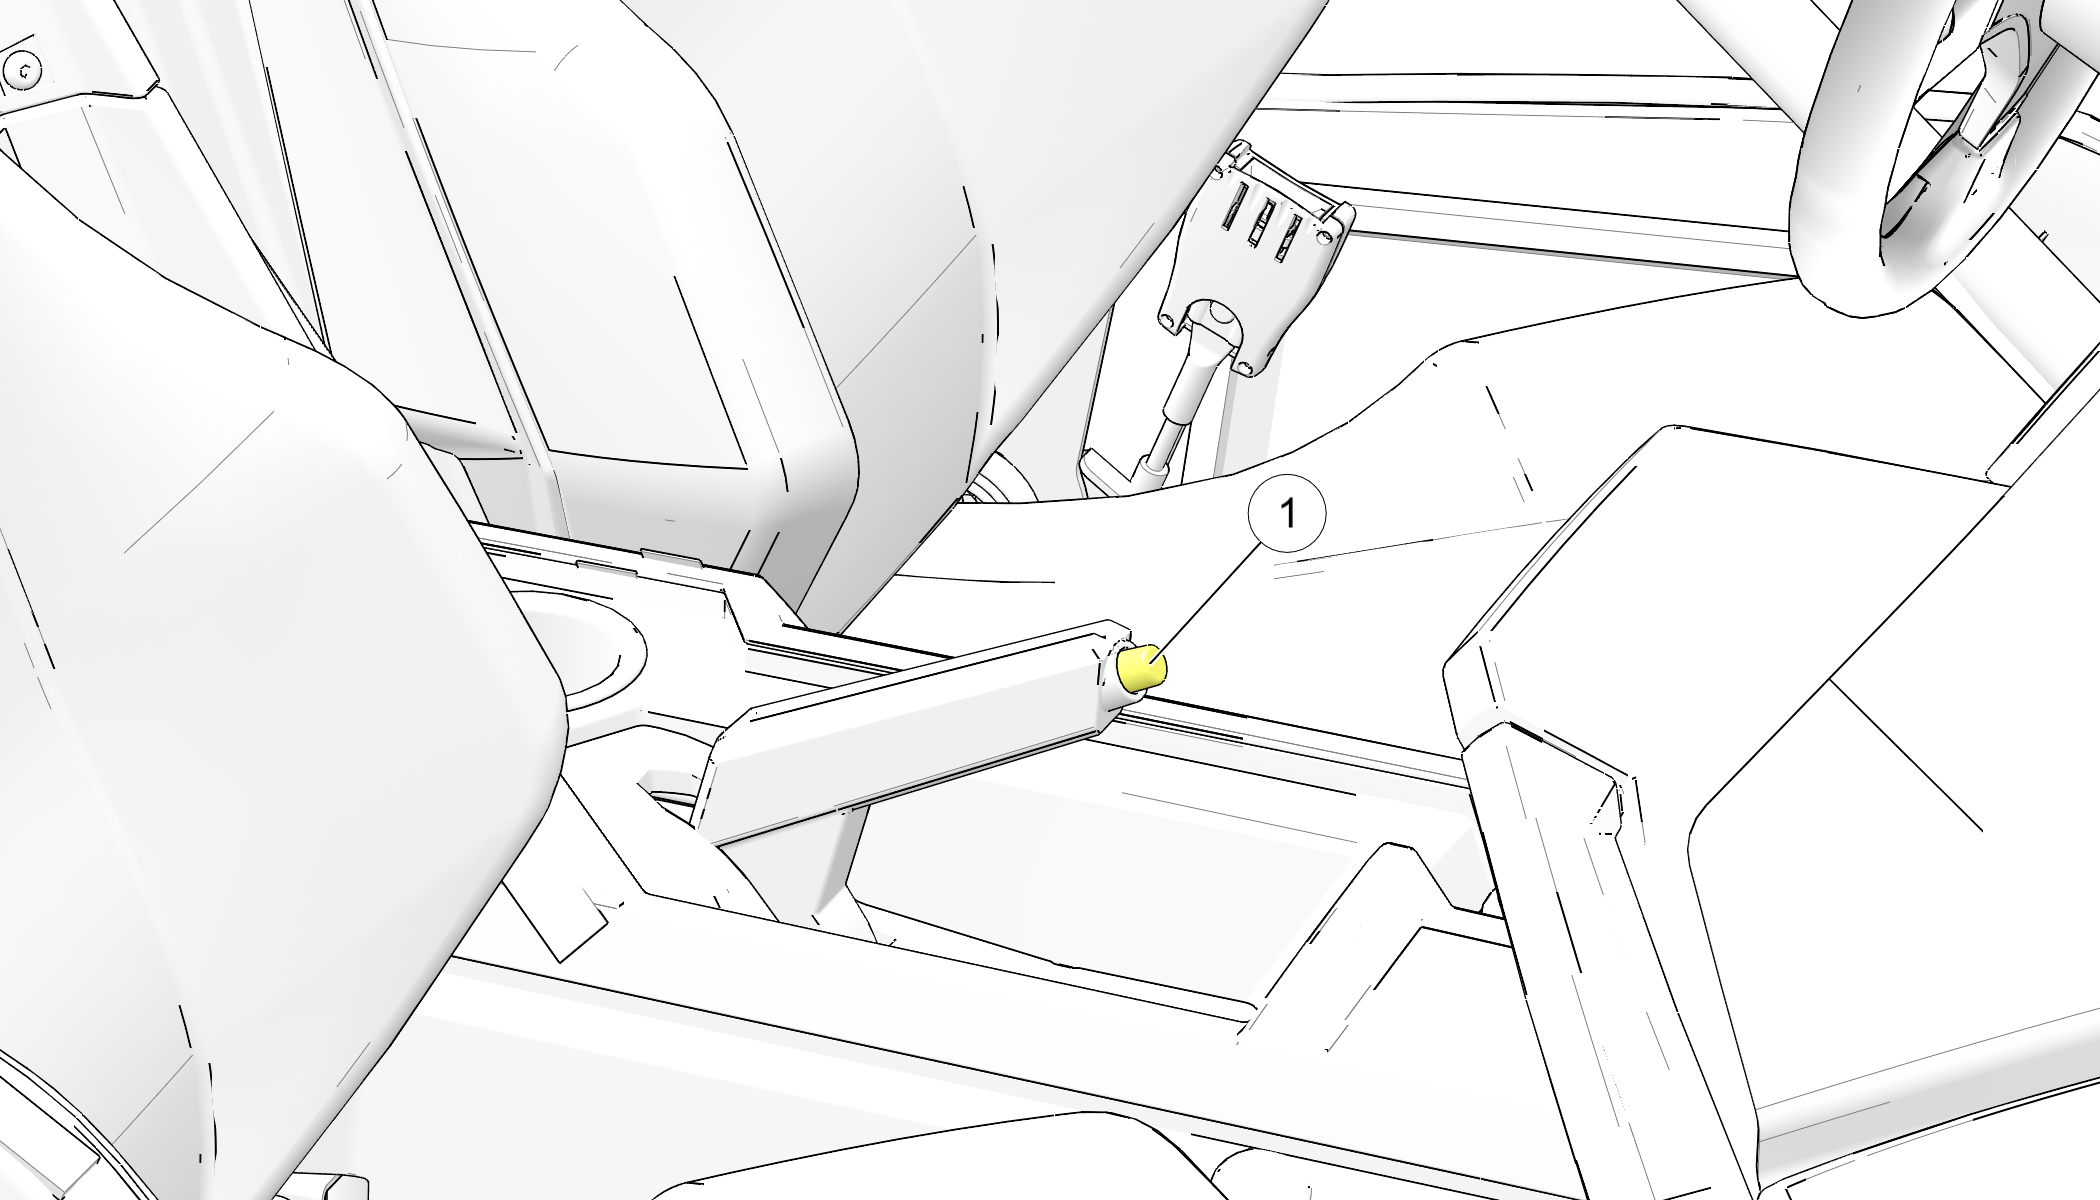
The park brake lever is located between the seats. To help prevent the vehicle from rolling, engage the park brake when the vehicle is parked. When the park brake is engaged and the park brake indicator is illuminated, the vehicle will not move. Always apply the brakes before engaging or releasing the park brake.

  1. To engage the park brake, apply the brakes. Pull the park brake lever upward as far as possible.

  2. To release the park brake, apply the brakes. Press the park brake release 1 inward and move the lever downward as far as possible.


WARNING
Always make sure parking brake is fully released before attempting to move the vehicle. Failure to do so can cause damage to the rear brakes.

3.3.14: Adjustable Seats

3.3.14.1: Seatback Adjustments

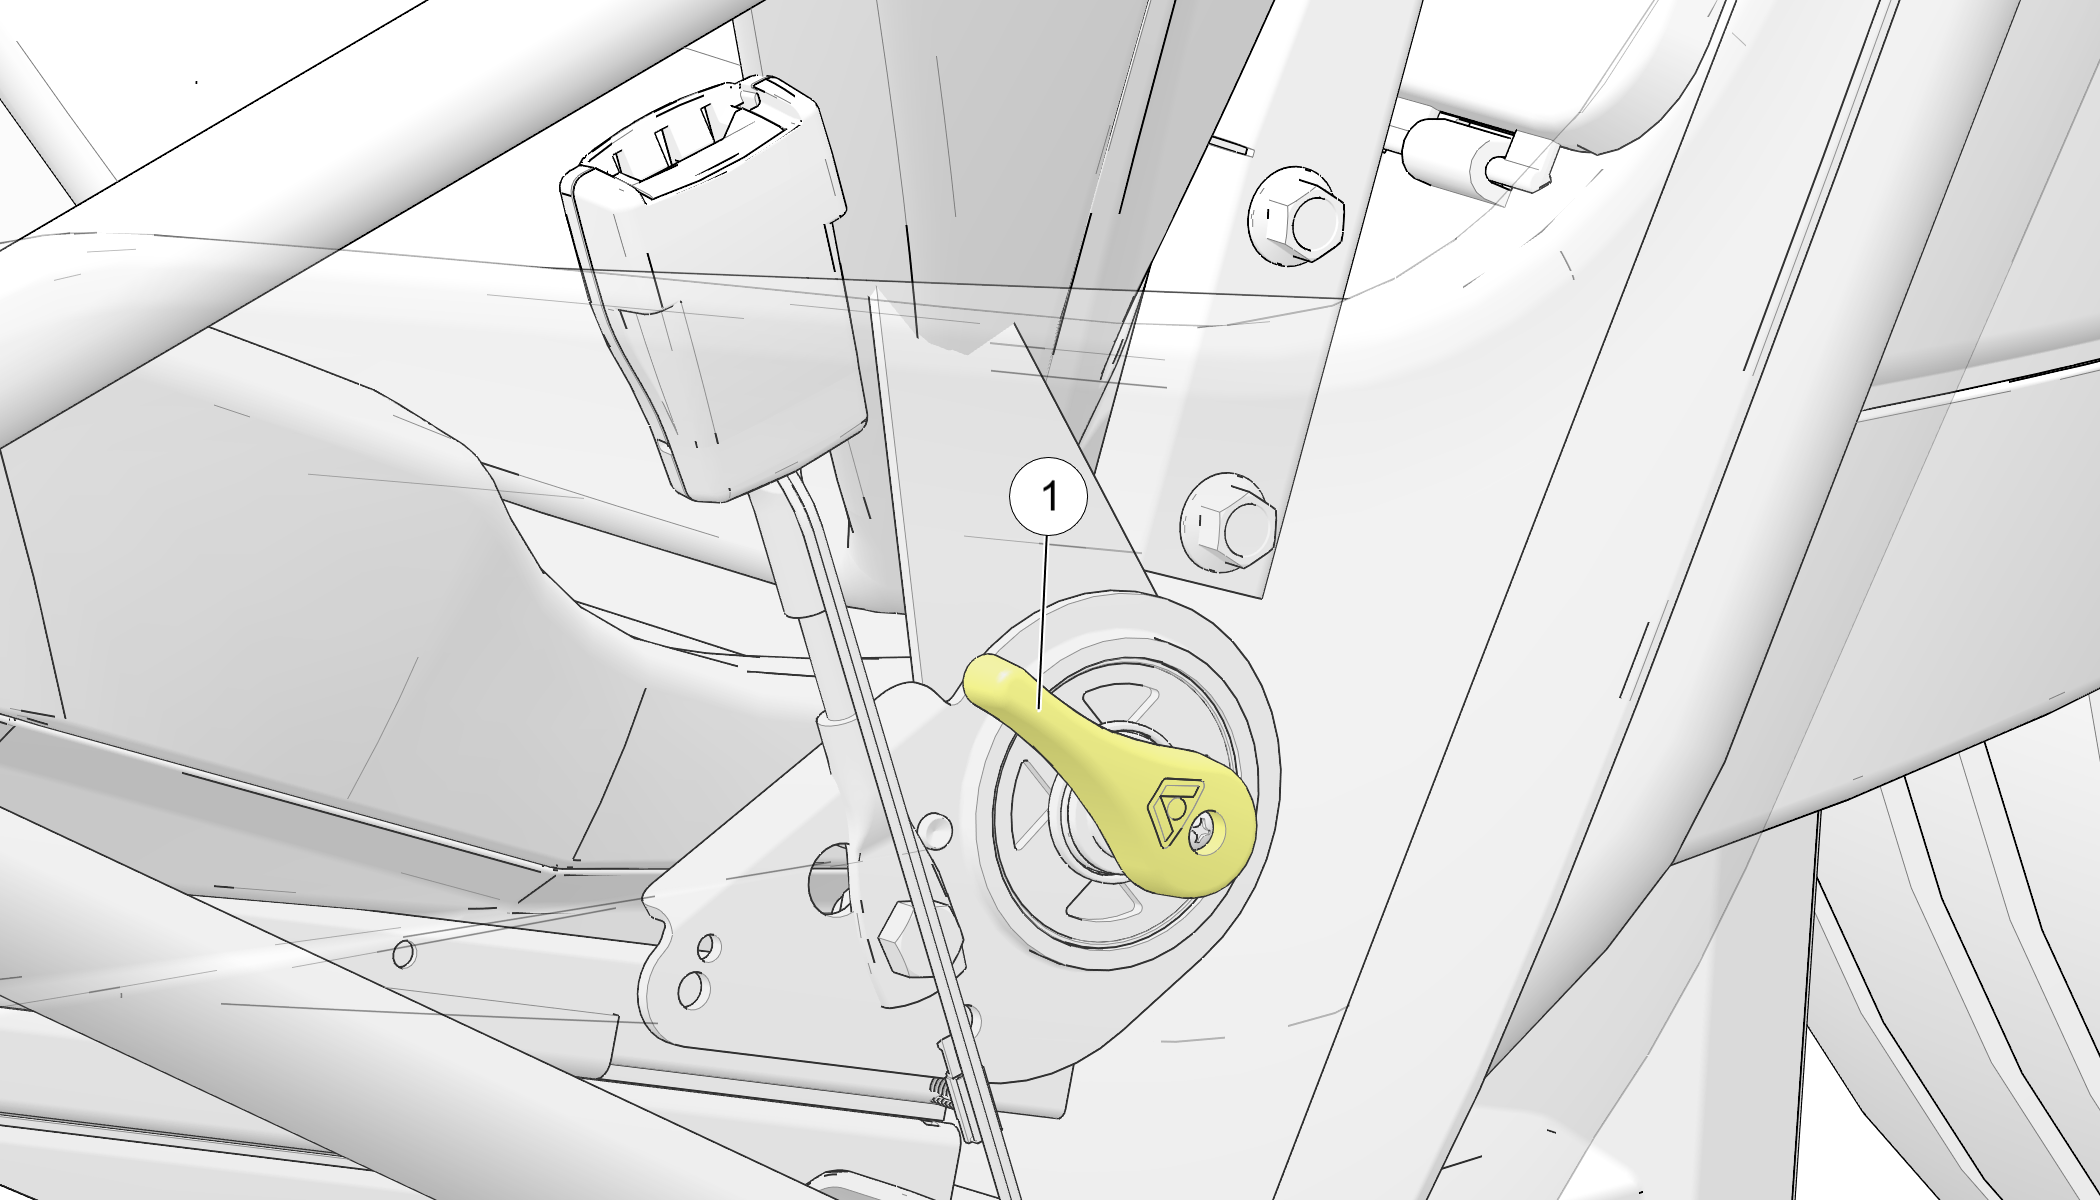
Lift and hold the seat adjustment lever 1 to release the seatback latch. Adjust seatback angle or tilt the seatback forward to access the storage compartment. Release the lever. After adjusting, make sure the seatback latches securely in place

3.3.14.2: Driver’s Seat Adjustments

To adjust the driver’s seat forward or rearward, pull upward on the bar under the front edge of the seat. Slide the seat to the desired position and release the lever. Make sure the seat latches securely in place.

WARNING
Making adjustments while driving could result in loss of control. Never make adjustments while driving.

3.3.15: Adjustable Steering Wheel

The steering wheel can be tilted upward or downward for rider preference.

WARNING
Making adjustments while driving could result in loss of control. Never make adjustments while driving.
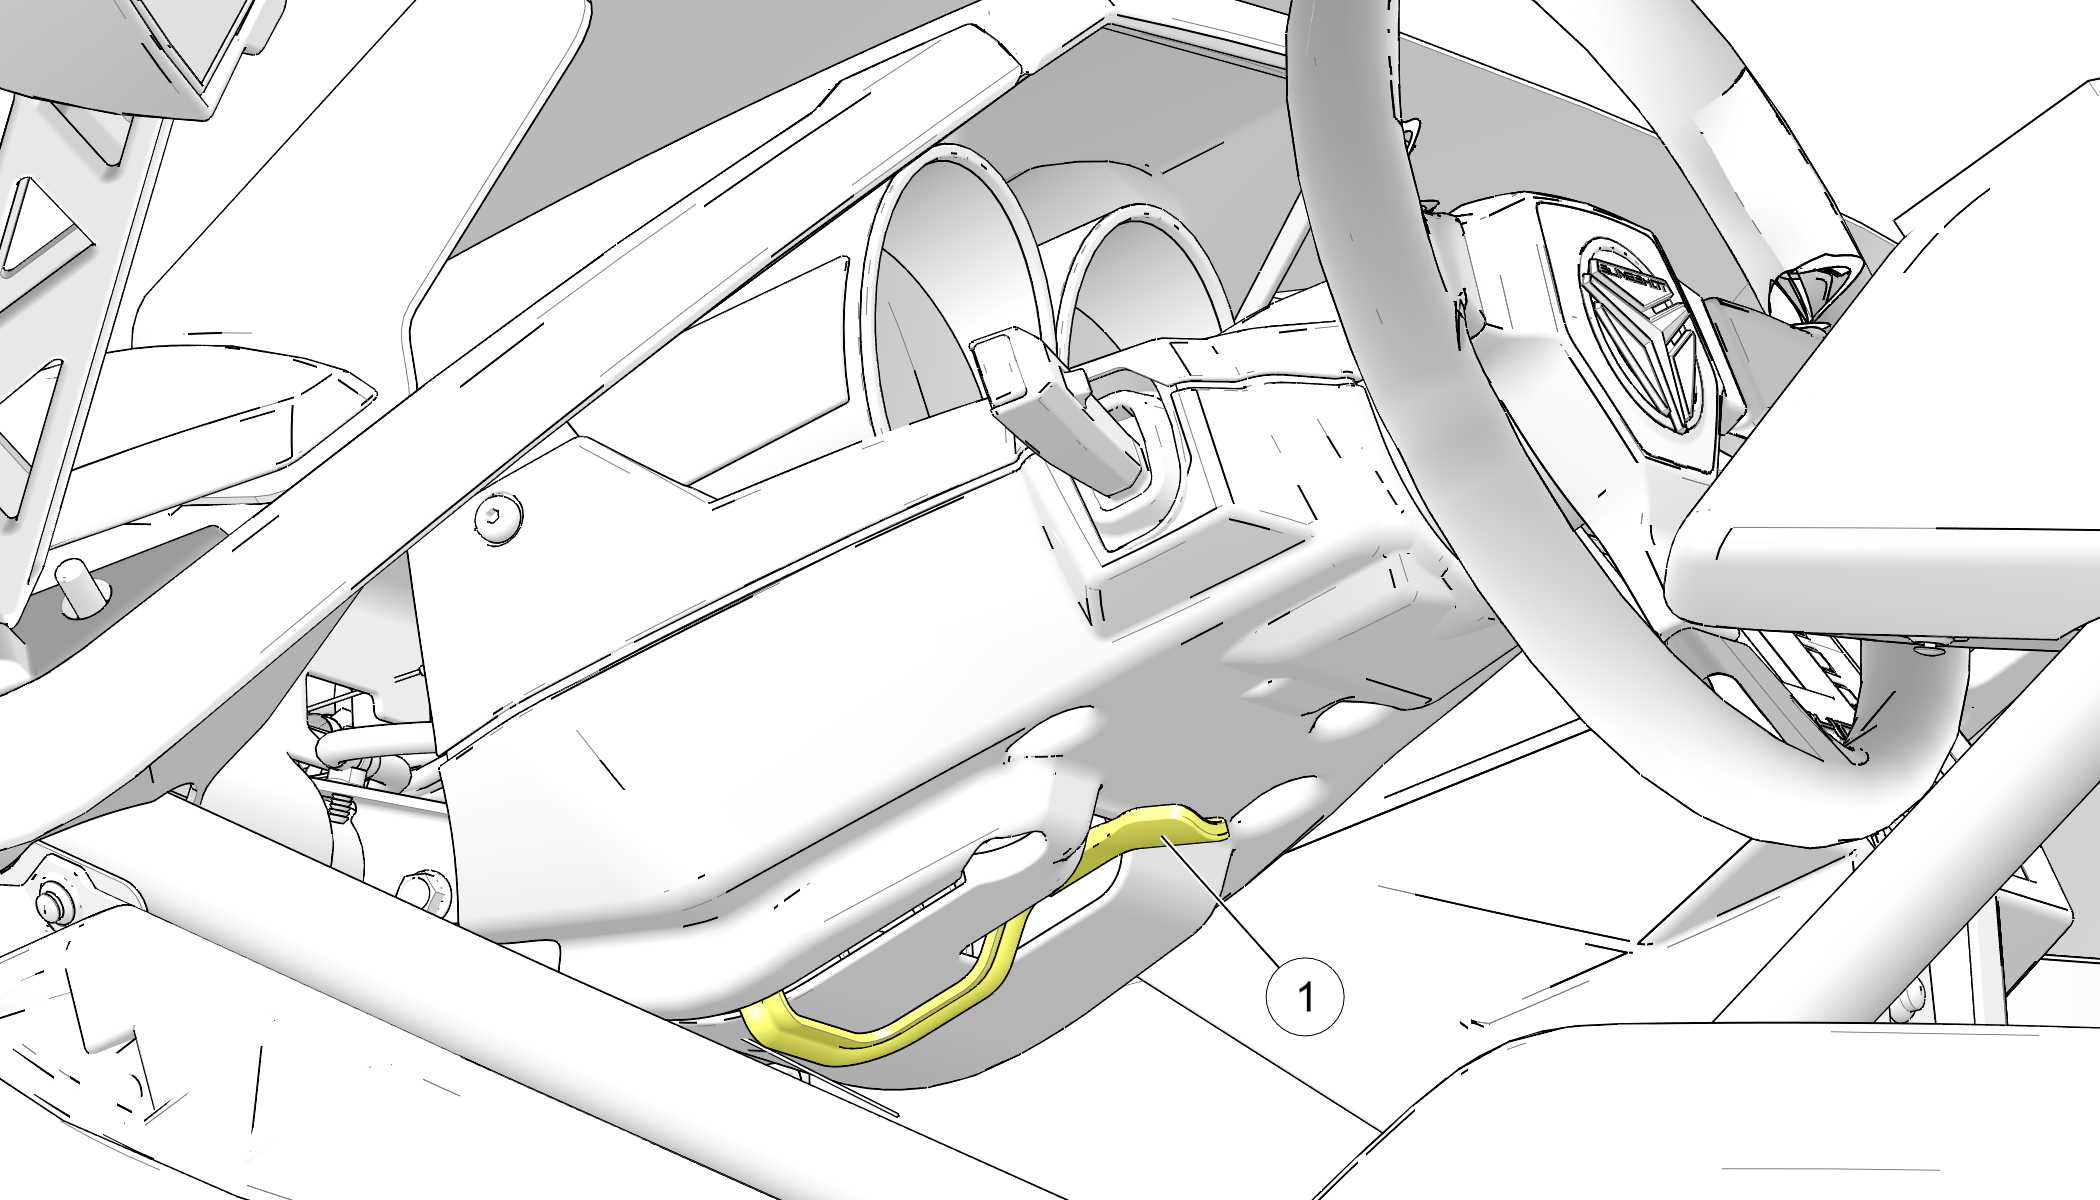
  1. Pull the adjustment lever downward to unlock the steering column 1.

  2. Move the steering wheel upward or downward to the desired position.

  3. Push the adjustment lever upward to lock the steering column in position. Make sure the lever is fully seated.

WARNING
Make sure the wheel is positioned so that it rotates freely and allows enough room between your legs and the rim of the wheel for your hands to pass without obstruction. Failure to do this could cause difficulty steering and result in loss of control.

3.3.16: Hood

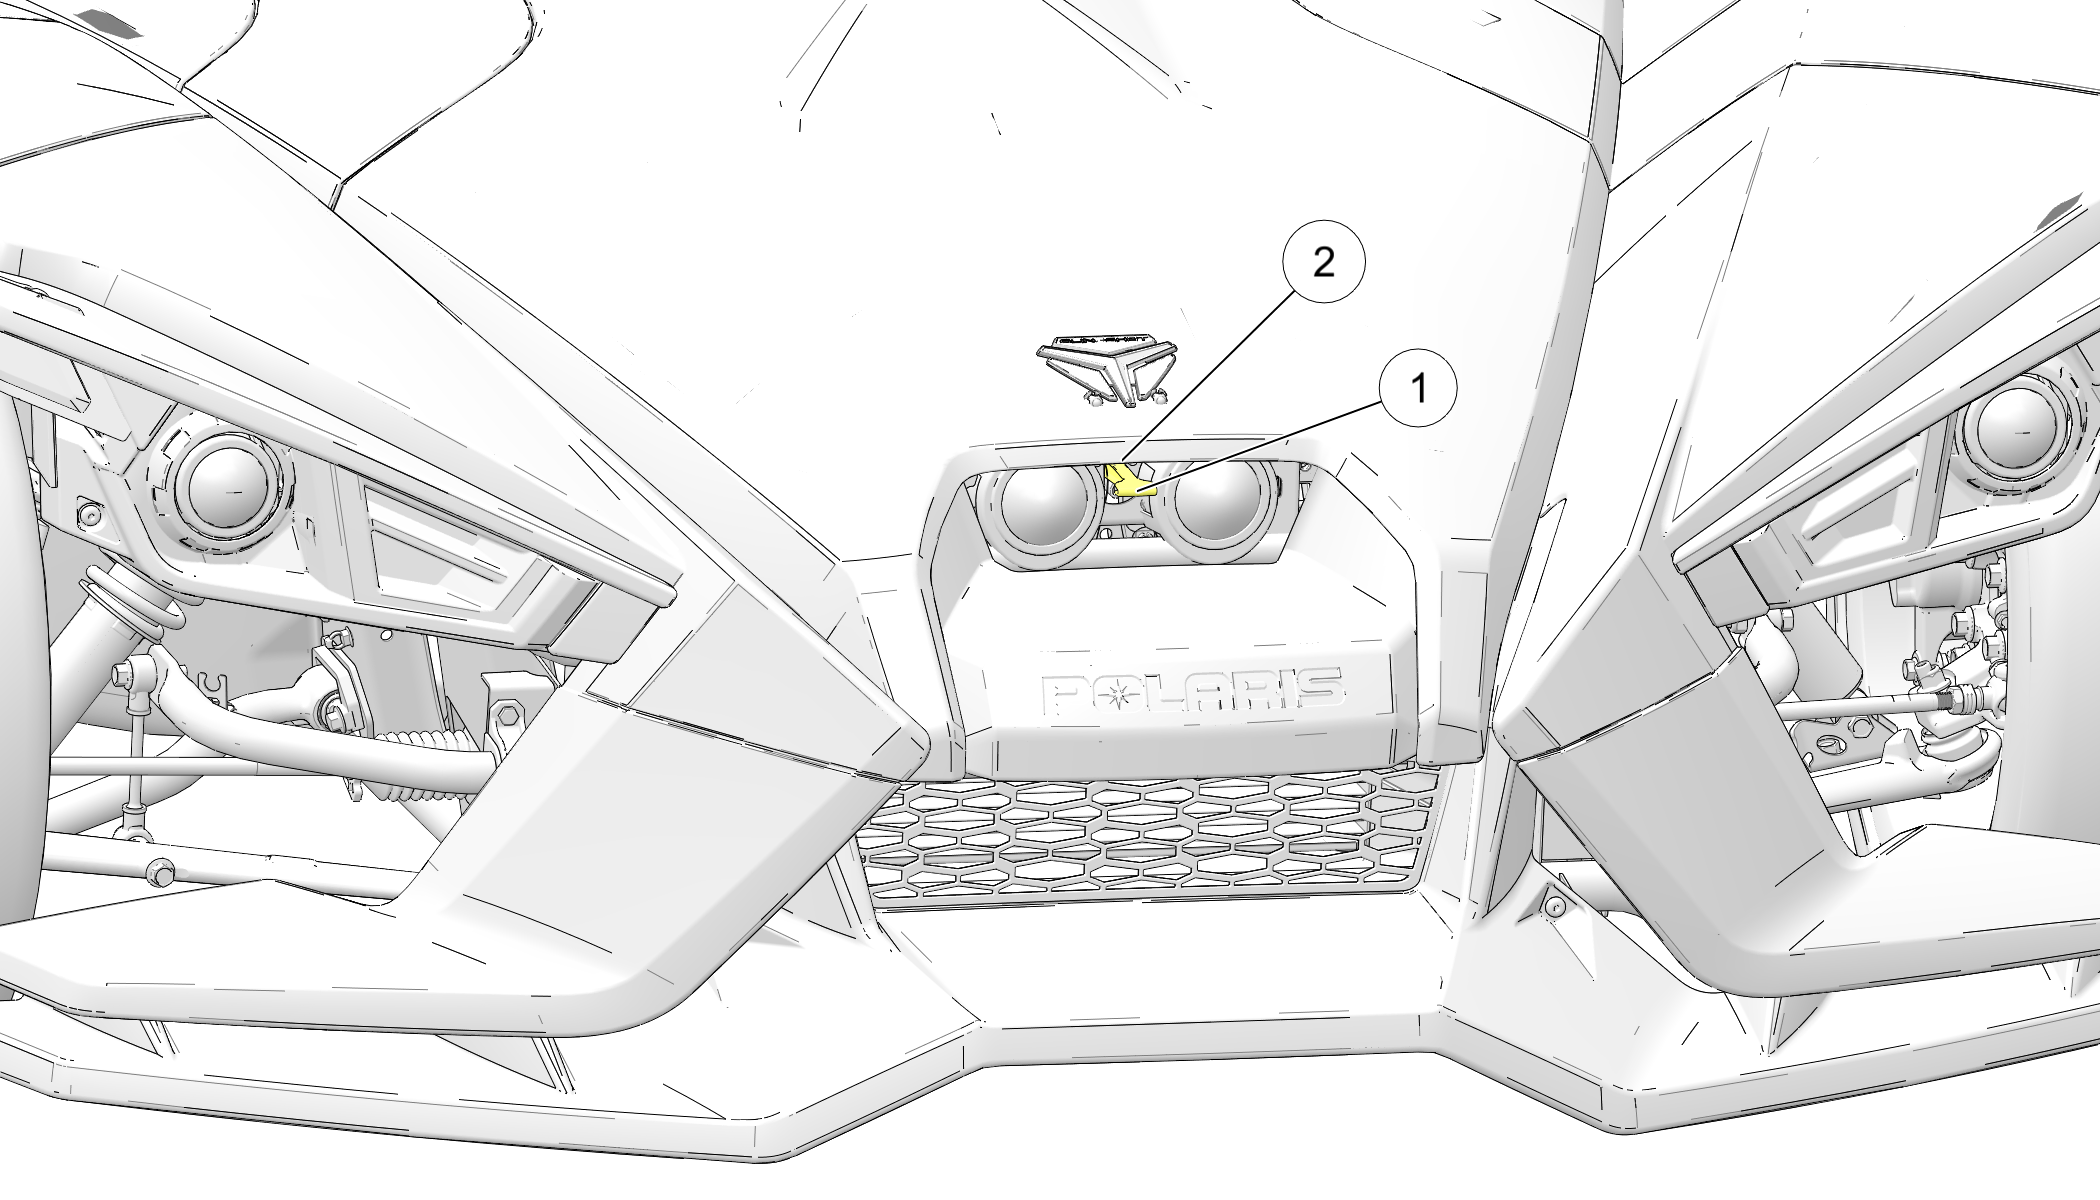
Open the hood to access the engine compartment. The hood release lever is located between the headlights.

  1. Push the hood release lever 1 downward to disengage the four hood latches.

    CAUTION
    Engine components may be hot after use. Always use only the hood handle when opening the hood. Do not grasp the hood edges.
  2. The metal hood handle 2 is a plate located above the release lever and on the underside of the hood plastic. Firmly grasp the hood handle and pull the hood upward and forward, rotating the hood to a vertical position at the front of the vehicle.

  3. To close the hood, grasp the hood handle. Pull the handle upward and toward the vehicle until the hood is fully seated. Apply firm downward pressure on the hood at all four latch points to ensure the hood is securely latched at all four points.

3.3.17: Windshield (if equipped)

NOTICE
Brake fluid and alcohol will permanently damage the windshield. Do not use glass cleaners, water or soil repellents, or petroleum or alcohol based cleaners on the windshield, as these products can damage the windshield.

The windshield provides wind protection and increased riding comfort but will not protect riders in a collision with another vehicle, the road, birds or any other object. Do not ride with a loose or damaged windshield or mounting hardware. Regularly check all fasteners for tightness.

Tighten all center windshield mount screws (if equipped).

TORQUE
6-8 ft-lbs (8-11 Nm)

Tighten all other screws only until the wellnut begins to turn.

3.3.17.1: Windshield Care

Clean the windshield with a soft cloth and plenty of warm water. Dry with a soft clean cloth. Remove minor scratches with a high-quality polishing compound designed for use on polycarbonate surfaces.

WARNING
Always replace the windshield if scratches obstruct clear vision and cannot be removed.

3.3.18: Fuel Cap

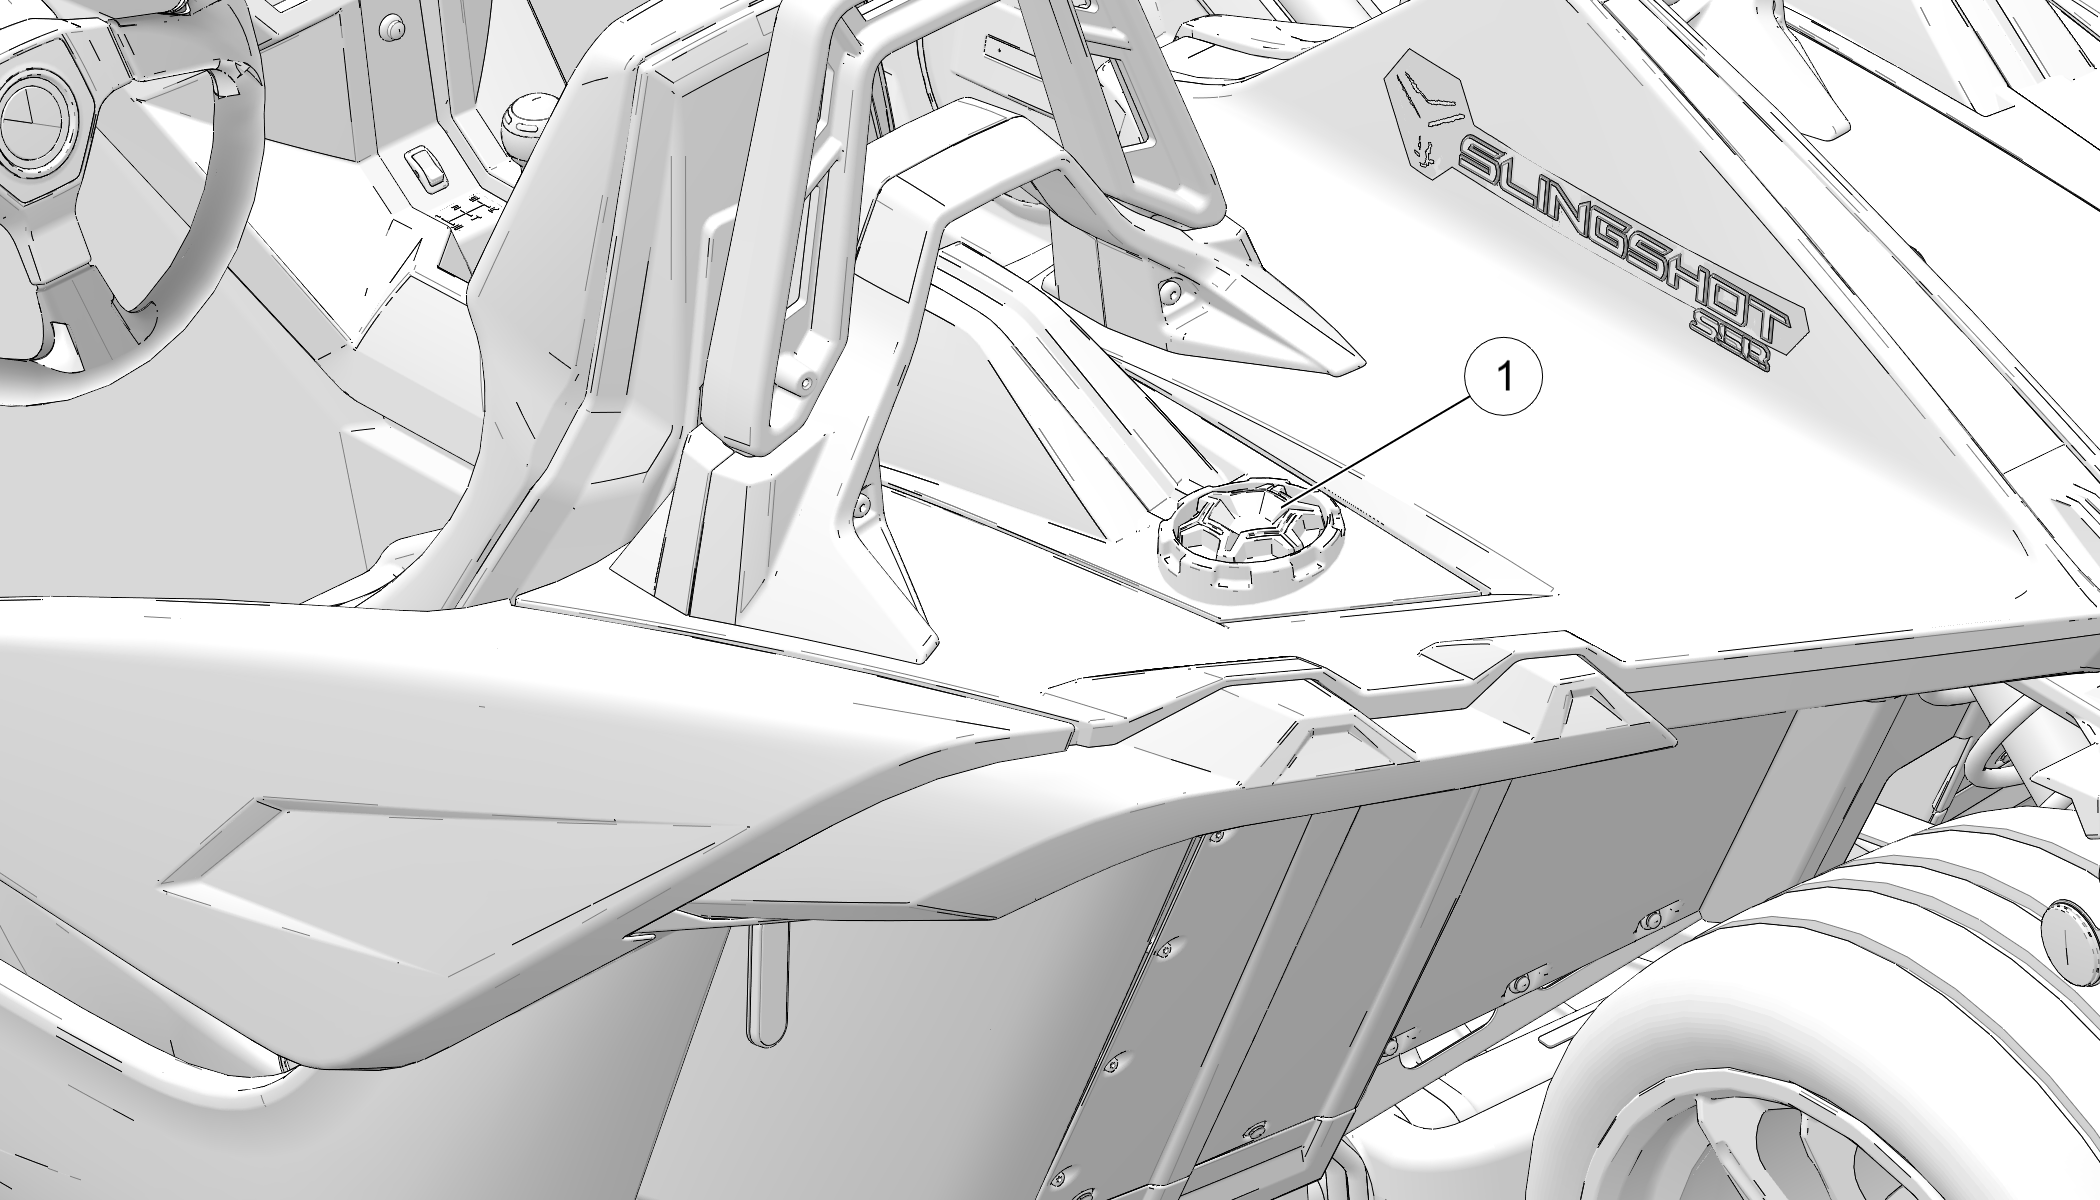
The fuel tank filler cap 1 is located on the left side of the vehicle, behind the driver’s seat.

3.3.19: Mirrors

Use the mirrors to assist in traffic maneuvers. Always check and adjust the mirrors before driving the vehicle.

3.3.20: Storage Compartments

Use the ignition key to lock or unlock a storage compartment door.

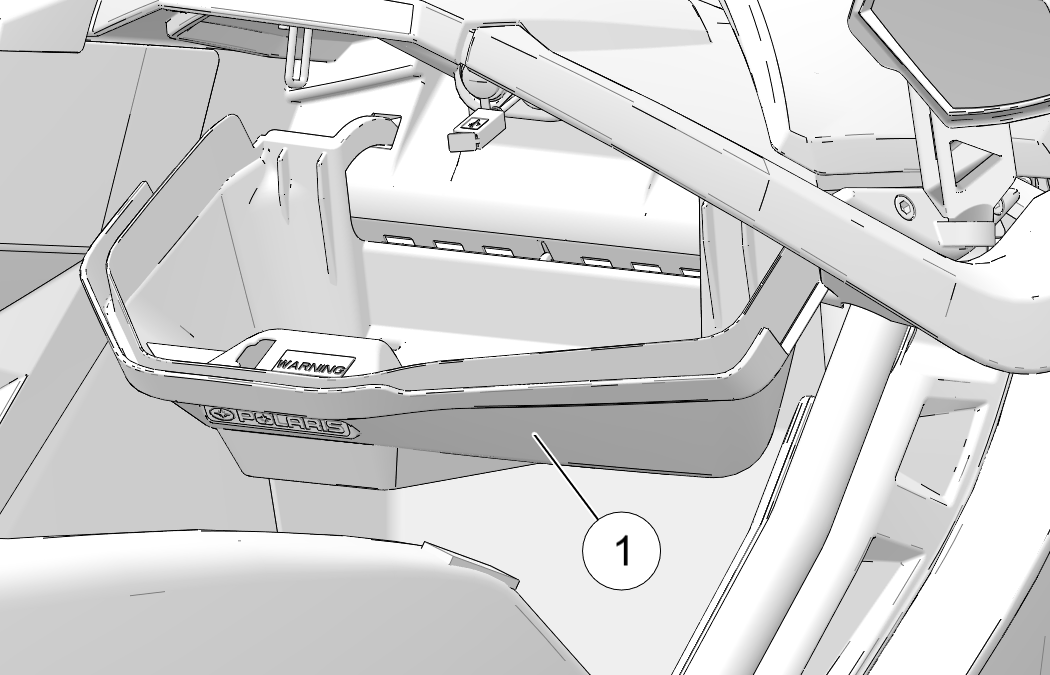
The glove box compartment 1 is located on the console in front of the passenger seat. Press and release the latch button to open the door. Do not open the glove box door while operating. Stowed items could be ejected due to air movement in the vehicle.

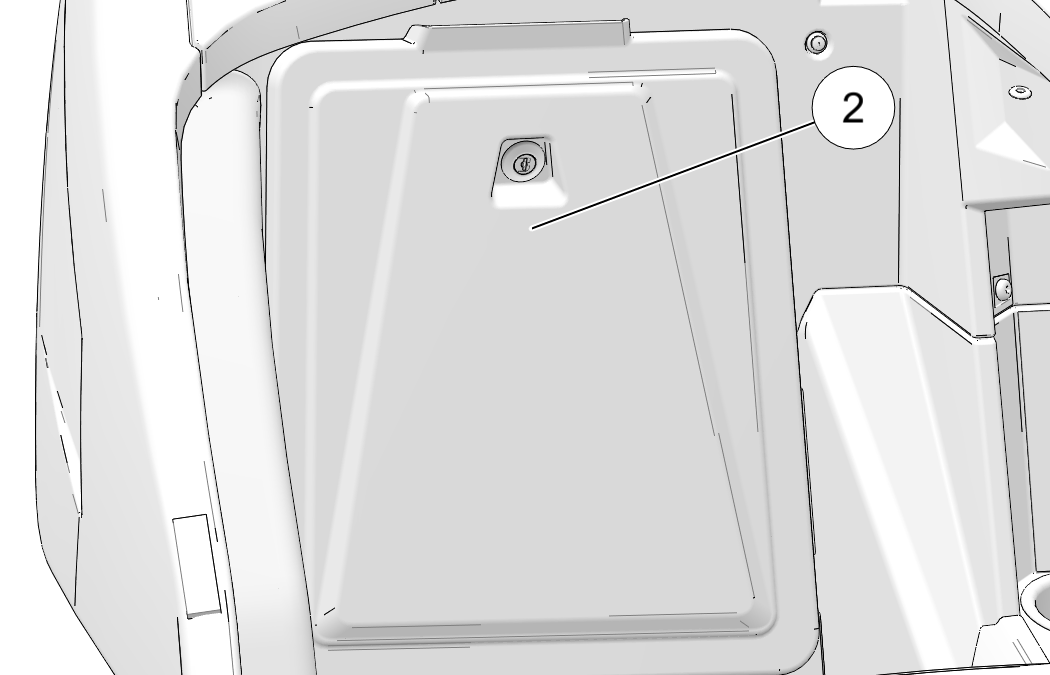
A larger storage compartment 2 is located behind each seat. Tilt the seatback forward to access the storage compartment. When unlocked, pull abruptly on the tab located above the lock to open the door. Close the door and tap each corner abruptly to engage the rubber compression plugs.

3.3.21: Seat Belts

This vehicle is equipped with three-point lap and diagonal seat belts on all seats. Always make sure the seat belts are secured for the driver and passenger before operating.

WARNING
The SLINGSHOT is a motorcycle (not a car) and does not meet automotive frontal crash and impact standards. In the event of a rollover or crash, an unbelted person is significantly more likely to be thrown from a vehicle and die than a person wearing a safety belt.

To wear the seat belt properly, follow this procedure:

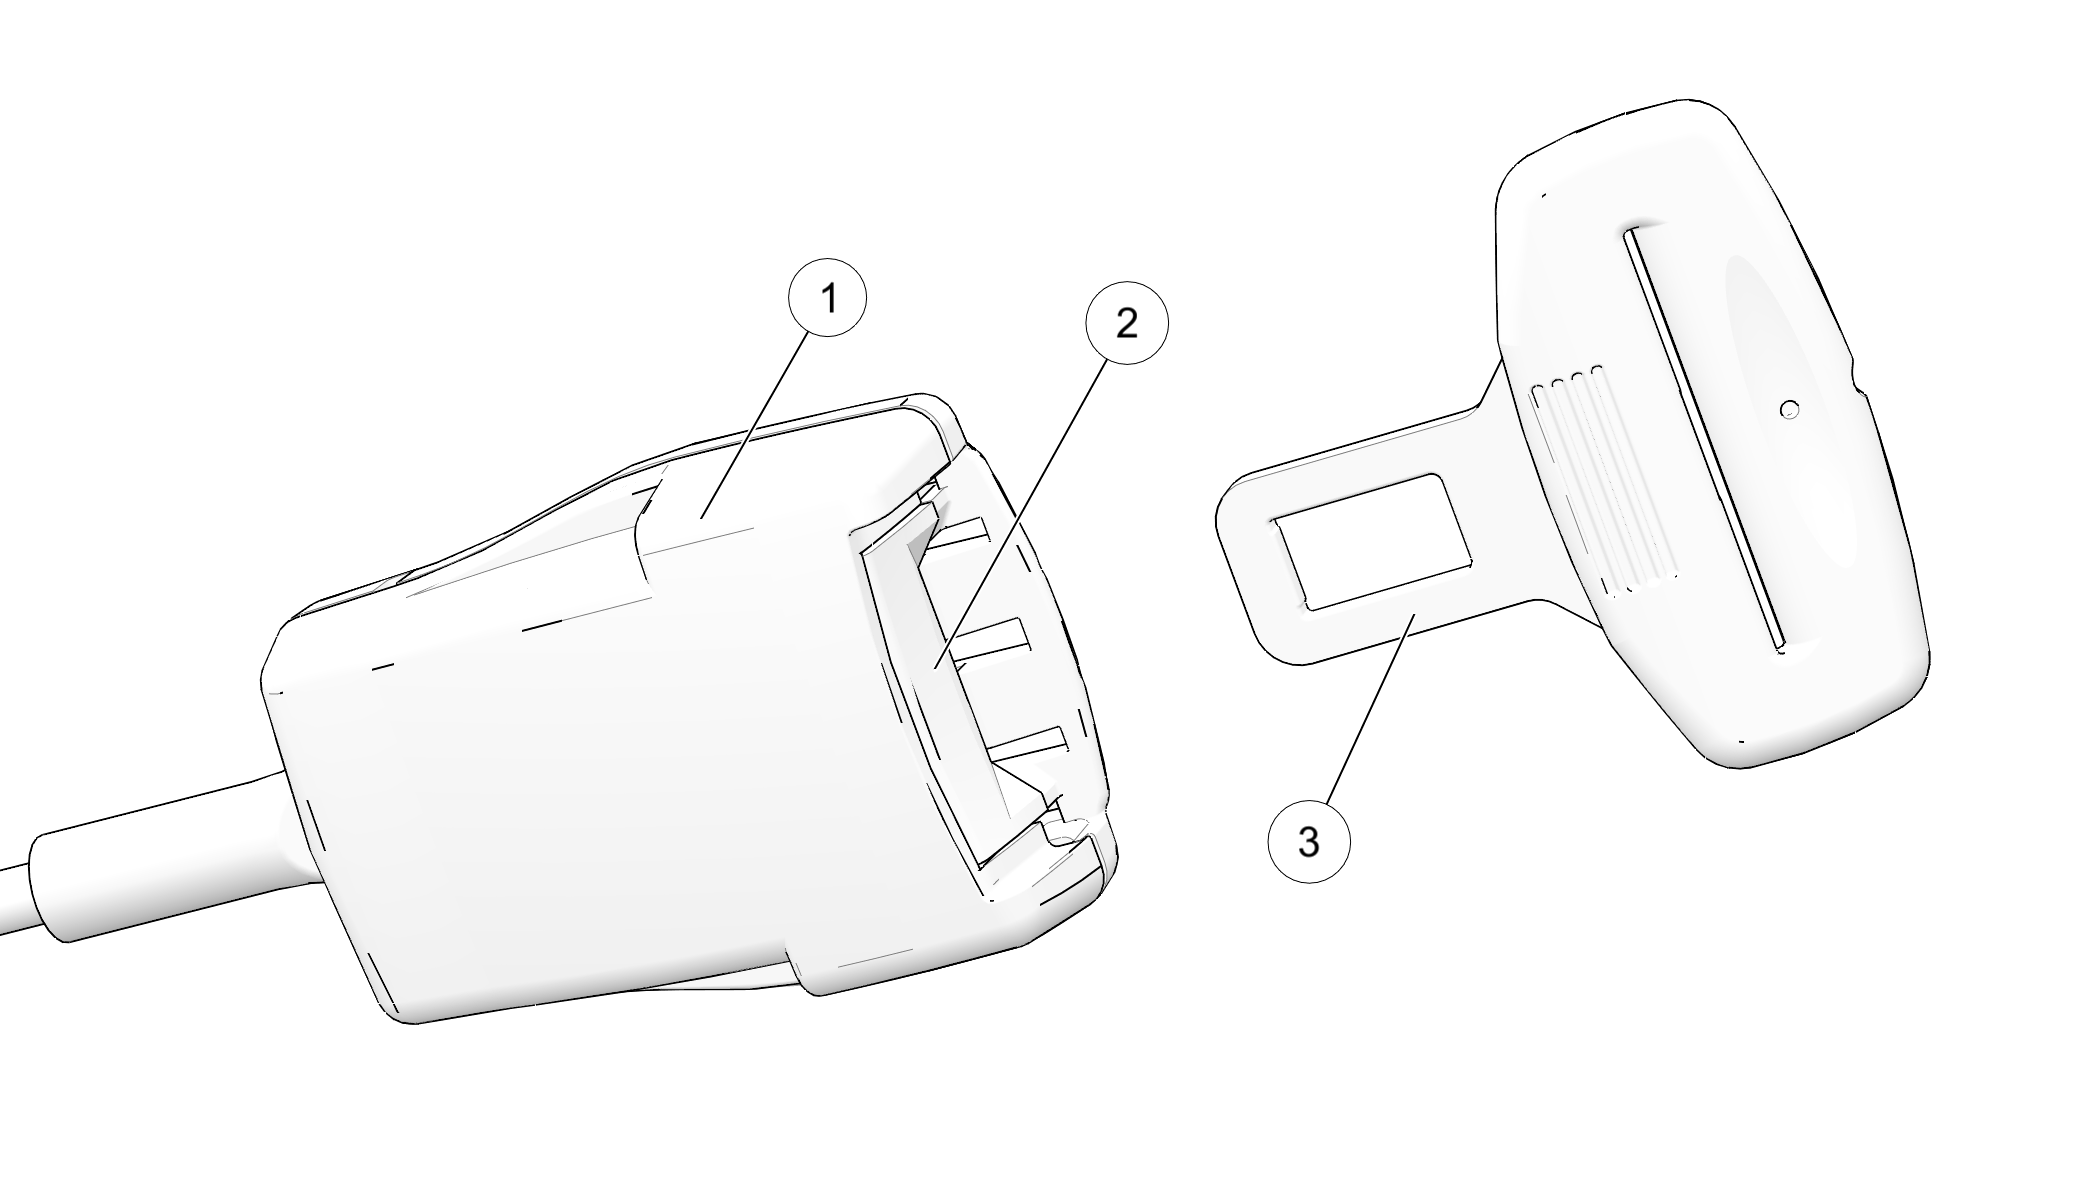
  1. For 3-point belts, pull the seat belt latch downward and across your chest toward the latch housing 1 at the outer edge of the seat. The belt should fit snugly across your hips and diagonally across your chest. Make sure the belt is not twisted.

  2. Push the latch plate 3 into the latch housing until it clicks.

  3. Release the strap, it will self-tighten.

    WARNING
    Failure to wear the seat belt properly could result in serious injury or death. Wear the shoulder belt on the inside shoulder only. Never wear the shoulder belt under your arm or behind your body.
  4. To release the seat belt, press the square red button 2 at the center of the latch housing.

3.3.21.1: Seat Belt Inspection

Inspect all seat belts for proper operation before each use of the vehicle.

  1. Push the latch plate into the latch housing until it clicks. The latch plate must slide smoothly into the housing. A click indicates that it’s securely latched.

  2. Push the red release latch at the center of the latch housing to make sure it releases freely.

  3. Pull each seat belt completely out and inspect the full length for any damage, including cuts, wear, fraying or stiffness. If any damage is found, or if the seat belt does not operate properly, have the seat belt system checked and/or replaced by your authorized dealer or another qualified person.

  4. To clean dirt or debris from the seat belts, sponge the straps with mild soap and water. Do not use bleach, dye or household detergents.

3.3.22: Slingshade (if equipped)

CAUTION
Watch your head while entering and exiting the Slingshot when Slingshade is installed.
WARNING
  • This top is not a safety device or roll cage. It is not intended to protect the occupants in the event of a rollover or other unforeseeable event.

  • This top is not a roof and is not intended to haul cargo. NEVER attach, strap, or haul objects of any type or weight on this top.

  • This top is not intended to contain or restrain the occupants or provide additional safety protection. ALWAYS wear a full face helmet, seat belt, and other safety equipment as outlined in your vehicle owner’s manual.

Failure to follow these warnings could lead to serious injury or death.

WARNING
Always secure latches during operation.
Failure to secure latches may result in unintended opening or release causing injury to other or damage to Slingshade.
NOTICE
Slingshade doors should be closed when your Slingshot is parked for an extended period of time.

3.3.23: Security System (Canada)

Your SLINGSHOT vehicle is equipped with a security system for theft and roll-away protection. The security system automatically immobilizes the engine when the ignition is switched off, and enables the engine when the ignition is switched on and a passcode is entered. After the passcode is entered, a slight delay before the starter engages is normal.

Change the factory-set passcode to a new passcode of your own choosing and select the desired security setting as soon as possible after receiving delivery of your new SLINGSHOT vehicle. Record your new passcode and keep it in a safe location. Do not place your 4-digit passcode anywhere in the vehicle.

NOTICE
The park brake must be engaged for the SECURITY menu to be accessible in the gauge.

3.3.23.1: Changing the Passcode

The factory-set passcode is 0000. Enter this passcode at step 5 the first time you change the passcode.

  1. Unlock the security system. See Unlocking the Security System.

  2. With the engine off and the park brake engaged, press and release the MODE button repeatedly until “SECURE” displays in the gauge.

  3. Press and hold the MODE button until “SETCODE” displays.

  4. Press and hold the MODE button until “OldCodE” displays.

  5. Enter your existing passcode using the same process used to unlock the system.

  6. If the passcode is not correct, “bAd COdE” displays. Re-enter the correct passcode. If the passcode entered is correct, “NEWCodE” displays.

  7. Enter your new passcode using the same process used to unlock the system.

  8. When “CONFIRM” displays, re-enter the new passcode to confirm.

  9. If the two entries do not match, “bAd COdE” displays and you’ll be returned to step 7. If the two entries match, “SUCCESS” displays. The passcode has been changed.

  10. Record your new passcode and keep it in a safe location. Do not place your 4-digit passcode anywhere in the vehicle.

3.3.23.2: Security Levels

The security system offers three security levels as outlined below:

Security Level Engine Starting Requirements
PASSIVE (default setting) When set to PASSIVE, use of the ignition key is required. Manual entry of your passcode is not required.
ACTIVE When set to ACTIVE, you will be prompted to press the MODE button within 10 seconds of turning the ignition switch off. The system will then require manual entry of your passcode the next time the ignition switch is turned on. See Unlocking the Security System. If you fail to press the MODE button within the allotted time, the system will not require manual entry of your passcode the next time the ignition switch is turned on.
AUTO When set to AUTO, the system requires manual entry of your passcode every time the ignition switch is turned on.

3.3.23.3: Changing the Security Level

The security level can be changed at any time by using the following procedure.

  1. Unlock the security system.

  2. With the engine off and the park brake engaged, press and release the MODE button repeatedly until “SECURE” displays in the gauge.

  3. Press and hold the MODE button until “SETCODE” displays.

  4. Press and release the MODE button once to display the current security level.

  5. Press and hold the MODE button to cycle through the three security level options. Release the button when the desired security level displays.

  6. To save the displayed setting, press and release the MODE button once. “EXIT” will display.

  7. Press and hold the MODE button to exit the security menu.

3.3.23.4: Unlocking the Security System

  1. Turn the ignition switch to the ON position. The gauge will display “ENtCOdE”.

  2. Press and release the MODE button once to advance the digit by one increment. Repeat until the desired digit displays.

  3. Press and hold the MODE button to save the digit and advance to the next digit.

  4. Repeat this process for the remaining 3 digits.

  5. When the fourth digit is saved, the system unlocks and “SUCCESS” displays in the gauge. If the passcode entered was not correct, the system remains locked and “BAdCOdE” displays in the gauge. Re-enter the correct passcode.

Chapter 4: Pre-Ride Inspections

4.4.1: Introduction

To keep your vehicle in safe operating condition, always perform the recommended pre-ride inspections before each use of the vehicle. This is especially important before making a long trip and when removing the vehicle from storage.

WARNING
Failure to perform the recommended pre-ride inspections could result in component failure while riding, which could result in serious injury or death. Always perform the pre-ride inspections before each ride. When inspection reveals the need for adjustment, replacement or repair, perform the service promptly.

You must be familiar with all instruments and controls to perform the pre-ride inspections.

NOTE
During the pre-ride inspections you may use products that are potentially hazardous, such as oil or brake fluid. When using any of these products, always follow the instructions and warnings on the product packaging.

When inspections reveal the need for adjustment, replacement or repair:

  • refer to the maintenance section of this manual

  • refer to the service manual, or

  • your authorized dealer or another qualified person can assist with service

Turn the ignition key to the ON position before performing the electrical pre-ride inspections. Return the ignition key to the OFF position after completing these inspections. If inspection of any electrical item reveals component failure, repair or replace the component before operating the vehicle.

Item Inspection Procedure See Page
Electrical
Front Lights Turn the ignition key on. Verify that the headlights, auxiliary lights (if equipped) and park lamps illuminate. Switch to high beam. Verify that the high beam indicator comes on and that headlamp brightness increases. Adjust headlight aim as needed. Headlamp Aim Inspection Conditions
Rear Lights Verify that the taillights and license plate light illuminate. Apply the brakes and verify that the taillight lamps increase in brightness. -
Turn Signals Verify that the left and right turn signals flash at the front and rear of the vehicle, and that the corresponding indicator lamp flashes in the gauge. -
Emergency Flashers Press the top of the hazard switch to turn the flashers on. Verify that all four turn signals flash, as well as the lamps in the gauge. Press the bottom of the switch to turn the flashers off. Verify that all signals and indicator lamps stop flashing. -
Horn Press the horn button. Verify that the horn sounds loudly. -
Low Oil Pressure Indicator Start the engine and verify that the low oil pressure lamp does not illuminate. -
Steering Check power steering for smooth operation. Steering
General
Engine Oil Level Check the oil level. Engine Oil
Fuel Level View the fuel gauge to check the fuel level. Fuel Level
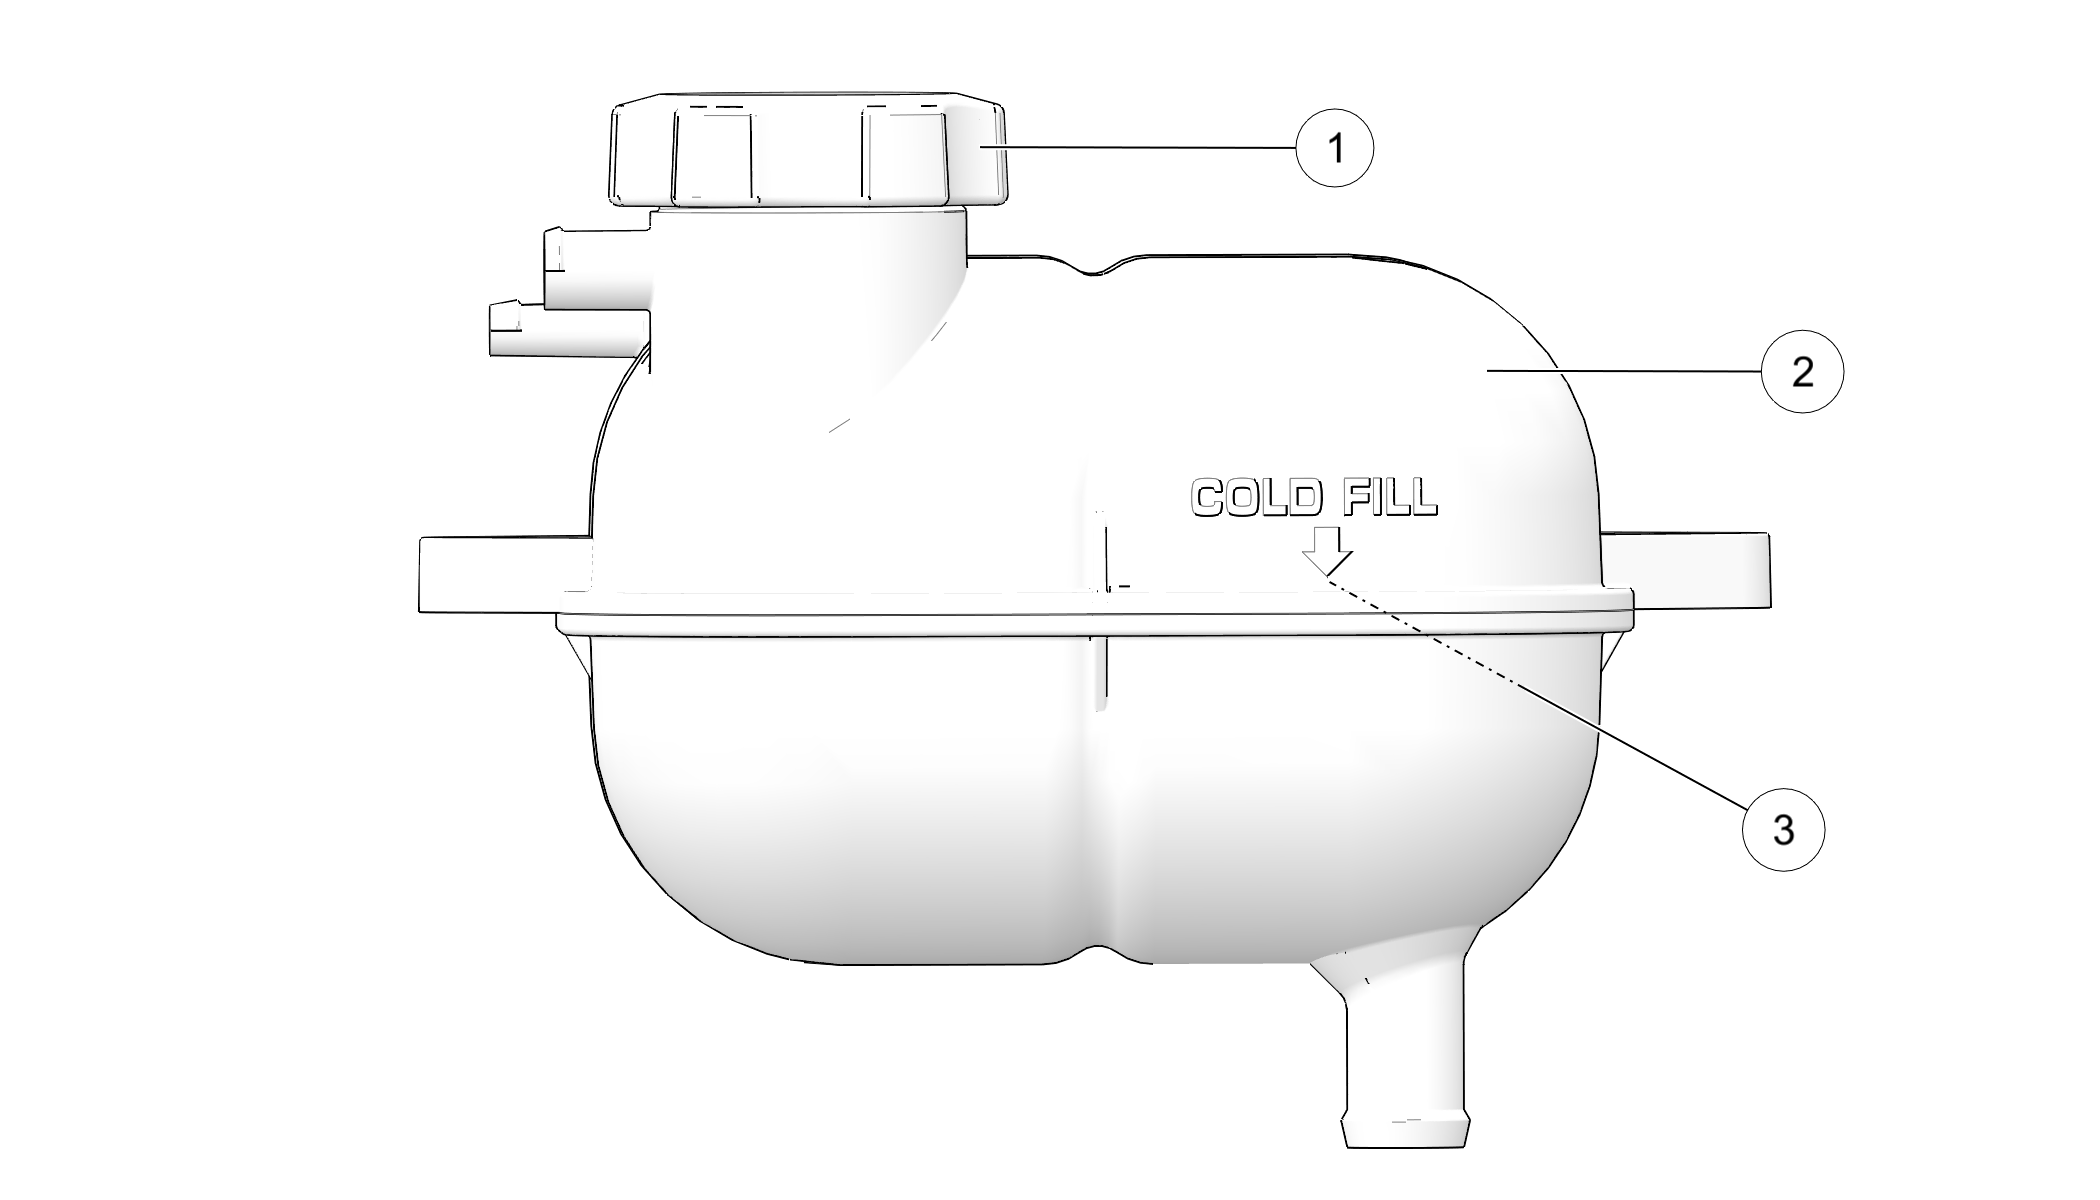
Coolant Level Check the recovery bottle coolant level. Coolant Level
Tires Inspect tire condition, pressure and tread depth. Wheels and Tires
Wheels Inspect for loose, damaged or missing wheel nuts. Wheel Inspection
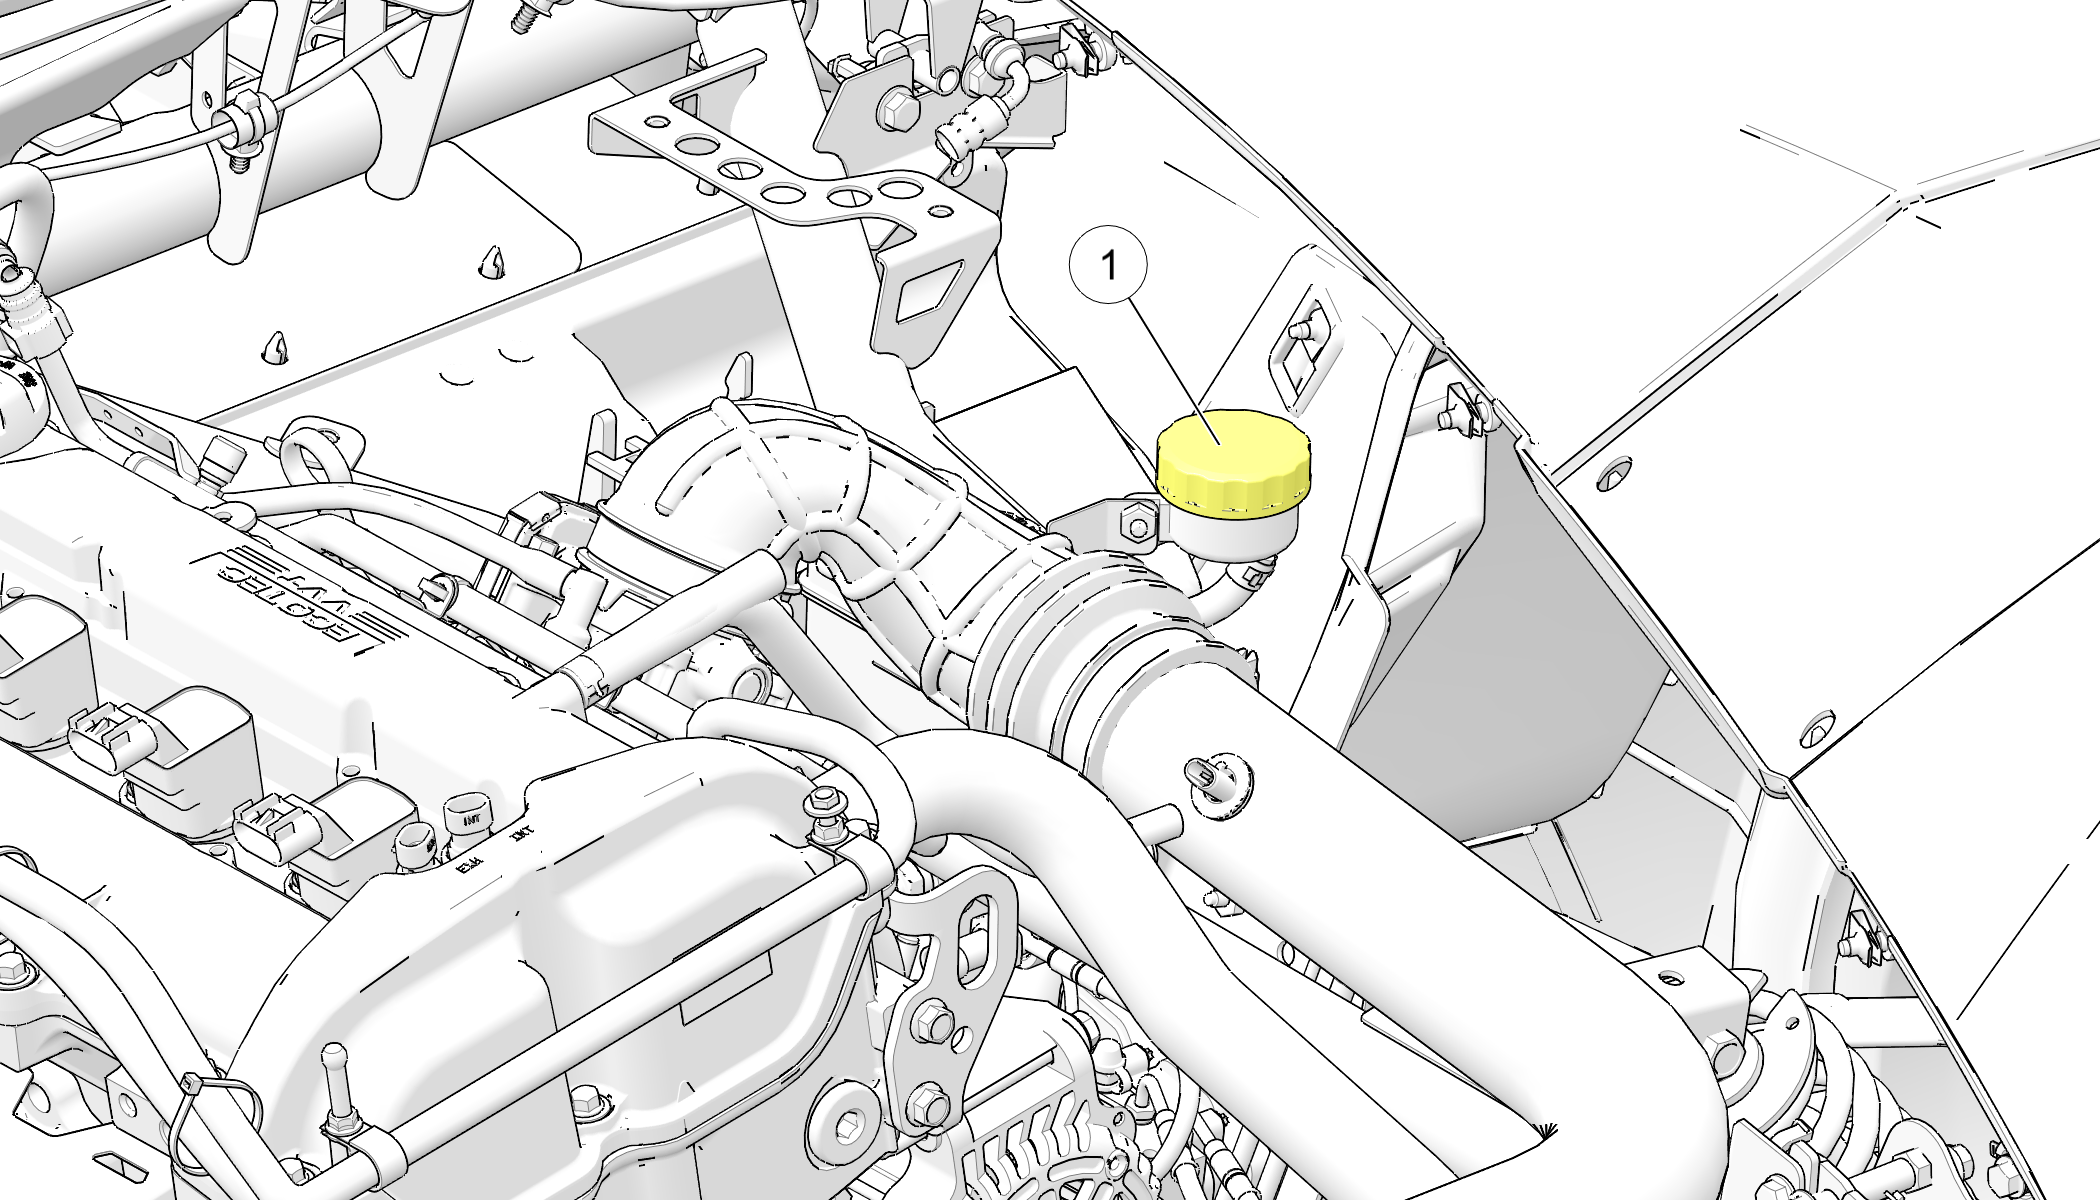
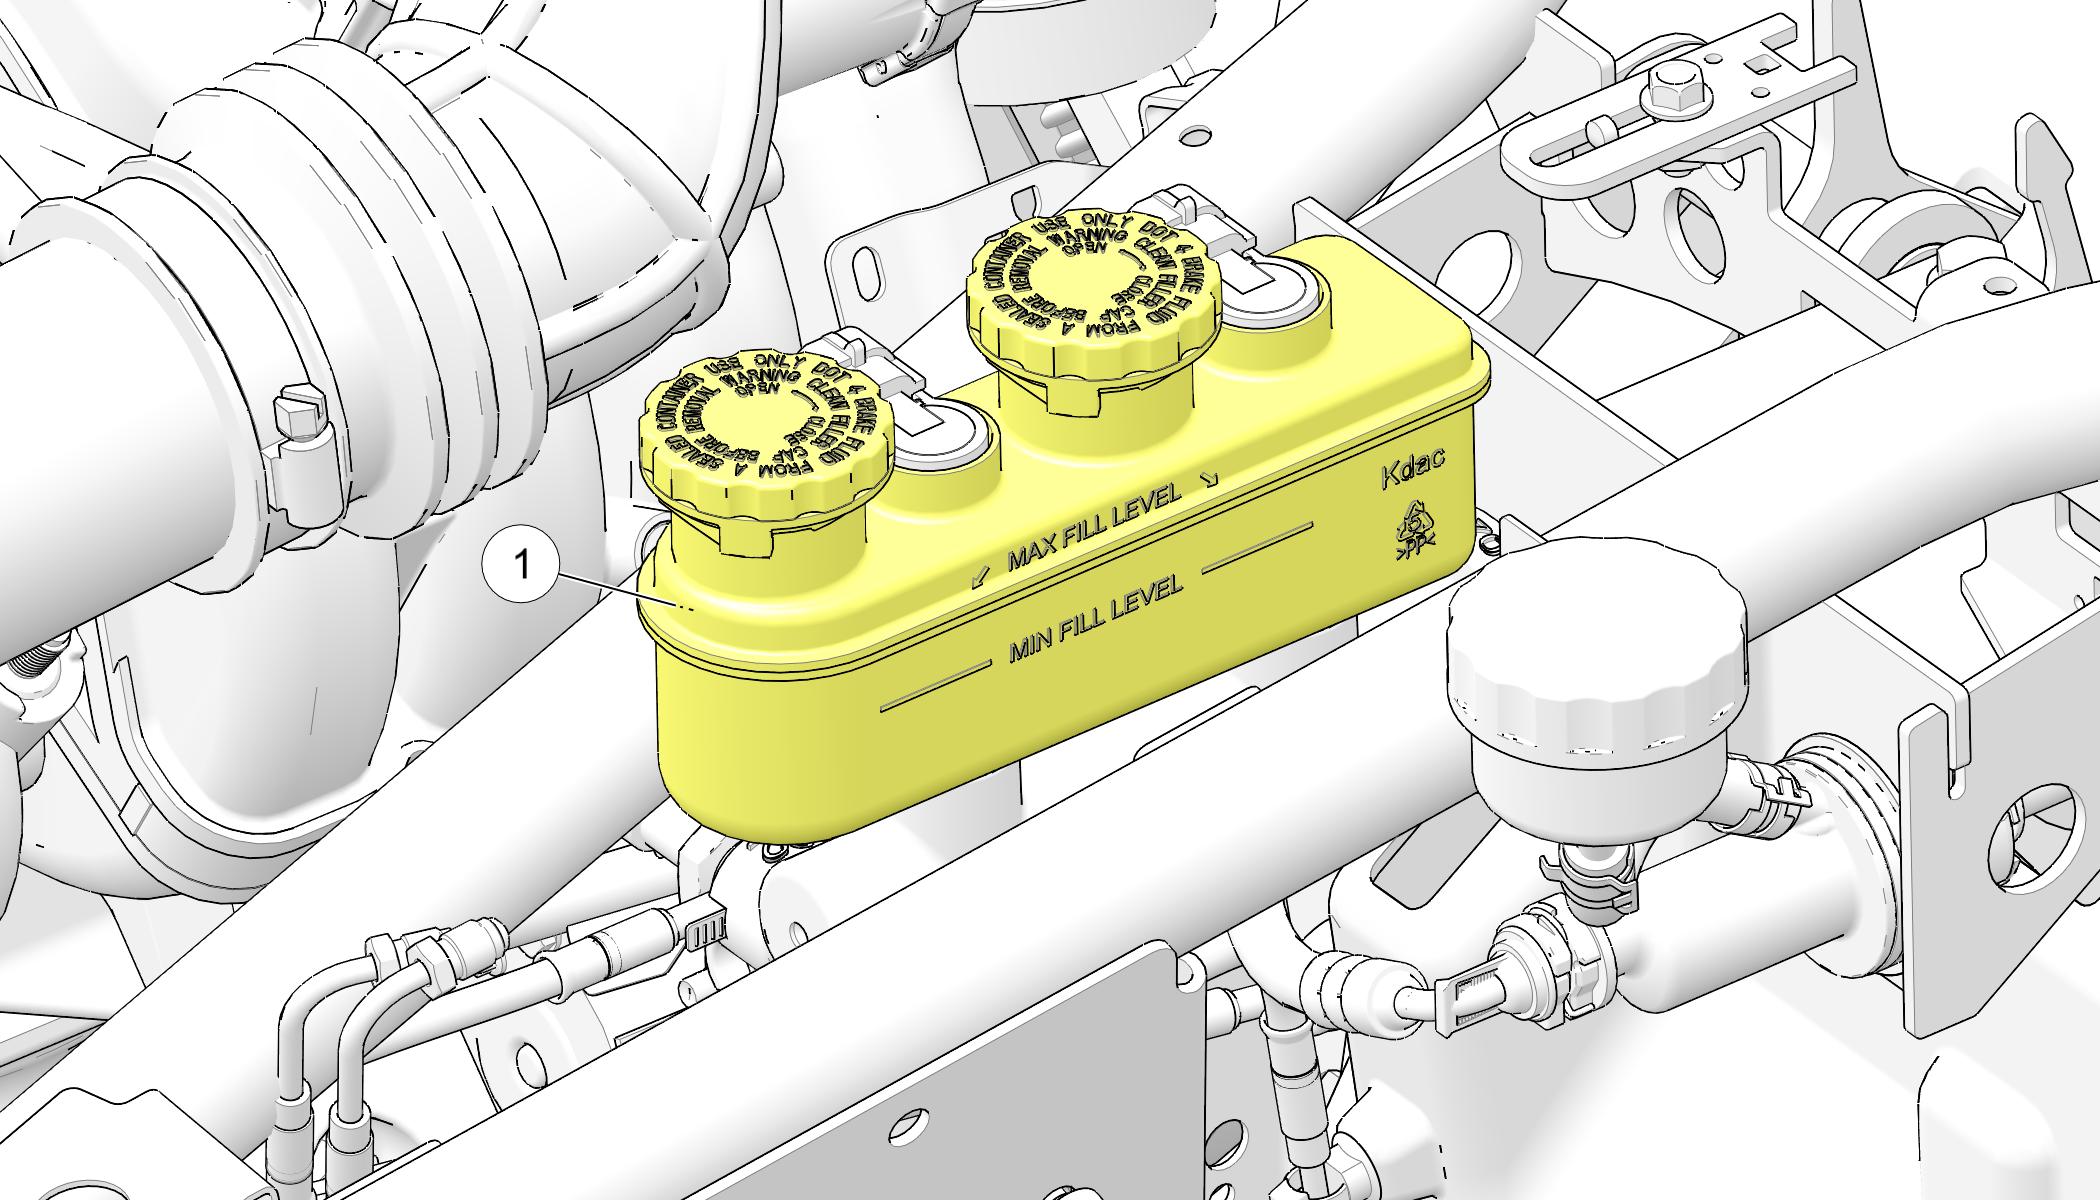
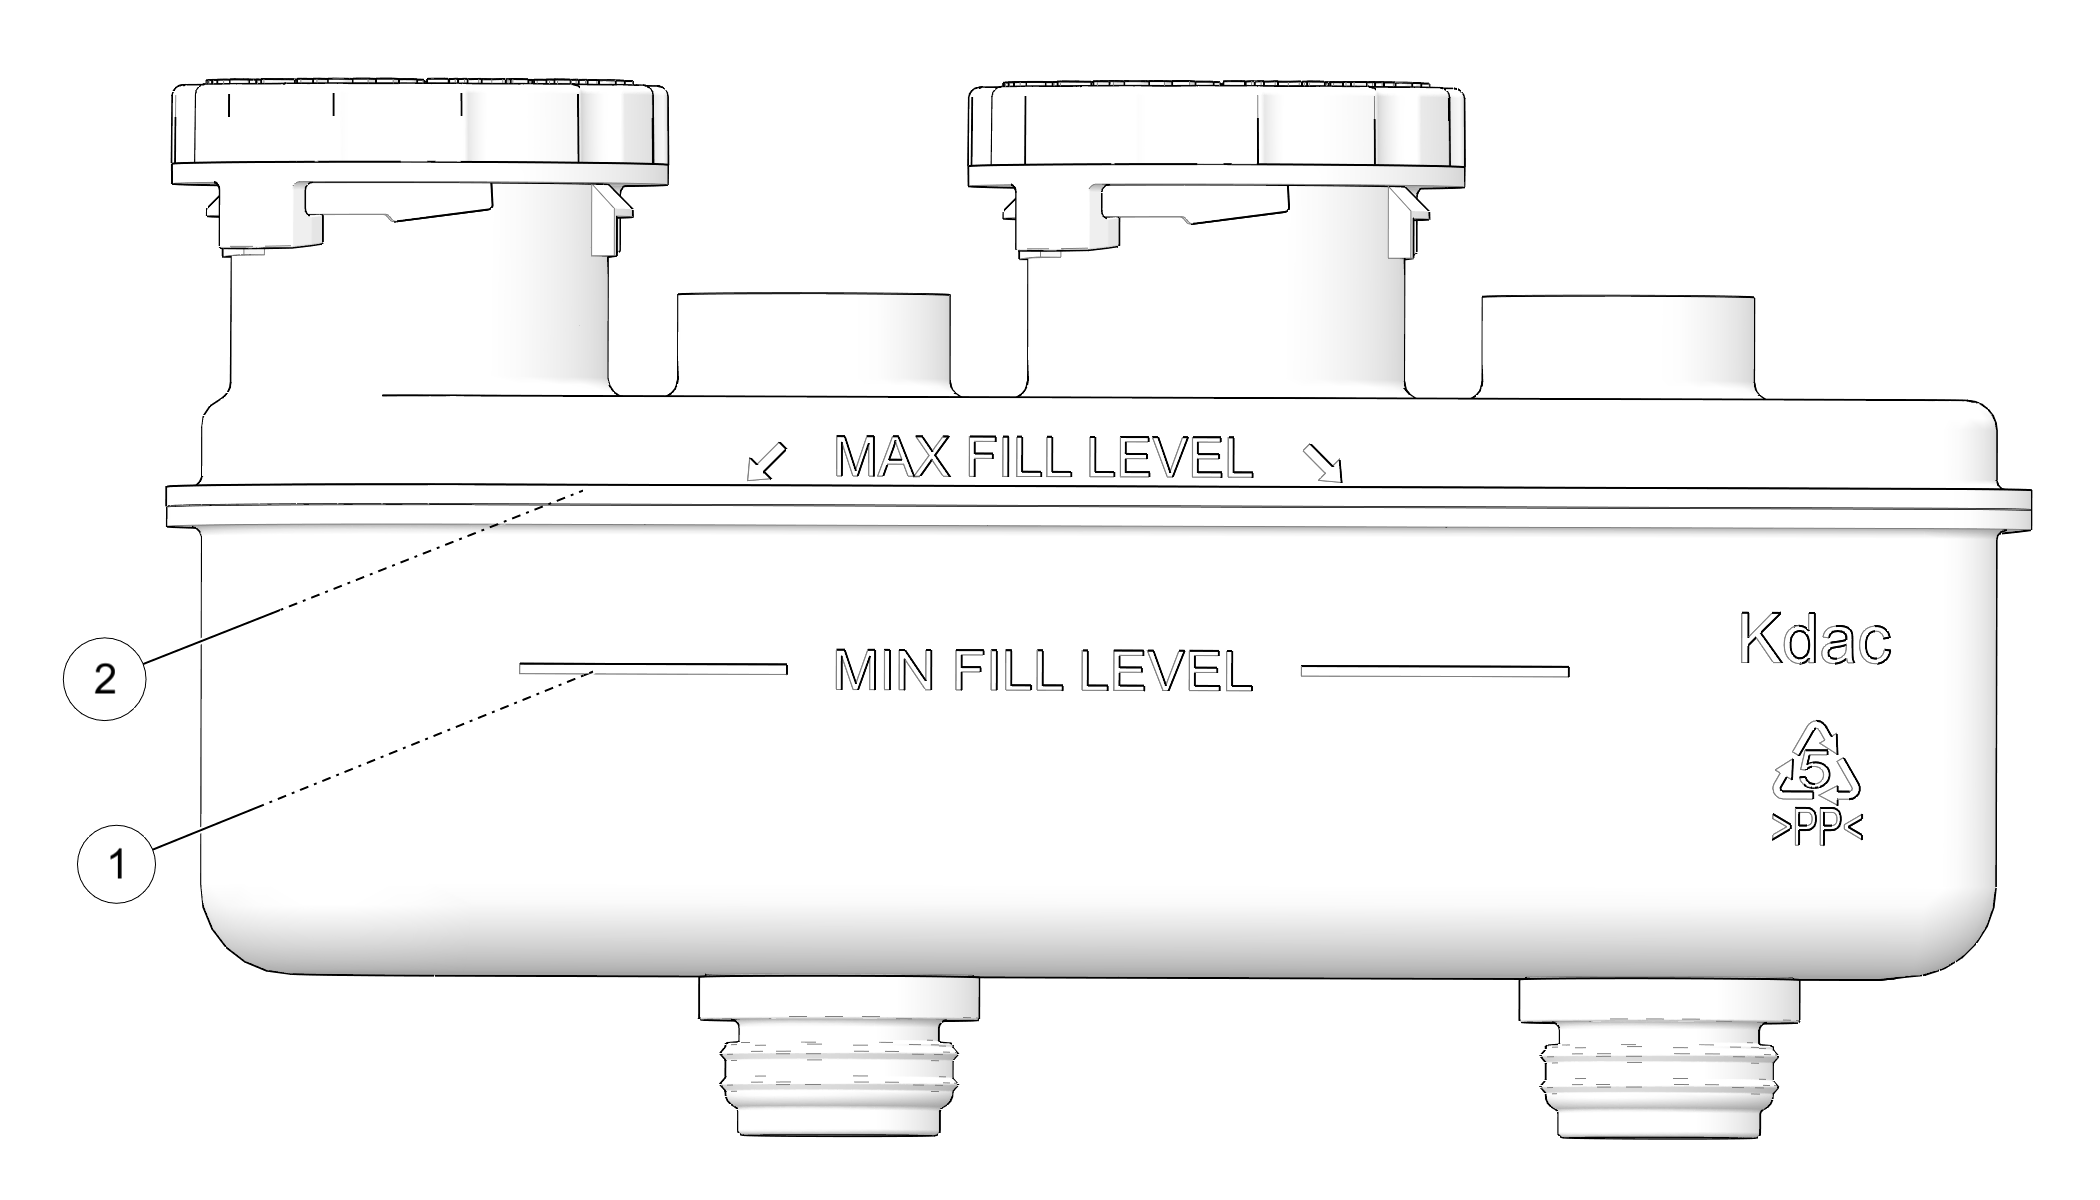
Brake Fluid Level Check the master cylinder brake fluid level. Brake Fluid Level
Park Brake Verify that the vehicle does not roll when the park brake is set. Park Brake Lever
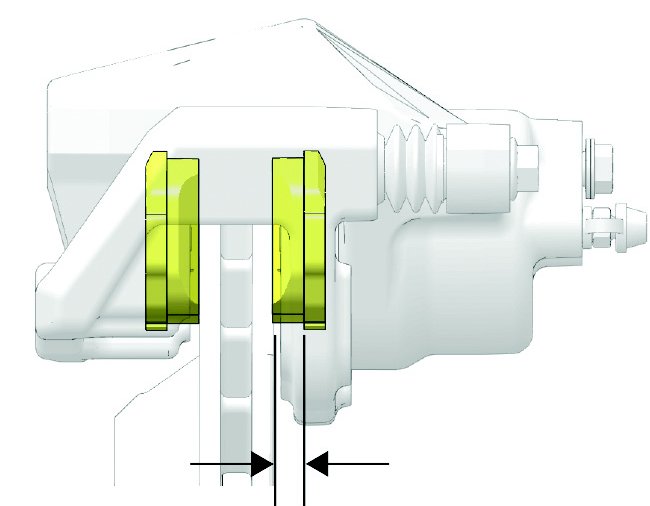
Brake System Inspect brake system hoses, connections and brake pads. Check brake pedal for excessive travel or a spongy feel. Brake System Inspection
Throttle Pedal Check throttle pedal travel, ensure smooth operation and full return. Throttle Pedal
Clutch System Check fluid level and pedal travel. Hydraulic Clutch Fluid
Front Suspension Check for suspension wear or damage. Front Suspension
Rear Suspension Check for suspension wear or damage. Rear Suspension
Drive Belt Check for wear or damage. Drive Belt, Drive Belt Condition
Fasteners Inspect entire vehicle for loose, damaged or missing fasteners. Fasteners
Mirrors Adjust for proper side and rear view. -

4.4.2: Fuel Level

  1. Position the vehicle on a level surface.

  2. Turn the ignition switch to the ON position.

  3. Observe the fuel level in the fuel gauge 1. See Multi-Function Display.

  4. Refuel as needed. See Fuel Recommendation for fuel specifications.

4.4.3: Steering

  1. Position the vehicle on a level surface.

  2. Turn the steering wheel full left, then full right. The action should be smooth, but not loose.

4.4.4: Front Suspension

Inspect the front suspension for oil leaks or damage. Verify smooth suspension operation.

4.4.5: Rear Suspension

  1. Check rear shock absorber movement to ensure the correct amount of suspension travel and ground clearance. Refer to the Specifications chapter for details.

WARNING
Inadequate ground clearance could result in components contacting the ground, causing loss of control and serious injury or death. Always ensure ground clearance is at specification.

4.4.6: Drive Belt

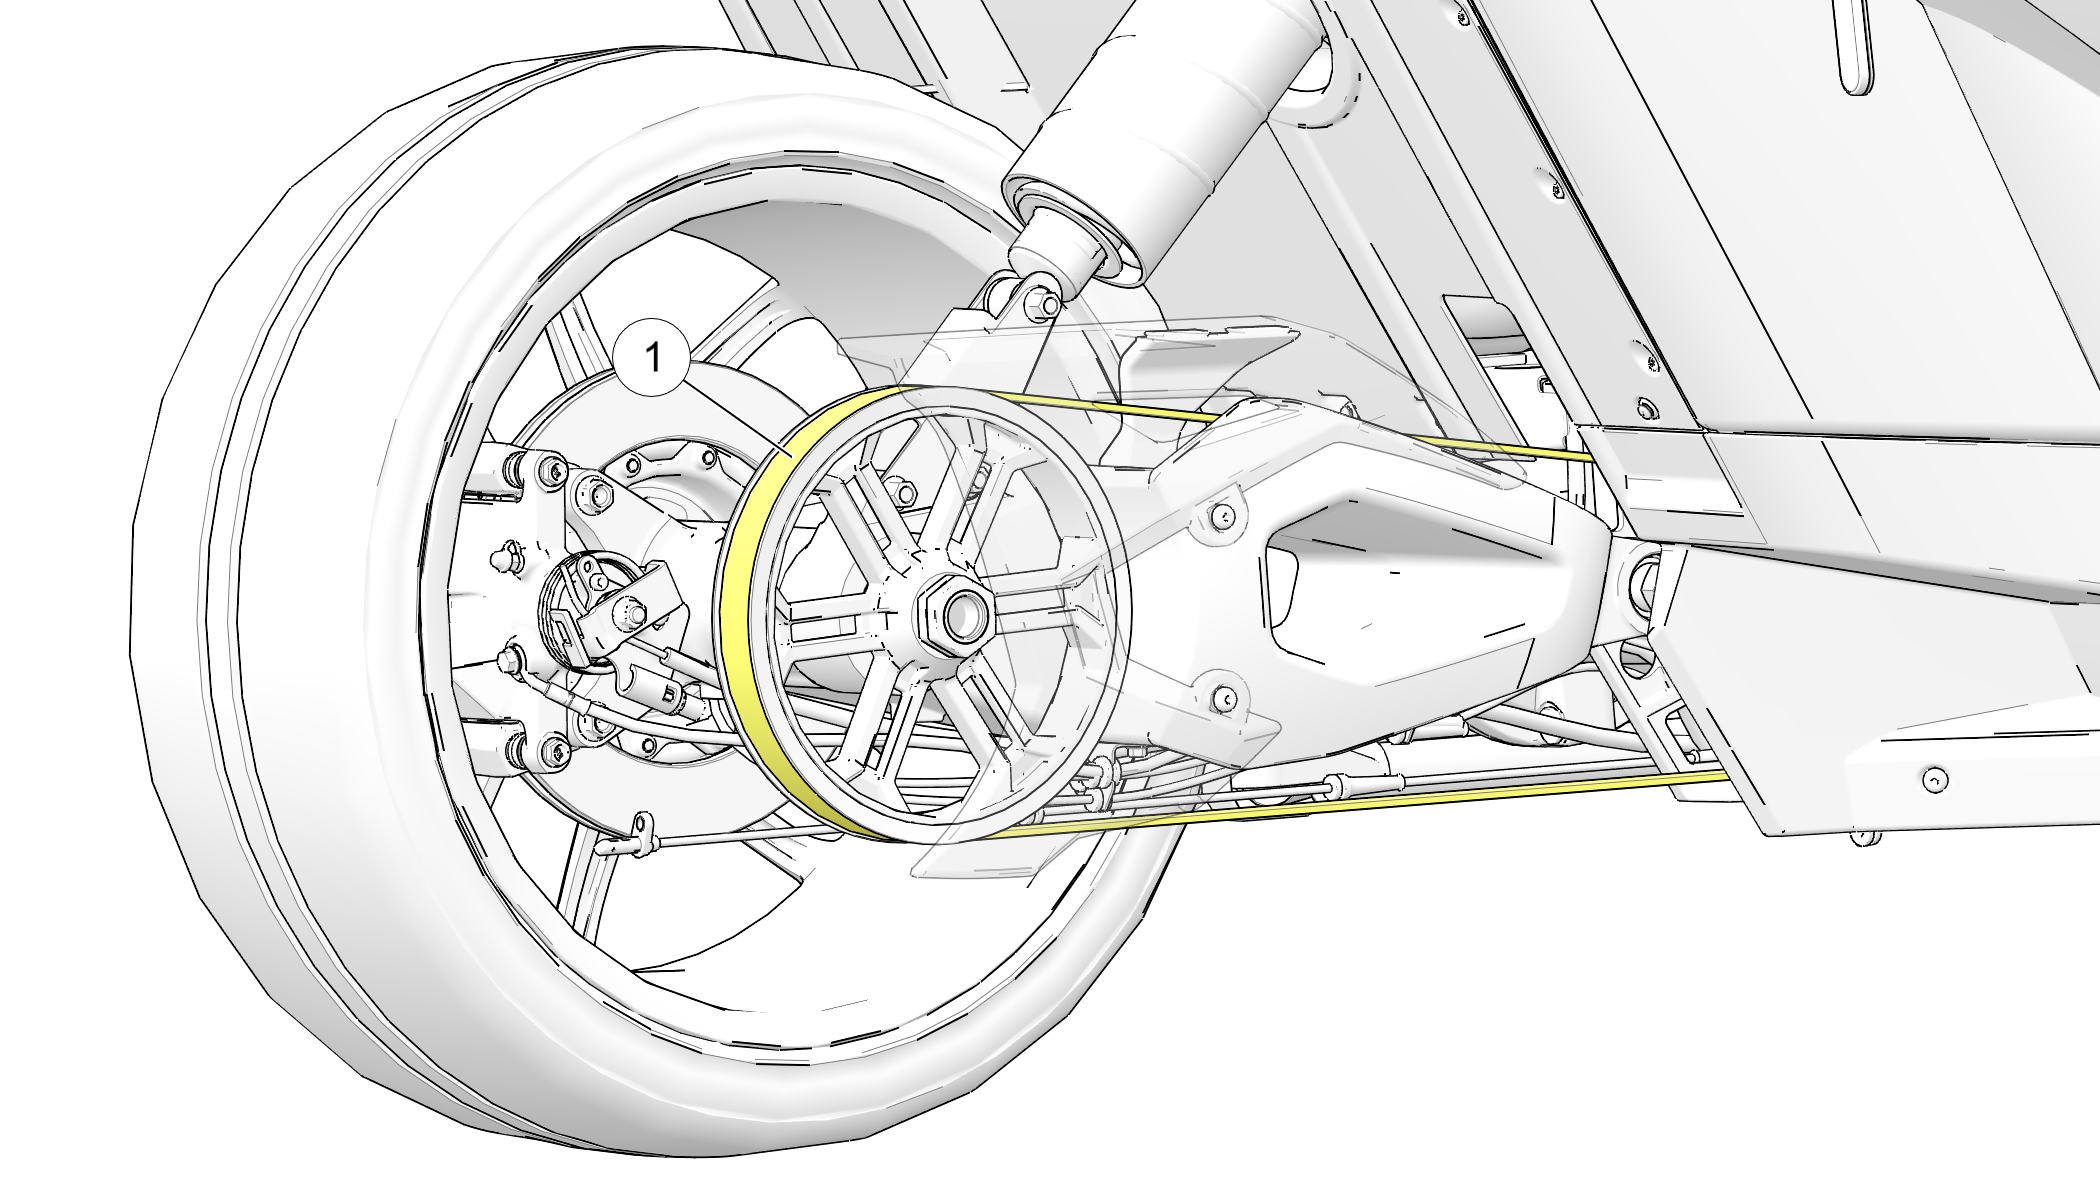
  1. Check the drive belt 1 teeth for stones or other debris.

  2. Inspect drive belt condition. If you discover cracks, broken teeth or frayed edges, replace the drive belt before riding. Refer to the SLINGSHOT Service Manual , or an authorized dealer can assist.

4.4.7: Fasteners

  1. Inspect the entire vehicle chassis and engine for loose, damaged or missing fasteners. Tighten loose fasteners to the proper torque.

    NOTICE
    Refer to the Maintenance chapter of this manual or the service manual for fastener torque values. If needed, your dealer can assist.
  2. Always replace stripped, damaged or broken fasteners before riding. POLARIS recommends genuine SLINGSHOT fasteners of equal size and strength.

Chapter 5: Operation

5.5.1: SLINGSHOT Vehicles vs. Other On-Road Vehicles

WARNING
Failure to operate the vehicle properly can result in a collision, loss of control, accident or rollover, which may result in serious injury or death. Read and understand all safety warnings outlined in the safety section of this owner’s manual. See Operating a SLINGSHOT vehicle has inherent risks..

In the United States, the 3-wheel SLINGSHOT vehicle is an on-road vehicle in the motorcycle class.

The SLINGSHOT vehicle handles differently than 2-wheel motorcycles, other 3-wheel vehicles and 4-wheel vehicles. The following information will help you understand the features and characteristics that make operation and handling of the SLINGSHOT vehicle different from the operation and handling of other on-road vehicles.

How does a SLINGSHOT differ from a 2-wheel motorcycle?

  • Low center of gravity

  • Steering wheel

  • Foot controls (brake, accelerator)

  • Clutch pedal (for manual transmission vehicles)

  • Front suspension and steering

  • Side-by-side operator and passenger seats

  • Seat belts for both riders

  • Lighting

  • One rear drive wheel and two front wheels

The unique handling characteristics of the SLINGSHOT include:

  • More stability in turns

  • Flat cornering

  • Turns in direction of wheel

  • Quick response to steering changes

  • Like all on-road vehicles, the SLINGSHOT can hydroplane (lose traction) when encountering a layer of water on the driving surface. Every vehicle has a unique hydroplane speed and response, driven by vehicle weight, tire configuration and tire condition. The SLINGSHOT may hydroplane at lower speeds and react differently to hydroplaning than most motorcycles and cars.

WARNING
The SLINGSHOT vehicle is intended for on-road use ONLY. Extreme use on private tracks or at private facilities is not recommended and may result in serious injury or death.

5.5.2: Break-In Period

The break-in period for your vehicle is the first 500 miles (800 km) of operation. During this break-in period, critical engine parts require special wear-in procedures so they seat and mate properly. Read, understand and follow all break-in procedures to ensure the long-term performance and durability of your engine.

5.5.2.1: Engine and Drivetrain Break-in

NOTICE
Failure to properly follow the engine break-in procedures outlined in this manual can result in serious damage to the engine. Follow all break-in procedures carefully. Avoid full-throttle operation and other conditions that may place an excessive load on the engine during the break-in period.
  1. Fill the fuel tank with gasoline. Heed the fuel warnings in the Fuel and Exhaust Safety section and the Fuel Recommendation section.

  2. Check the oil level. See the Engine Oil Level section for details. Add the recommended oil as needed to maintain the oil level between the safe and add marks.

  3. Vary speed. Do not drive at a constant speed, whether fast or slow. Do not drive at sustained idle.

  4. Avoid full-throttle starts and do not drive at full throttle.

  5. Do not exceed 70 MPH (113 km/h).

  6. Avoid the use of downshifting to brake or slow the vehicle.

  7. Avoid making hard stops for the first 200 miles (322 km).

  8. Perform regular checks on fluid levels, controls and areas outlined on the daily pre-ride inspection checklist. See the Pre-Ride Inspections section for details.

  9. Change both the engine oil and filter at 500 miles (800 km).

5.5.3: Fuel Recommendation

NOTICE

Use of fuel other than the recommended fuel could result in voiding of your warranty.

Use only unleaded gasoline with a 91 pump octane minimum and a maximum ethanol content of 10%. DO NOT USE E-85 GASOLINE OR GASOLINE CONTAINING METHANOL. Using E85 or gasoline/methanol blends can result in poor starting and driveability, and may damage critical fuel system components.

Review the fuel warnings. See Fuel and Exhaust Safety. Use only the recommended fuel.

  1. Insert the fuel nozzle into the fuel tank filler neck. Do not leave the nozzle unattended while fueling.

  2. Fill the fuel tank until the pump stops. Do not overfill.

WARNING
Fuel expands in the fuel tank. To prevent leaks, make sure the fuel filler cap is properly seated. Do not overfill.
NOTICE
Fuel can damage painted surfaces and plastic parts. If gasoline spills on the any part of the vehicle, immediately rinse it off with water or wipe it dry with a clean cloth.

5.5.4: Priming the Fuel System

If the vehicle runs out of fuel, prime the fuel system before attempting to restart the engine.

  1. Fill the fuel tank.

  2. Turn the ignition key to the ON position.

  3. Allow the fuel pump to run until it stops (about 5 seconds).

  4. Turn the key to the OFF position and wait 10 seconds.

  5. Repeat steps 2 – 4 three more times, then start the engine. See Starting the Engine.

5.5.5: Starting the Engine

The starter interlock system allows the engine to be started only when the clutch is disengaged (clutch pedal fully depressed).

NOTE
If the vehicle runs out of fuel, prime the system before attempting to restart the engine. See Priming the Fuel System.
  1. If this is your first time operating the SLINGSHOT, read and understand the following sections of this manual before starting the engine:

  2. Perform the Pre-Ride Inspections. See Pre-Ride Inspection.

  3. Insert the key into the ignition switch. Turn the key to the ON position. You should hear the fuel pump run momentarily as it pressurizes the fuel system.

  4. Release the park brake.

  5. Depress the clutch pedal fully to disengage the clutch.

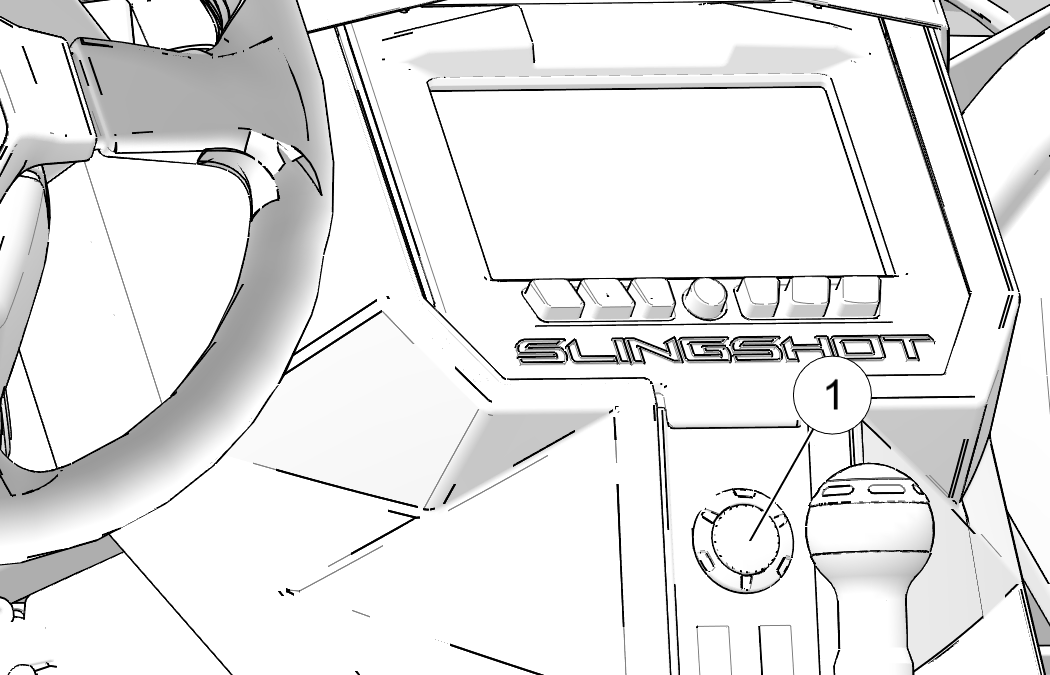
  6. Press and release the one-touch starter switch 1 to start the engine.

  7. If either the check engine indicator or the low oil pressure indicator illuminates after the engine starts, stop the engine immediately. Refer to either the check engine indicator information or the low oil pressure indicator information found on Indicator Lamps.

  8. With the brake applied, allow the engine to idle. Idle speed will gradually slow to normal as the engine warms to operating temperature.

5.5.6: Shifting Gears

WARNING
Forced shifting (without depressing the clutch pedal) could cause damage to the engine, transmission and drive train. Such damage could cause loss of control, which could result in serious injury or death. Always depress the clutch pedal fully to disengage the clutch before shifting gears.

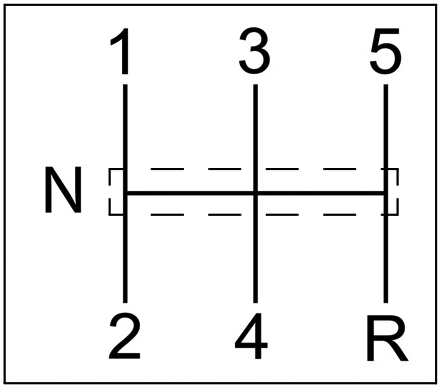
The SLINGSHOT vehicle is equipped with a 5-speed transmission. Neutral is located between gears. When the shift lever is in neutral, it should move freely from left to right.

  1. Start the engine. See the Starting the Engine section for details.

  2. With the engine at idle speed and the clutch disengaged (pedal depressed), apply the brakes.

  3. Move the shift lever into first gear.

  4. Release the brake pedal.

  5. In one smooth motion, simultaneously release the clutch pedal while slowly depressing the throttle pedal. As the clutch begins to engage, the vehicle will move forward.

  6. To shift to a higher gear, accelerate smoothly to the recommended shift point. See the Recommended Shift Points section for details. Perform the following actions quickly and precisely:

    1. Simultaneously release the throttle pedal completely while disengaging the clutch (depressing the clutch pedal).

    2. Move the shift lever to the next gear.

    3. Simultaneously release the clutch pedal while depressing the throttle pedal.

    NOTE
    Within the recommended speed ranges (see the Recommended Shift Points section for details), you can downshift to slow the vehicle or to increase power. You may want to downshift when climbing a hill or passing. Downshifting also helps to decrease speed when combined with releasing the throttle pedal.
  7. To shift to a lower gear (downshift), reduce speed to the recommended shift point. See the Recommended Shift Points section for details. Perform the following actions quickly and precisely:

    1. Simultaneously release the throttle pedal completely while disengaging the clutch (depressing the clutch pedal).

    2. Move the shift lever to the next lower gear.

    3. Simultaneously release the clutch pedal while depressing the throttle pedal.

WARNING
Downshifting improperly could cause transmission damage, loss of traction and loss of control, which could result in serious injury or death.
  • Reduce speed before downshifting. Always downshift within the recommended shift points.

  • Use extreme caution when downshifting on wet, slippery or other low traction surfaces. Release the clutch pedal very gradually in these conditions.

  • Avoid downshifting in a curve. Downshift before entering the curve. Avoid coasting (clutch disengaged) through curves and corners.

5.5.6.1: Recommended Shift Points

Upshifting (Accelerating)   Downshifting (Decelerating)
Gear Change Recommended Speed   Gear Change Recommended Speed
1 to 2 15 MPH (24 km/h)   5 to 4 40 MPH (64 km/h)
2 to 3 25 MPH (40 km/h)   4 to 3 35 MPH (56 km/h)
3 to 4 40 MPH (64 km/h)   3 to 2 20 MPH (32 km/h)
4 to 5 45 MPH (72 km/h)   De-clutch 15 MPH (24 km/h)

5.5.7: Accelerating

Accelerate by depressing the throttle pedal. For even acceleration, depress the throttle pedal smoothly. When you reach the recommended speed for upshifting, shift up one gear.

WARNING
Accelerating abruptly could cause loss of control on low traction surfaces. Loss of control could result in serious injury or death. Always accelerate gradually, especially on wet, slippery or other low traction surfaces.

5.5.8: Braking

WARNING
Braking improperly could result in loss of control, which could result in serious injury or death. Always apply the brakes gradually, especially on wet, slippery or other low traction surfaces. Avoid braking in a curve or turn.
NOTE
If the anti-lock brake system activates while braking, you may feel pulsing at the brake pedal. Continue applying equal pressure to the brakes to slow or stop the vehicle.

Always allow a sufficient stopping distance so that brakes can be applied gradually. Practice braking in a safe area to become familiar with the feel of the SLINGSHOT brakes before driving in traffic.

  1. To slow the vehicle, release the throttle pedal and depress the brake pedal evenly and gradually.

  2. As the vehicle slows, disengage the clutch, or downshift each time vehicle speed reaches a downshift point. If braking to a complete stop, disengage the clutch when the vehicle is nearly stopped.

  3. After braking to a complete stop, shift to neutral and release the clutch pedal to reduce clutch bearing wear. If stopping in traffic, keep your foot on the brake pedal so other drivers can see your vehicle’s brake lights.

5.5.9: Stopping the Engine

Bring the vehicle to a complete stop before stopping the engine.

NOTE
Stopping the engine with the transmission in gear while the vehicle is moving could cause loss of rear wheel traction or engine and transmission damage, which could cause loss of control and serious injury or death. Always stop the engine after the vehicle is fully stopped and the transmission is in neutral (or clutch is disengaged). If the engine stops unexpectedly while the vehicle is moving, guide the vehicle to a safe location off the road and away from traffic.
  1. Brake to a complete stop. When nearly stopped, disengage the clutch.

    NOTE
    As the vehicle slows, disengage the clutch, or downshift each time vehicle speed reaches a downshift point.
  2. When fully stopped, move the ignition switch to the OFF position.

  3. Remove the ignition key.

  4. Engage the park brake.

5.5.10: Reverse Operation
(Manual Transmission)

NOTICE
Do not attempt to shift into reverse gear when the vehicle is moving.

Follow these precautions when operating in reverse:

  1. Brake to a complete stop. When nearly stopped, disengage the clutch.

  2. When fully stopped, shift to neutral.

  3. Always check for obstacles or people behind the vehicle, and always inspect left and right fields of vision before operating in reverse.

  4. When it’s safe to proceed, shift into reverse gear. If your vehicle is equipped with a back-up camera, view the display screen for additional assistance as needed while operating in reverse. See the Back-Up Camera section for details.

  5. Release the brake pedal.

  6. In one smooth motion, simultaneously release the clutch pedal while slowly depressing the throttle pedal. As the clutch begins to engage, the vehicle will move rearward.

    NOTICE
    The reverse speed limit feature limits reverse operation to 10 MPH (16 km/h). Do not attempt to exceed this speed. If the engine seems to “cut out”, vehicle speed is exceeding the limit. Reduce throttle and slow down. Exceeding the limit could result in vehicle instability.
  7. Never apply hard throttle while operating in reverse.

  8. Always observe your path of travel and be alert to traffic, pedestrians and obstacles at all sides of the vehicle while operating in reverse.

5.5.11: Using Cruise Control

The cruise control switches are located on the turn signal lever. Make sure you read this section and understand how to safely operate this feature before using the cruise control.

WARNING
Improper operation of cruise control could cause loss of control and result in serious injury or death. Follow all cruise operation procedures carefully. Never use cruise control when roads are wet or slippery. Do not use cruise control when driving in heavy or congested traffic.
NOTE
Cruise control functions will not be available until the brake has been applied firmly at least once after a restart of the vehicle.

5.5.11.1: Cruise Control Tips

  • Cruise control can be set in any gear.

  • Vehicle speed must be above 25 MPH (40 km/h).

  • Set speed will vary slightly in hilly terrain.

  • The cruise control will not resume a pre-set speed if the resulting acceleration or deceleration rate is too high or too low. For example, resuming a set speed from 30 MPH (48 km/h) while in 5th gear may cause cruise to disengage.

  • Cruise control will not engage if brake lights are not operating properly.

  • Cruise control will be disabled if there is an active stability or traction control event.

  • Cruise control will be disabled if there are multiple wheel speed sensor faults or a communication error with the electronic stability module.

5.5.11.2: Set Speed

  1. Move the cruise control ON/OFF/RES switch 1 to ON to activate the cruise control.

    Position Function
    Left Reset (+)
    Center On
    Right Off
  2. Accelerate to the desired speed. Press and release the SET switch 2 at the tip of the lever.

5.5.11.3: Cancel Cruise Control

To temporarily cancel the cruise control and allow use of the resume feature, perform one of the following:

  • depress the brake pedal or

  • depress the clutch pedal

To cancel the cruise control and erase the set speed from memory, move the ON/OFF/RES switch to OFF.

5.5.11.4: Resume Speed

  1. Disengage the cruise control by depressing the brake pedal or clutch pedal.

    NOTE
    If you depress the throttle pedal to accelerate, the cruise control will resume the previously set speed when the pedal is released.
  2. Move the ON/OFF/RES switch to RES to resume operation at the previously set speed.

    NOTE
    Moving the ON/OFF/RES switch to OFF will erase the set speed from memory and disengage the cruise control.

5.5.11.5: Increase Speed Setting

Move and release the ON/OFF/RES switch to RES to increase the set speed in approximately one MPH (1-2 km/h) increments. Move and hold the ON/OFF/RES switch in the RES position to accelerate to a new SET speed. The speed will reset when the switch is released or after a maximum acceleration of approximately 10 MPH (16 km/h), whichever comes first.

5.5.11.6: Reduce Speed Setting

Press and release the SET switch to decrease speed in approximately one MPH (1-2 km/h) increments. Press and hold the SET switch to decelerate to a new SET speed (resets when switch is released), or to the minimum cruise speed of 25 MPH (40 km/h).

Chapter 6: Maintenance

6.6.1: Introduction

Proper maintenance assures the highest level of safety, durability and dependability for your SLINGSHOT vehicle.

Owners are responsible for performing the scheduled maintenance identified in this owner’s manual.

  • Your authorized SLINGSHOT dealer can perform the break-in maintenance procedures when the vehicle’s odometer registers 500 miles (800 km).

  • See your dealer or perform the recommended periodic maintenance at the intervals specified in the Periodic Maintenance Chart beginning on Periodic Maintenance.

Any qualified repair shop or person may maintain, replace, or repair the emission control devices or systems on your vehicle. An authorized POLARIS dealer can perform any service that may be necessary for your vehicle. POLARIS also recommends POLARIS parts for emissions related service. However, equivalent parts may be used for such service. It is a potential violation of the Clean Air Act if a part supplied by an aftermarket parts manufacturer reduces the effectiveness of the vehicle’s emission controls. Tampering with emission controls is prohibited by federal law.

6.6.2: Break-In Maintenance

Your dealer can perform the break-in maintenance procedures when the vehicle’s odometer registers 500 miles (800 km). Performing the break-in maintenance will help ensure optimum engine performance for the entire service life of the engine. Your dealer can change engine oil, inspect all fluids and serviceable components, ensure that all fasteners are tightened and make other adjustments as needed.

6.6.3: Major Maintenance

For major repair information, refer to the SLINGSHOT Service Manual. Major repairs typically require technical skills and specially designed tools. Emission system service requires special tools and training and should be performed by your dealer.

6.6.4: Safety During Service Procedures

WARNING
Failure to follow recommended precautions and procedures could result in serious injury or death. Always heed all safety precautions and follow all operation, inspection and maintenance procedures outlined in this manual.
  • Improperly installed or adjusted components can result in a system failure. If you do not have the time, tools and expertise necessary to complete a procedure properly, please see your dealer or another qualified person for service.

  • Review the safety-related maintenance information on Safety Maintenance.

  • Before beginning any maintenance procedure, read the instructions for the entire procedure.

  • Always position the vehicle on a firm level surface before performing service.

  • Wear eye and face protection when using pressurized air.

  • Never start the engine or let it run in an enclosed area. Engine exhaust fumes are poisonous and can cause loss of consciousness or death in a short time.

  • During some procedures you may use potentially hazardous products such as oil, coolant, or brake fluid. Always follow the instructions and warnings on the product packaging.

6.6.5: Elevating the Vehicle for Service

WARNING
Serious injury or death can occur if the vehicle moves or falls while elevated. When elevating is necessary, make sure the vehicle is properly elevated and stable before performing service.

Some procedures require elevating the vehicle. DO NOT attempt to elevate your vehicle without proper equipment. If you’re not familiar with using floor jacks or lift mechanisms, see your dealer for service.

To elevate the SLINGSHOT vehicle, use automotive-quality floor jacks. Use the floor jacks on a firm, flat surface.

Make sure the floor jacks are positioned under the frame rails in the front where the lower control arm mounts to the frame, or in the rear where the frame rails meet.

For fluid changes, always make sure the elevated vehicle is level.

Bottom View of Lift Points Side View of Lift Points

6.6.6: Periodic Maintenance

Inspect, clean, lubricate, adjust and replace parts as necessary. When inspection reveals the need for replacement parts, we recommend genuine SLINGSHOT parts available from your dealer. However, equivalent parts may also be used, but may void your vehicle warranty. Record service and maintenance information in the Maintenance Log on Maintenance Log.

Perform maintenance at the intervals specified in the Periodic Maintenance Chart. Perform the procedures more frequently if the vehicle is subjected to severe use.

6.6.6.1: Severe Use Definition

  • Idling for extended periods

  • High speed operation for extended periods

  • Low speed operation for extended periods

  • Frequent operation in dusty or otherwise adverse conditions

  • Frequent operation in extremely hot or cold climates

  • Frequent short trip cold weather operation

6.6.6.2: Maintenance Chart Key

WARNING
Improperly performing the procedures marked with a “D” could result in component failure and lead to serious injury or death. We recommend that you request assistance from an authorized SLINGSHOT dealer who can perform these services.
Symbol Description
XU Perform these operations more often for vehicles subjected to severe use.
D We recommend that you request assistance from an authorized SLINGSHOT dealer who can perform these services.
Symbol Procedure Description
I Inspect, tighten, clean, adjust, repair and/or replace as needed.
R Replace
L Lubricate as directed
P Perform the service as directed

6.6.6.3: Periodic Maintenance Chart

Odometer Reading in Miles (Kilometers)
See Maintenance Chart Key on preceding page  

500 (800)

5000 (8000)

10000 (16000)

15000 (24000)

20000 (32000)

25000 (40000)

30000 (48000)

35000 (56000)

40000 (64000)

45000 (72000)

50000 (80000)

100000 (160000)

150000 (240000)

  Component Pg  
XU Air Filter 68 I I I R I I R I I R I I I
  Battery 81 I I I I I I I I I I I I I
XU Belt, Accessory - - - - - - - - - - - - - I
XU Brake Fluid 73 I I R I R I R I R I R R R
XU Brake Pads 75 I I I I I I I I I I I I I
  Brake Pedal 29 I I I I I I I I I I I I I
  Clutch Fluid 71 I I I I I I R I I I I    
  Clutch Pedal — I I I I I I I I I I I    
XU, D Coolant - I I I I I R I I I I R R R
XU Coolant Hoses 67 I I I I I I I I I I I I I
  Crankcase Vent 70 I I I I I I I I I I I    
  Drive Belt 69 I I I I I I I I I I I I I
  Driveshaft Yoke - I I I I I I I I I I I I I
XU Engine Oil & Filter 59 R R R R R R R R R R R R R
  Engine Compression - - I - - - I - - - - I I I
D Evaporative Emission Control System (if equipped) - I I I I I I I I I I I I I
  Exhaust System 80 I I I I I I I I I I I I I
  Fasteners 44 I I I I I I I I I I I    
  Fuel System 70 I I I I I I I I I I I    
  Headlamps 86 I   I   I   I   I   I    
XU Radiator & Fan 67 - I I I I I I I I I I I I
  Radio/Radio Software 123 Update annually. Please see your dealer.
  ABS Components 30 I I I I I I I I I I I    
  Rear Shock 43 I I I I I I I I I I I R -
XU Angle Drive Fluid 64 - - - - - - - - - - R R R
D Spark Plugs - - - - - - I - - - - I R -
  Steering - I I I I I I I I I I I I I
  Swingarm - I I I I I I I I I I I    
  Tires (Condition) 76 I I I I I I I I I I I I I
XU Transmission Fluid 62 - - - - - - - - - - R R R

6.6.7: Engine Oil

Always check and change the engine oil at the intervals outlined in the Periodic Maintenance Chart beginning on Periodic Maintenance Chart. Always use POLARIS SLINGSHOT Premium 5W-30 engine oil or another 5W-30 dexos1®-approved engine oil for the SLINGSHOT vehicle. See Lubricants and Coolant for the part numbers of recommended service products.

6.6.7.1: Engine Oil Level

The oil fill cap and dipstick are located under the hood, on the engine. Always use the recommended oil.

NOTE
The engine must be at normal operating temperature when checking or changing the oil. Do not check or change the oil when the engine is cold.
  1. Position the vehicle on a level surface. Place the transmission in neutral. Engage the park brake.

  2. Start the engine and allow it to idle for 2-3 minutes. Stop the engine.

  3. Wait 3 minutes before checking the oil level. This allows the oil to settle to the bottom of the crankcase. Do not check the oil level immediately after stopping the engine.

  4. Open the hood. See Hood.

  5. Remove the dipstick 2. Wipe it dry with a clean cloth.

  6. Reinstall the dipstick. Make sure it’s fully seated.

  7. Remove the dipstick and view the oil level. Maintain the oil level between the MIN and MAX marks on the dipstick 3. Add oil if necessary. Do not overfill.

NOTICE
A rising oil level between checks in cool weather driving can indicate contaminants such as fuel or moisture collecting in the crankcase. If the oil level is over the full mark, change the oil immediately.

6.6.7.2: Engine Oil / Filter Change

Always check and change the engine oil at the intervals outlined in the Periodic Maintenance Chart. Always change the oil filter whenever changing oil.

  1. Position the vehicle on a level surface. Place the transmission in neutral. Engage the park brake.

    NOTE
    The engine must be at normal operating temperature when checking or changing the oil. Do not check or change the oil when the engine is cold.
  2. Start the engine and allow it to idle for 2-3 minutes. Stop the engine.

    CAUTION
    Hot oil can cause burns to skin. Do not allow hot oil to contact skin.
  3. Clean the area around the drain plug at the bottom of the crankcase.

  4. Remove the oil cap. Loosen the oil filter cap to allow the pressurized oil to drain into the oil pan.

  5. Place a drain pan under the drain plug. Remove the drain plug. Allow the oil to drain completely.

  6. Clean the sealing surfaces of the drain plug and oil pan. The sealing surfaces should be clean and free of burrs, nicks or scratches.

  7. Reinstall the drain plug. DO NOT overtighten.

    TORQUE
    18 ft-lbs (25 Nm)
  8. Using an appropriate oil filter wrench, rotate the oil filter cap 2 counter-clockwise to remove the cap and filter unit.

  9. Remove the filter from the cap.

  10. Using a clean, dry cloth, clean the filter sealing surface on the crankcase.

  11. Lubricate the gasket area on the new oil filter with a thin film of clean engine oil.

  12. Install the new filter onto the oil filter cap.

  13. Lubricate the o-ring on the oil filter cap with a thin film of clean engine oil.

  14. Use the oil filter wrench to reinstall the cap/filter unit. Tighten to specification.

    TORQUE
    16 ft-lbs (22 Nm)
  15. Remove the oil fill cap 1. Add the recommended oil. Do not overfill.

    CAPACITY
    4.5 qts (4.25 liters)
  16. Reinstall the oil fill cap.

  17. Shift to neutral.

  18. Start the engine and allow it to idle for 1-2 minutes. Stop the engine.

  19. Check for leaks around the drain plug and oil filter.

  20. Remove the dipstick and view the oil level. Maintain the oil level between the MIN and MAX marks on the dipstick. Add oil if necessary. Do not overfill.

  21. Recycle the used oil and filter properly.

6.6.8: Transmission Fluid

This fluid level does not require routine inspection. If gear shifting seems irregular or if you suspect a fluid leak, inspect the fluid level.

Always change the transmission fluid at the intervals outlined in the Periodic Maintenance Chart section. Always use SLINGSHOT Transmission Fluid or another GL-3 rated transmission fluid. See the Recommended Service Products chapter for the part numbers of recommended service products.

The fill plug is located on the left side of the gearcase. The drain plug is located on the right side of the gearcase.

6.6.8.1: Fluid Level Check

  1. Elevate the vehicle using appropriate jack stands. Make sure the elevated vehicle is level.

  2. Remove the fill plug 1. If the fluid level is not within 5 mm of the bottom edge of the fill hole, add the recommended fluid to bring the level to the bottom edge of the fill hole.

  3. Reinstall the fill plug.

    TORQUE
    19-35 ft-lbs (26-48 N·m)
  4. See your dealer for service. A low fluid level indicates a fluid leak.

6.6.8.2: Fluid Change

  1. Elevate the vehicle using appropriate jack stands. Make sure the elevated vehicle is level.

  2. Remove the fill plug.

  3. Place a drain pan under the drain plug 2.

  4. Remove the drain plug. Allow the fluid to drain completely.

  5. Clean and reinstall the drain plug with a new gasket. Torque to specification.

    TORQUE
    19-35 ft-lbs (26-48 N·m)
  6. Add the recommended fluid. Do not overfill. Maintain the fluid level at the bottom edge of the fill hole.

    CAPACITY
    2.75 qt (2.6 l)
  7. Reinstall the fill plug with a new o-ring. Torque to specification.

    TORQUE
    19-35 ft-lbs (26-48 N·m)
  8. Check for leaks. Dispose of used fluid properly.

6.6.9: Angle Drive Fluid

This fluid level does not require routine inspection. If you suspect a fluid leak, inspect the fluid level.

Always change the angle drive fluid at the intervals outlined in the Periodic Maintenance Chart section. Always use SLINGSHOT Angle Drive Fluid or another Fully Synthetic 80w–250 fluid for the angle drive. See the Recommended Service Products chapter for the part numbers of recommended service products.

The fill plug is located on the left side of the angle drive housing. The drain plug is located on the bottom of the housing, driver’s side.

6.6.9.1: Fluid Level Check

  1. Elevate the vehicle using appropriate jack stands. Make sure the elevated vehicle is level.

  2. Remove the fill plug 1. If the fluid level is not at the bottom edge of the fill hole, add the recommended fluid to bring the level to the bottom edge of the fill hole.

    NOTICE
    Use a syringe to add the fluid. If a syringe is not available, remove the battery and use a funnel and tube to add the fluid.
  3. Reinstall the fill plug.

    TORQUE
    10-14 ft-lbs (14-19 Nm)
  4. See your dealer for service. A low fluid level indicates a fluid leak.

6.6.9.2: Fluid Change

  1. Elevate the vehicle using appropriate jack stands. Make sure the elevated vehicle is level.

  2. Remove the fill plug 1.

  3. Place a drain pan under the drain plug 2.

  4. Remove the drain plug. Allow the fluid to drain completely.

  5. Clean and reinstall the drain plug. Torque to specification.

    TORQUE
    10-14 ft-lbs (14-19 Nm)
    NOTE
    Use a syringe to add the fluid. If a syringe is not available, remove the battery and use a funnel and tube to add the fluid.
  6. Add the recommended fluid. Do not overfill. Maintain the fluid level at the bottom edge of the fill hole.

    CAPACITY
    23.7 oz (700 ml)
  7. Reinstall the fill plug. Torque to specification.

    TORQUE
    10-14 ft-lbs (14-19 Nm)
  8. Check for leaks. Dispose of used fluid properly.

6.6.10: Cooling System

The engine coolant level is maintained by the recovery system. The recovery system components are the recovery bottle, recovery bottle pressure cap and connecting hose.

As coolant operating temperature increases, the expanding (heated) excess coolant is forced out of the radiator and into the recovery bottle. As engine coolant temperature decreases, the contracting (cooled) coolant is drawn back from the tank and into the radiator.

NOTICE
Some coolant level drop on new vehicles is normal as the system is purging itself of trapped air. Observe coolant levels and maintain as recommended by adding coolant to the recovery bottle.

6.6.10.1: Coolant

Always use POLARIS SLINGSHOT 50/50 Antifreeze or another DEX-COOL®-approved 50/50 premixed antifreeze for your vehicle. DO NOT use POLARIS Antifreeze 50/50 Premix.

To ensure that the coolant maintains its ability to protect the engine, we recommend that the system be completely drained every five (5) years and fresh antifreeze added. See your authorized dealer for this service.

Always check and change the coolant at the intervals outlined in the Periodic Maintenance Chart beginning on Periodic Maintenance.

6.6.10.2: Coolant Level

Always check the coolant level when the engine is cold. Maintain the coolant level at the “cold” fill level mark 3 on the recovery bottle 2 (when the fluid is cool).

  1. Position the vehicle on a level surface.

  2. Open the hood.

  3. View the coolant level in the recovery bottle.

    CAUTION
    Escaping steam can cause burns. Never remove the pressure cap while the engine is warm or hot. Always allow the engine to cool before removing the pressure cap.
  4. If the level is low, slowly remove the pressure cap 1. Use a funnel to add coolant to the fill level mark.

  5. Reinstall the pressure cap.

    NOTE
    If coolant must be added often, or if the recovery bottle runs completely dry, there may be a leak in the system. Have the cooling system inspected by your dealer.

6.6.10.3: Radiator and Cooling Fan

Always check and clean the radiator and fan at the intervals outlined in the Periodic Maintenance Chart beginning on Periodic Maintenance.

NOTICE
Washing the vehicle with a high-pressure hose could damage the radiator fins and impair the radiator's effectiveness. Using a high-pressure system is not recommended.
  1. Check radiator air passages for restrictions or damage.

  2. Carefully straighten any bent radiator fins.

  3. Inspect the cooling fan for smooth rotation.

  4. Remove any obstructions with low pressure compressed air or low pressure water.

6.6.10.4: Coolant Hoses Inspection

CAUTION
Inspecting the cooling fans while the engine is running or when the engine is still hot can result in injury. Always make sure the engine is both off and sufficiently cooled before inspection.

Inspect coolant hoses for leaks, deterioration or damage at the intervals outlined in the Periodic Maintenance. Leaks may appear as dry traces that are white/grey in color. Replace worn or damaged hoses.

IMPORTANT
Prior to servicing hoses, always make sure the engine has fully cooled and to release latent pressure by removing the surge tank cap.

6.6.11: Air Filter (if equipped)

Always inspect the air filter at the intervals outlined in the Periodic Maintenance Chart. Replace the air filter every 15,000 miles (24,000 km).

  1. Open the hood.

  2. Clean all dirt and debris from the air box area.

  3. Unlatch the air box cover clips 1 and carefully remove the air box cover.

  4. Remove the air filter 2 from the air box.

  5. Inspect the air filter. Shake the filter to remove excess dirt. If the filter remains caked with dirt, replace the filter with a new filter.

  6. Clean the inside of the air box using a vacuum.

    NOTICE
    Avoid using compressed air for cleaning as dirt could enter the engine.
  7. Reinstall the air filter or install a new air filter.

    CAUTION
    Operating the vehicle without the air filter installed can result in serious engine damage, which could result in an accident and injury to the operator and others. Always make sure the air filter is installed.
  8. Reinstall the air box cover and secure the clips.

  9. Close the hood.

6.6.12: Air Filter (if equipped)

Always inspect the air filter at the intervals outlined in the Periodic Maintenance Chart. Replace the air filter every 15,000 miles (24,000 km).

  1. Open the hood.

  2. Loosen the clamp 1 from the air filter.

  3. Remove the bolt and nut securing the bracket 2 to the passenger side top radiator mount.

  4. Remove the air filter 4.
  5. Inspect the air filter. Shake the filter to remove excess dirt. If the filter remains caked with dirt, replace the filter with a new filter.

  6. If replacing the air filter, remove the nut 3 and bracket, and reinstall the bracket and nut on the new air filter.

    TORQUE
    Nut: 3.3-3.75 ft-lbs (4.5-5.1 Nm)
  7. Reinstall the air filter, or install a new air filter, with the clamp.

    NOTICE
    Operating the vehicle without the air filter installed can result in serious engine damage, which could result in an accident and injury to the operator and others. Always make sure the air filter is installed.
  8. Install the bolt and nut, securing the bracket to the passenger side top radiator mount.

    TORQUE
    Bolt: 7-9 ft-lbs (9.5-12.2 Nm)
  9. Tighten the clamp on the air filter.

    TORQUE
    Clamp: 2.6-3.25 ft-lbs (3.5-4.4 Nm)
  10. Close the hood.

6.6.13: Drive Belt Condition

Adjust drive belt tension after the first 2,500 miles (4,000 km) of operation. Replace the drive belt 1 and both sprockets as a set if the drive belt has over 30,000 miles (48,000 km) of service at the time of damage or failure.

When inspecting the drive belt for signs of wear, refer to the Drive Belt Wear Analysis table on the next page to determine whether the belt needs to be replaced. See the SLINGSHOT Service Manual or an authorized dealer for more information.

DO NOT attempt to check belt tension if the belt has been exposed to rain or washing within a 24 hour period or if the belt is hot from being in use. Allow the belt to cool down to ambient temperature before measuring belt tension.

6.6.14: Drive Belt Wear Analysis

Internal tooth cracks (hairline): OK to run, but monitor condition External tooth cracks: Replace belt Missing teeth: Replace belt Chipping (not serious): OK to run, but monitor condition
Fuzzy edge cord: OK to run, but monitor condition Hook wear: Replace belt Stone damage: Replace belt if damage is on edge Bevel wear (outboard edge only): OK to run, but monitor condition

6.6.15: Drive Belt Cleaning

Cleaning the drive belt will maximize belt and sprocket life and minimize drive line noise. Clean the belt at every tire change. Clean the belt more often if operating in dirty, dusty or high debris environments.

  1. Mix a few drops of mild dish soap with a cup of warm water.

  2. Use a soft nylon brush to clean the belt and sprocket teeth with the soapy water. Clean well in corner areas where road debris and belt dust can collect.

  3. Rinse the belt with clear water, then dry thoroughly.

NOTICE
Do not inspect or adjust drive belt tension when the belt is wet. Improper adjustment will result.

6.6.16: Suspension Inspections

Always inspect the suspensions at the intervals outlined in the Periodic Maintenance Chart beginning on Periodic Maintenance. Refer to the SLINGSHOT Service Manual, or your authorized dealer can assist.

6.6.17: Fuel System Components

Inspect fuel lines and connections for wear, deterioration, kinks, leaks, or other damage. If any leaks or damage of fuel system components are found, do not operated the vehicle. Promptly see your dealer for service if any of these conditions exist.

6.6.18: Evaporative Emission Control System (California Models)

The “check engine” indicator illuminates if a purge valve fault is present. See your authorized dealer for service.

6.6.19: Crankcase Breather Hose

Inspect the entire length of the crankcase breather hose 1 for cracks, kinks, wear or other damage. Make sure clamps are in place and secure.

6.6.20: Hydraulic Clutch Fluid

The clutch fluid reservoir 1 is located under the hood on the driver’s side of the vehicle. Check the hydraulic clutch fluid level before each use of the vehicle. Maintain the fluid level between the MIN and MAX lines on the reservoir.

Use DOT 4 brake fluid in the hydraulic clutch fluid reservoir. Use fluid only from a sealed, clean container. Review the brake fluid precautions on Brake Fluid Precautions.

NOTICE
Brake fluid will damage painted surfaces and plastic parts. Always clean spilled brake fluid immediately with water and a mild detergent.

6.6.20.1: Clutch Fluid Level

  1. Position the vehicle on a level surface.

  2. Place the transmission in gear.

  3. Open the hood.

  4. Wipe the fluid container and the area around the reservoir cover with a clean cloth.

    WARNING
    Using the wrong fluid or allowing air or contaminants into the fluid system can damage the system seals or result in a malfunction that could lead to serious injury or death. Do not operate the clutch while the reservoir cover is removed. Fluid could overflow from the reservoir and cause air to enter the fluid system.
  5. View the fluid level in the reservoir. If the fluid level is below the MIN line on the reservoir, remove the cap and add the recommended fluid to the MAX line. Do not overfill.

  6. Reinstall the reservoir cap.

  7. Depress the clutch pedal forcefully for a few seconds. Check for fluid leakage around the clutch reservoir fittings.

6.6.20.2: Clutch Fluid Change

Always change fluid if the fluid becomes contaminated, if the fluid condition is questionable, or if the type and brand of the fluid in the reservoir are unknown.

  1. Position the vehicle on a level surface.

  2. Place the transmission in gear.

  3. Open the hood.

  4. Wipe the fluid container and the area around the reservoir cover with a clean cloth.

    WARNING
    Using the wrong fluid or allowing air or contaminants into the fluid system can damage the system seals or result in a malfunction that could lead to serious injury or death. Do not operate the clutch while the reservoir cover is removed. Fluid could overflow from the reservoir and cause air to enter the fluid system.
  5. Using a syringe or vacuum-type tool, remove the old fluid from the fluid reservoir.

  6. Refill the reservoir to the MAX line with the recommended fluid. Do not overfill.

  7. Reinstall the reservoir cap.

  8. Depress the clutch pedal forcefully for a few seconds. Check for fluid leakage around the clutch reservoir fittings.

6.6.21: Brake Fluid

The brake fluid master cylinder reservoir 1 is located under the hood on the driver’s side of the vehicle. Check the brake fluid level before each use of the vehicle. Maintain the fluid level between the MIN and MAX lines on the reservoir.


If the BRAKE FAILURE indicator illuminates, brake fluid may be low. Check the brake fluid level.

Use DOT 4 brake fluid in the brake fluid reservoir. Use fluid only from a sealed, clean container.

6.6.21.1: Brake Fluid Precautions

WARNING

Using the wrong fluid or allowing air or contaminants into the fluid system can damage the system seals or result in a malfunction that could lead to serious injury or death. Use only DOT 4 brake fluid from a sealed container.

Do not operate the front brake with the reservoir cover removed. Fluid could overflow from the reservoir and allow air to enter the system. Air in the brake system could cause the brakes to malfunction.

An over-full reservoir may cause brake drag or brake lock-up, which could result in serious injury or death. Maintain brake fluid at the recommended level. Do not overfill.

After opening a bottle of brake fluid, always discard any unused portion. Never store or use a partial bottle. Brake fluid is hygroscopic, meaning it rapidly absorbs moisture from the air. The moisture causes the boiling temperature of the brake fluid to drop, which can lead to early brake fade and the possibility of accident or serious injury

NOTICE
Brake fluid will damage painted surfaces and plastic parts. Always clean spilled brake fluid immediately with water and a mild detergent.

6.6.21.2: Brake Fluid Change

Change the brake fluid every two years or 10,000 miles (16,093 kilometers), whichever comes first. Always change fluid if the fluid becomes contaminated, if the fluid condition is questionable, or if the type and brand of the fluid in the reservoir are unknown. See your authorized dealer or another qualified person for this service.

6.6.21.3: Brake Fluid Level

Check the brake fluid level before each use of the vehicle.

  1. Position the vehicle on a level surface.

  2. Place the transmission in gear.

  3. Open the hood.

  4. Wipe the fluid container and the area around the reservoir cover with a clean cloth.

  5. View the fluid level in the reservoir. If the fluid level is below the MIN 1 line on the reservoir, remove the cap and add the recommended fluid to the MAX 2 line. Do not overfill.

  6. Reinstall the reservoir cap.

  7. Depress the brake pedal forcefully for a few seconds. Check for fluid leakage around the master cylinder fittings and the brake caliper fittings.

6.6.22: Brake System Inspection

  1. Inspect all brake hoses and connections for dampness or stains from leaking or dried fluid. Tighten any leaking connections and replace components as necessary. See the SLINGSHOT Service Manual or your authorized dealer.

  2. Check the brake pedal for excessive travel or a spongy feel.

  3. Check the brake pads for wear, damage and looseness.

  4. Inspect brake discs for nicks, scratches, cracks or other damage. Clean any grease using an approved brake cleaner or alcohol.

    WARNING
    Do not apply WD-40 or any petroleum product to brake discs. These types of products are flammable and may also reduce the friction between the brake pad and caliper.
  5. Inspect the brake disc spline and pad wear surface for excessive wear. Change pads when worn to 3/64” (1 mm).

  6. Inspect the thickness of each brake disc at four or more locations around the disc. If any disc is worn to the minimum thickness at the thinnest point, or if a disc is damaged, see your dealer for replacement.

3/64 in. (1 mm)

Minimum Thickness
Front: 4.5 mm / Rear: 6.5 mm

6.6.23: Brake System Inspection (SLR Only)

  1. Inspect all brake hoses and connections for dampness or stains from leaking or dried fluid. Tighten any leaking connections and replace components as necessary. See the SLINGSHOT Service Manual or your authorized dealer.

  2. Check the brake pedal for excessive travel or a spongy feel.

  3. Inspect the rotor to ensure tightness to hub.

  4. Check the brake pads for wear, damage and looseness.

  5. Inspect brake discs for nicks, scratches, cracks or other damage. Clean any grease using an approved brake cleaner or alcohol.

    WARNING
    Do not apply WD-40 or any petroleum product to brake discs. These types of products are flammable and may also reduce the friction between the brake pad and caliper.
  6. Inspect the brake disc spline and pad wear surface for excessive wear. Change pads when worn to 3/50'' (1.5 mm).

  7. Inspect the thickness of each brake disc at four or more locations around the disc. If any disc is worn to the minimum thickness at the thinnest point, or if a disc is damaged, see your dealer for replacement.

  8. The SLR model comes with a 2–piece rotor. Check that the rotor is tightened adequately to the hub.

3/50'' (1.5 mm)

Minimum Thickness
Front: 19 mm / Rear: 19 mm

6.6.24: Wheels and Tires

WARNING

Operating the vehicle with worn tires, improper tires or tires with improper or uneven tire pressure could cause loss of control or accident. Always use the correct size and type of tires specified for your vehicle. Always maintain proper tire pressure as recommended in the owner’s manual and on safety labels. Always replace tires when tread depth has worn to the minimum requirement.

If you experience a wheel impact, such as hitting a curb, a large pothole or road debris, have your tires and rims inspected immediately. These types of impacts may cause hidden tire/rim damage that may not be noticeable during operation. This damage could cause tire or rim failures and result in accidents causing serious injury or death. If you are in doubt, have the wheel checked by your authorized Slingshot dealer or another authorized person. Exercise care when parking along curbs and reduce speed if possible when approaching unavoidable potholes and/or road debris.

6.6.24.1: Tire Condition

Inspect the tire sidewalls, road contact surface and tread base. If inspection reveals cuts, punctures, cracks or other wear or damage, replace the tire before driving the vehicle. Refer to the SLINGSHOT Service Manual, or an authorized dealer can assist.

6.6.24.2: Tire Tread Depth

Measure the tread depth near the center of the tread on both tires.

  • Replace a front tire when tread depth wears to the minimum of 1.6 mm.

  • Replace the rear tire when tread depth wears to the minimum of 4 mm.

6.6.24.3: Tire Pressure

For an accurate reading, check tire pressure when tires are cold. Driving warms the tires and increases tire air pressure.

  1. Remove the valve stem cap 1.

  2. Adjust tire pressure to the recommended specification. Refer to safety labels on the vehicle or to the Specifications chapter.

WARNING
Do not exceed the maximum recommended inflation pressure to seat the bead. Tire or rim failure may result.

6.6.24.4: Wheel Inspection

Inspect all wheels for cracks or other damage. Replace damaged wheels promptly. Do not operate the vehicle if wheels are damaged or cracked.

6.6.24.5: Wheel Removal

  1. Position the vehicle on a firm, level surface.

  2. Place the transmission in gear.

  3. Engage the park brake.

  4. Position an appropriate floor jack under the frame at the side or rear of the vehicle, near the wheel to be removed.

  5. If removing the rear wheel, place wheel chocks at the front of both front wheels to prevent rolling.

  6. Elevate the vehicle until the wheel is slightly off the ground.

  7. Remove the wheel nuts and remove the wheel.

6.6.24.6: Wheel Installation

  1. With the transmission in gear and the park brake set, place the wheel on the wheel hub. Be sure the valve stem is toward the outside and rotation arrows on the tire point toward forward rotation.

  2. Install the wheel nuts and finger-tighten them.

    NOTE
    On vehicles with tapered rear wheel nuts, make sure the tapered end of the nut goes into the taper on the wheel.
  3. Tighten all wheel nuts in a star pattern to specification.

    TORQUE
    75 ft-lbs (102 Nm)
  4. Lower the vehicle and remove the floor jack.

6.6.25: Spark Plugs

6.6.25.1: Spark Plug Recommendations

Refer to the specifications section beginning on Specifications for the recommended spark plug type and gap for your vehicle. Torque spark plugs to specification after installing.

NOTICE
Using non-recommended spark plugs can result in serious engine damage. Always use the recommended spark plugs.
Spark Plug Specifications
Spark Plug Type AC Delco 41-103 or equivalent
Spark Plug Torque 15 ft-lbs (20 Nm)

Inspect and replace spark plugs at the intervals recommended in the Periodic Maintenance Chart beginning on Periodic Maintenance. Inspect spark plugs when the engine is warm. Always replace spark plugs in sets of four.

6.6.25.2: Spark Plug Service

  1. Open the hood.

    CAUTION
    A hot exhaust system and engine can cause burns. Allow a hot engine to cool or wear protective gloves when removing a spark plug for inspection.
  2. Unplug the spark plug wire connectors 1 from the ignition coils.

  3. Remove the ignition coil bolts 3.

  4. Remove the ignition coils 2.

    CAUTION
    Wear eye and face protection when using pressurized air.
  5. Before removing the spark plugs, use compressed air to remove any loose dirt or debris from the spark plug wells.

    NOTICE
    The spark plugs must be installed before using compressed air in this area.
  6. Rinse the plug wells with water and dry with compressed air.

    NOTE
    Spark plug wells have drain holes built into the cylinder head to allow water to drain out.
  7. Remove the spark plugs. Tool: 5/8” spark plug socket with extension.

  8. Inspect electrodes for wear and carbon buildup. A good plug will have a sharp outer edge with no rounding or erosion of the electrodes.

  9. Do not attempt to adjust spark plug gap.

  10. Reinstall the spark plugs or install new plugs.

  11. Tighten spark plugs to specification.

  12. Reinstall the ignition coils.

  13. Reinstall the ignition coil bolts. Tighten to specification.

    TORQUE
    7.5 ft-lbs (10 Nm)
  14. Connect the spark plug wires to the ignition coils.

6.6.26: Engine Compression Test

An engine compression test can be performed to monitor general engine condition. Refer to the SLINGSHOT Service Manual, or your authorized dealer can assist.

6.6.27: Exhaust System Inspection

CAUTION
A hot exhaust system and engine can cause burns. Allow a hot engine to cool or wear protective gloves when inspecting the exhaust system.

Check the exhaust system for visible and audible signs of exhaust gas leaks. Check that all fasteners, springs, and rubber isolators are in place and in good condition. Check that exhaust heat shields are in place and not damaged or deteriorated. If any exhaust leaks or missing/deteriorated components (including heat shields) are found, do not operate the vehicle. Perform necessary repairs before continuing vehicle operation. Refer to the SLINGSHOT Service Manual, or your authorized dealer can assist.

6.6.28: Battery

WARNING
Improperly connecting or disconnecting battery cables can result in an explosion and cause serious injury or death. When removing the battery, always disconnect the negative (black) cable first. When reinstalling the battery, always connect the negative (black) cable last.
WARNING
Battery electrolyte is poisonous. It contains sulfuric acid. Serious burns can result from contact with skin, eyes or clothing.

Antidote:
External: Flush with water.
Internal: Drink large quantities of water or milk. Follow with milk of magnesia, beaten egg, or vegetable oil. Call physician immediately.
Eyes: Flush with water for 15 minutes and get prompt medical attention.
Batteries produce explosive gases. Keep sparks, flame, cigarettes, etc. away. Ventilate when charging or using in an enclosed space. Always shield eyes when working near batteries. KEEP OUT OF REACH OF CHILDREN.

6.6.28.1: Battery Maintenance

Always keep battery terminals and connections free of corrosion. If cleaning is necessary, remove corrosion with a stiff wire brush. Wash with a solution of one tablespoon baking soda and one cup water. Rinse well with tap water and dry off with clean shop towels. Coat the terminals with dielectric grease or petroleum jelly. Be careful not to allow cleaning solution or tap water into a conventional battery.

Make sure battery connections are tight. See Battery Installation for cable torque specifications.

6.6.28.2: Battery Access and Removal

The battery compartment 1 is located on the lower left side of the vehicle, behind the rider compartment.

  1. Remove the access panel fasteners and remove the access panel.

  2. Disconnect the negative (-) battery cable 2.

  3. Remove the three bolts 3 holding the battery bracket.

  4. Disconnect the positive (+) battery cable.

  5. Slide the battery out.

6.6.28.3: Battery Installation

Using a new battery that has not been fully charged can damage the battery and result in a shorter life. It can also hinder vehicle performance.

  1. Make sure the battery is fully charged.

  2. Slide the battery into place.

  3. Connect the positive (+) battery cable. 1

  4. Replace the three bolts to secure the battery bracket.

  5. Connect the negative (-) battery cable. 2

  6. Reinstall the battery access panel

6.6.28.4: Battery Storage

Whenever the vehicle is not used for a period of one month or more, remove the battery from the vehicle, ensure that it’s fully charged, and store it out of the sun in a cool, dry place. Check battery voltage each month during storage and recharge as needed to maintain a full charge.

6.6.28.5: Battery Charging

6.6.28.5.1: AGM Battery Charger Recommendations

Slingshot vehicles utilize Absorbent Glass Mat (AGM) batteries which are selected for their superior vibration resistance, weight savings, and high output. Polaris recommends using the BatteryMINDer® 2012 AGM - 2 AMP battery charger (PN 2830438) to charge and maintain AGM batteries. The charger can be found on the Polaris PG&A website and ordered in DEX – Item Availability.

Batteries that fall below 12.5V run the risk of sulfation, a condition whereby sulfate crystals form inside the battery and significantly reduce performance. AGM chargers are designed specifically for charging AGM type batteries and use high frequency pulses to partially reverse sulfation.

IMPORTANT
The use of non-AGM battery chargers or non-AGM battery tenders may result in a misleading “battery not found” or “open cell” fault message. Please ensure you are using the recommended AGM charger when charging AGM type batteries.
6.6.28.5.2: AGM Battery Testing Procedure
  1. Test battery using the battery tester PU-50296.

  2. If the tester indicates a test result other than “Good Battery,” follow the steps below before replacing the battery:

    1. Connect battery to the recommended battery charger. If charging sequence begins as normal, fully charge battery and proceed to step 3.

      The time listed on the PU-50296 battery tester printout is an estimate. The recommended automatic charger will indicate when the battery is fully charged on its display.

    2. If charging sequence does not initialize, refer to AGM Battery Charging Recommendations – Deeply Discharged (below 3 volts) to attempt to restore the deeply discharged battery. If charging sequence will not finish as intended, the battery needs to be replaced.

  3. Re-test battery. If the test results show that battery failed, proceed with battery replacement.

6.6.28.5.3: AGM Battery Charging Recommendations – Low Charge

The nominal voltage for a Slingshot battery is 12.8 Volts when fully charged. The battery will self-discharge when disconnected from a vehicle, and will discharge at a faster rate when connected. If the battery voltage falls below 12.5V, it should be charged immediately using the recommended battery charger. Listed below are the recommended battery inspection schedules.

  • Batteries which are not connected to a vehicle should be inspected every 60 days. The battery must be charged if found to be below 12.5 volts.

  • Batteries which are connected to vehicles should be inspected when they arrive at your dealership and at least once every month thereafter. The battery must be charged if found to be below 12.5 volts.

  • Showroom vehicles used to demonstrate radio, display and infotainment features should be charged daily. If possible, these vehicles should be connected to the recommended battery charger continuously.

Always use the recommended automatic battery charger, and wait for the charger to complete the charge cycle before disconnecting it.

6.6.28.5.4: AGM Battery Charging Recommendations – Deeply Discharged (below 3 volts)

AGM batteries discharged to a voltage of 3 volts or less may not be recognized by the recommended automatic battery charger. (The minimum voltage threshold recognized by other battery chargers may be as high as 10.5 volts). Often times deeply discharged batteries can be restored by attaching another, fully-charged, battery to “jump start” the low battery. Follow the steps below to restore a deeply discharged battery.

  1. Carefully connect the two batteries’ positive terminals, then the negative terminals using jumper cables.

  2. Connect the recommended battery charger to the low battery and initiate the charging sequence.

    WARNING
    Always check to ensure the positive cables are connected to the positive terminals before powering the charger on. Reversing polarity when charging can damage electrical components and risk personal injury. Be careful not to let battery cable clamps touch each other.
  3. After the charging sequence has initiated, disconnect the fully-charged battery. Always disconnect the fully-charged battery positive first, followed by low battery positive, low battery negative, and finally fully-charged battery negative

  4. Proceed with charging both batteries to full capacity. Listed in the table below are the approximate charging times for deeply discharged batteries. Always use the recommended automatic battery charger, and wait for the charger to complete the charge cycle before disconnecting it. The recommended automatic charger will indicate when the battery is fully charged on its display.

    Battery

    PN

    Charging

    Time

    Battery

    Capacity

    Charging

    Rate

    4014609 18 hours 30 AH 2 amps
6.6.28.5.5: AGM Battery Maintenance Tips
  1. If the vehicle will not be driven for more than 2 weeks, maintaining the battery with the BatteryMINDer® 2012 AGM - 2 AMP charger (PN 2830438) is recommended.

  2. To make battery charging easier, the charging cable can be connected to the positive terminal on the Slingshot alternator. Please review the instructions outlined in the Slingshot Service Manual (Electrical Chapter) for details regarding this charging process.

    WARNING
    DO NOT jump start using the alternator positive terminal. In certain conditions, the current load created by the starter may exceed the capability of the fusible link.
  3. For added convenience Polaris offers the BatteryMINDer® Accessory Vehicle Power Plug (PN 2830518) which allows easy connection to vehicle's battery through the 12V socket. The 12V socket located between the seats directly above the cup holders CAN be used for charging. The 12V socket located in the glove box is powered after key-on and CANNOT be used for charging.

  4. To help prolong battery life, it is recommended to remove the battery from vehicles stored ONE month or longer. To maximize the life of stored batteries, they should be kept in a cool / dry location. Batteries will self discharge more rapidly when stored in extreme temperatures. Batteries should be maintained using the recommended battery charger while in storage.

  5. Batteries will self-discharge more quickly when dirty. Periodic cleaning of the battery terminals using a terminal brush will help maximize battery life. Wash terminals with a solution of one tablespoon baking soda and one cup water. Rinse well with tap water and dry off with clean shop towels. Coat the terminals with dielectric grease or petroleum jelly.

  6. Battery connections should be tightened to the correct torque during installation. This will reduce voltage drop and ensure a reliable connection between the alternator and battery.

6.6.29: Headlamp Bulb Replacement

When servicing a halogen lamp (bulb), avoid touching the lamp with bare fingers. Oil from your skin leaves a residue, causing a hot spot that will shorten the life of the lamp. If fingers do touch a lamp, clean it with denatured alcohol.

6.6.29.1: Outer Headlamps

  1. Pull the sealing boot away from the back of the bulbs and housing.

  2. Press the looped end of the wire bulb retainer clip and swing the end toward the center of the bulb to release it from the latch tab.

  3. With the wire connector attached, pull the bulb out.

  4. Disconnect the wire harness. Install the new bulb and secure the retainer.

  5. Reinstall the sealing boot. Make sure it seals tightly around the bulb base and lens to seal off from moisture.

6.6.29.2: Center Headlamps (if equipped)

  1. Disconnect the headlight wiring harness at the rear of the headlights.

  2. From the rear of the headlight, grasp the bulb housing and rotate it counter-clockwise to remove it.

  3. Install the new bulb and rotate it clockwise to secure it.

  4. Reconnect the wiring harness.

6.6.30: LED Light Assemblies

LED lights are not serviceable. If one of the LED lamps fails to illuminate, the entire light assembly must be replaced.

  1. Remove the rear body panel to access the light assembly.

  2. Remove the screws 1 securing the light assembly to the vehicle (taillight assembly shown).

  3. Unplug the electrical connector 2 from the light assembly.

  4. Remove the light assembly.

  5. Install the electrical connector to the replacement light assembly.

  6. Reinstall the light assembly. Tighten the screws.

    TORQUE
    3 ft-lbs (4 Nm)
  7. Reinstall the rear body panel. Tighten the screws.

    TORQUE
    5.4 ft-lbs (7 Nm)

6.6.31: Headlamp Aim Inspection Conditions

The following headlamp aim inspections and adjustments will be accurate only when tire pressures and suspensions are at factory-recommended settings. Refer to safety labels on the vehicle or to the Specifications chapter. The vehicle must also be unladen (without fuel, rider weight or cargo weight).

6.6.32: Center Headlamp Aim Adjustment (USA)

  1. Verify that headlamp aim inspection conditions are met.

  2. Position the vehicle on a level surface with the nose approximately 25 ft. (7.6 m) from a wall 1.

  3. Move the ignition switch to the ON position to turn the lights on. Place the headlamps on low beam.

  4. Observe the headlight beam display on the wall. The beam displays at two levels, higher at the right side and lower at the left side.

  5. Measure from the floor to the lower beam display at the left side as illustrated. When the beam is properly adjusted, this measurement should be in the following range:

    • 19-20.75” (48-53 cm) for base model

    • 20-21.75” (51-55 cm) for SL model

  6. To adjust a headlight beam, open the hood and turn the two upper headlamp adjustment screws 1 simultaneously and equally.

    • Clockwise adjustment lowers the beam

    • Counter-clockwise adjustment raises the beam

6.6.33: Auxiliary Headlamp Aim Adjustment (USA)

  1. Verify that headlamp aim inspection conditions are met. See Headlamp Aim Inspection Conditions.

  2. Position the vehicle on a level surface with the nose 5 ft. (1.5 m) from a wall 1.

  3. Move the ignition switch to the ON position to turn the lights on.

  4. Observe the auxiliary headlight beam display on the wall. The lower edge of the beam displays with a multi-colored halo.

  5. Measure from the floor to the bottom edge of the halo’s green band as illustrated. When the beam is properly adjusted, this measurement should be in the following range:

    • 3.75-5.75” (9.5-14.6 cm) for base model

    • 4.75-6.75” (12-17.1 cm) for SL model

  6. To adjust a headlight beam, open the hood and turn the two headlamp adjustment screws 2 simultaneously and equally.

    • Clockwise adjustment raises the beam

    • Counter-clockwise adjustment lowers the beam

6.6.34: Headlamp Aim Adjustment (Canada)

  1. Verify that headlamp aim inspection conditions are met. See Headlamp Aim Inspection Conditions.

  2. Position the vehicle on a level surface with the nose approximately 25 ft. (7.6 m) from a wall 1.

  3. Move the ignition switch to the ON position to turn the lights on. Place the headlamps on low beam.

  4. Observe the headlight beam display on the wall. The beam displays at two levels, higher at the right side and lower at the left side.

  5. Measure from the floor to the lower beam display at the left side as illustrated. When the beam is properly adjusted, this measurement should be in the following range:

    • 20-21.75” (51-55 cm) for base model

    • 21-22.75” (53.3-57.8 cm) for SL model

  6. To adjust a headlight beam, open the hood and turn the two upper headlamp screws 2 simultaneously and equally.

    • Clockwise adjustment raises the beam

    • Counter-clockwise adjustment lowers the beam

6.6.35: Fuse Replacement

The fuse box 1 is located under the hood near the brake fluid reservoir. The three main system fuses are located in the battery compartment.

  1. Open the hood.

  2. Squeeze the fuse box cover tabs 2 inward and remove the cover.

  3. Use the fuse puller provided in the tool kit to remove the spent fuse.

    NOTICE
    Always use the recommended fuse to prevent electrical system damage. Refer to the label on the fuse box cover.
  4. Install the new fuse.

  5. Reinstall the fuse box cover.

Chapter 7: Cleaning and Storage

7.7.1: Cleaning Products

This section provides tips on the very best way to clean, polish and preserve every surface of your beautiful new SLINGSHOT vehicle. We recommend the use of Polaris Engineered Vehicle Care cleaning and polishing products to offer the best care for your vehicle. Polaris Engineering Vehicle Care can be found online at https://www.polaris.com/en-us/ or at your Polaris SLINGSHOT Dealer. After cleaning the vehicle, inspect for damage to the painted surfaces. Repair chips or scratches promptly by applying touch-up paint to prevent corrosion.

For more information, or for answers to your cleaning and detailing questions, please see your SLINGSHOT dealer.

7.7.2: Washing the Vehicle

NOTICE
Do not use pressurized water to wash the SLINGSHOT vehicle. Water may seep in and deteriorate wheel bearings, brake caliper assemblies, electrical connectors and transmission seals. Do not direct any water stream at the air intakes, exhaust outlets, radiator, rider compartment, engine compartment, heat shields, or electrical components.
  1. Do not use abrasive cleaners.

  2. Rinse off as much dirt and debris as possible with water running at low pressure. Use as little water as possible when washing near the air intake or the exhaust pipe openings. Dry these components thoroughly before using the vehicle.

  3. Make sure the brakes are functioning properly before riding.

NOTE
Do not apply waxes or polishes to uncoated plastic, vinyl, or rubber. See your SLINGSHOT dealer for approved cleaning products.

7.7.3: Seasonal Storage

If you will not operate the vehicle for 60 days or longer, such as during the winter, storing it properly will help prevent damage to the fuel system, electrical system, engine, suspensions, tires and body. During extended storage periods, maintain tire pressure and battery voltage at the recommended levels.

  1. Choose a dry, well-ventilated storage location away from direct sunlight, preferably a garage or similar structure. The structure should have a firm, flat, clean surface free of oil and gasoline. The structure should have a relatively constant and moderate temperature.

  2. Proper storage starts with cleaning, washing and waxing the hood, chassis, upholstery and plastic parts. Be sure that corrosive salt and acids are removed from surfaces before beginning preservation with waxes and rust inhibitors (grease, oil or paint). Clean and touch up with paint any rusted or previously painted surfaces.

  3. Apply a light coat of oil or grease to all bushings, spindle shafts and tie rod ends.

  4. Change the engine oil. Start the engine and allow it to idle just long enough to circulate the new oil throughout the engine.

  5. Fog the engine using the recommended aerosol fogging oil available from your dealer. Follow the instructions on the container.

  6. Treat the fuel system with a fuel stabilizer. If a fuel stabilizer is not used, the fuel tank, fuel lines and fuel rail should be completely drained of gasoline.

  7. Remove the spark plugs. Spray a light amount of engine fogging oil into each cylinder to prevent rust. Reinstall the plugs.

  8. Make sure the coolant quality and level in the system is adequate for freeze protection during storage.

  9. Apply a metal protectant to shock absorber shafts or any exposed metal to prevent corrosion.

  10. Separate electrical connector blocks and clean corrosive build-up from connectors. Replace worn or frayed electrical wire and connectors.

  11. Prepare the battery for storage.

  12. Verify that tire pressure is at specification.

  13. Cover intake and exhaust openings to prevent small animals from entering.

  14. Elevate the vehicle using appropriate jack stands. Remove the wheels to prevent flat spots on the tires.

  15. Do not engage the park brake. If engaged, the brake pads may stick to the discs.

  16. Cover the vehicle with a fabric cover. Do not use plastic or vinyl covers, which trap moisture and encourage rust and corrosion.

7.7.4: Battery Storage

  1. Remove the battery.

  2. Clean the battery terminals first with a wire brush to remove any loose deposits.

  3. Wash the posts and the ends of the battery cables with a solution of one part baking soda to 16 parts water. Rinse with clean water and wipe dry.

  4. Apply a thin film of dielectric grease to the posts and cable connectors.

  5. Clean the outside of the battery with a solution of mild detergent and warm water.

  6. Store the battery in a dry area with a temperature of 32° to 90° F (0° to 32° C).

  7. While in storage, fully charge the battery once a month.

7.7.5: Removal From Storage

  1. Remove the fabric cover.

  2. Remove intake and exhaust opening covers (if covered for storage).

  3. Install the tires. Lower the vehicle and remove the jack stands.

  4. Verify that tire pressure is at specification. Refer to safety labels on the vehicle or to the Specifications chapter.

  5. Install the battery and perform an electrical inspection.

  6. Inspect the spark plugs. Install new spark plugs if necessary.

  7. If the vehicle was stored in an area subject to wide swings in temperature and humidity (such as outdoors), change the engine oil before starting the engine.

    NOTICE
    During storage, temperature and humidity changes can cause condensation to form in the crankcase and mix with engine oil. Running the engine with oil that contains condensation can cause engine damage.
  8. Inspect the storage area for signs of fluid leaks. Identify and perform service to any leaking components.

  9. Wash and polish the vehicle. Wax, polish or apply protectant to appropriate components.

  10. Perform the pre-ride inspections. See the Pre-Ride Inspections chapter for details.

  11. Check any fluid levels not included in the pre-ride inspection.

Chapter 8: Transporting and Towing

8.8.1: Transporting the SLINGSHOT

Because of the single rear wheel on the SLINGSHOT vehicle, it cannot be towed by a conventional tow truck. Never tow the SLINGSHOT vehicle on its wheels behind another vehicle.

To transport the SLINGSHOT vehicle, always use a trailer or flatbed truck. A trailer must have an approved load rating greater than the actual weight of the SLINGSHOT vehicle, including any installed accessories or cargo.

CAUTION

SLINGSHOT vehicles must be loaded with the front of the vehicle pointed toward the direction of travel. Loading the vehicle backwards may cause damage to the hood or other body panels during transport.

Follow these guidelines after loading the SLINGSHOT vehicle on a trailer or flatbed truck.

  1. Place the transmission in gear.

  2. Engage the park brake.

  3. Turn the key off. Remove the key to prevent loss.

  4. Secure all cargo and other items or remove them from the vehicle.

  5. Secure all storage compartment doors.

  6. Block all wheels at the front and rear of each tire.

  7. Always secure the frame of the SLINGSHOT vehicle to the transporting unit securely with suitable tie-down straps. Do not attach straps to the lower front trim. Secure the tie-down straps to the lower front A-arms 1 and rear swing-arm 2. See illustration.

  8. Never allow passengers on a trailer or in a trailered vehicle.

  9. Reduce speed and drive with caution while transporting.

Chapter 9: Troubleshooting

9.9.1: Inspection and Repair Safety

For your personal safety, do not attempt inspection or repairs not fully described in this owner’s manual. Contact an authorized dealer or another qualified person for service if you cannot determine the cause of a problem or if the inspection / repair exceeds your mechanical ability or tool resources. Do not perform any inspection or repair with the engine running.

9.9.2: Engine Cranks But Will Not Start

Possible Cause Possible Remedy/Action
Low Fuel Verify fuel level
Fuel pump inoperative Turn the key ON. The fuel pump should run momentarily and then stop. If you do not hear the fuel pump run, check the fuel pump / ignition circuit breaker. See the Fuse Replacement section for details.
Battery Discharged Fully charge the battery. See the Battery Charging section for details.
Spark Plug(s) Fouled Inspect spark plugs. See the Spark Plug Recommendations section for details.
Spark Plug Wire(s) Disconnected or Loose Be sure spark plug wires are securely fastened.

9.9.3: Starter Motor Does Not Turn or Turns Slowly

Possible Cause Possible Remedy/Action
Battery Discharged Fully charge the battery. See the Battery Charging section for details.
Battery Cables Loose or Corroded Inspect battery cables.
Transmission In Gear Disengage the clutch. See the Starting the Engine section for details.

9.9.4: Engine Starts But Misses or Runs Poorly

NOTICE
Turn engine OFF before inspecting any of these items.
Possible Cause Possible Remedy/Action
Battery Discharged Fully charge the battery. See the Battery Charging section for details.
Battery Cables Loose or Corroded Inspect battery cables and connections.
Spark Plug(s) Fouled Inspect spark plugs. See the Spark Plug Recommendations section for details.
Spark Plug Wire(s) Loose or Wet Inspect spark plug wires, ensure dry/secure.
Contaminated Fuel Inspect fuel for water / contamination. See dealer.
Engine Oil Level Incorrect Or Wrong Type Inspect level and quality of oil. See the Engine Oil Level for details.
Loose, Broken, Shorted Ignition Coil Wires Inspect coil primary wires. See dealer.
Air Intake Restricted Inspect air filter. See the Air Filter section for details.

9.9.5: Shifting Difficulties
(Manual Transmission)

Possible Cause Possible Remedy/Action
Hydraulic Clutch Fluid Contaminated Flush hydraulic clutch fluid (see dealer).
Air In Hydraulic Clutch System Bleed system (see dealer).
Clutch Slave Cylinder Bracket Loose Inspect / tighten loose parts.
Hydraulic Clutch Fluid Leak Inspect system for leaks (see dealer).
Clutch Damage Replace clutch.

9.9.6: Battery Charging Rate Low or Battery Discharges

Possible Cause Possible Remedy/Action
Loose/Corroded Charging Circuit Connection Check/clean battery cable connections. Check/clean charging circuit connections. See dealer.
Accessory Load Exceeds Charge Rate Use ACC position and limit accessory operation when engine is off.
Improperly Wired Accessory (Current Draw) See dealer to check charging system output and current draw.
Battery discharges when vehicle not in use. See dealer to check key OFF current draw.

9.9.7: Brake Noise / Poor Brake Performance

NOTICE
Contact your dealer if brake performance does not return after these inspections.
Possible Cause Possible Remedy/Action
Dust / Dirt On Brake Disc(s) Clean disc.
Worn Pads Or Disc / Brake Disc Damage Inspect pads.
Brake Fluid Level Low Or Fluid Contaminated Inspect fluid level / fluid.

9.9.8: Anti-Lock Brake Light Remains
Illuminated or Illuminates Intermittently

Possible Cause Possible Remedy/Action
Blown fuse Check the fuses.
Loose or damaged pulse ring Inspect pulse ring for looseness or chipped teeth.
Debris lodged in components Inspect wheel speed sensor and pulse ring for debris.
Damage caused by debris Inspect wheel speed sensor for cracked housing.
Damaged components See service manual or authorized dealer.

Chapter 10: Specifications

10.10.1: Slingshot Specifications

  SLINGSHOT S / SLINGSHOT SL / SLINGSHOT SLR / SLINGSHOT GRAND TOURING
Dimensions (Dimensions and specifications may vary with features, options and accessories)
Overall Length 149.6 in. (3800 mm)
Grand Touring: 150 in. (3808 mm)
Overall Width 77.6 in. (1960 mm)
Overall Height 51.9 in. (1318 mm)
Track Width 69.1 in. (1755 mm)
Wheel Base 105 in. (2667 mm)
Ground Clearance 5 in. (127 mm)
Weight
Maximum Wet Weight 1749 lbs. (793 kg)
Maximum Load Capacity (riders, cargo, accessories, options) 457 lbs. (207 kg)
Gross Vehicle Weight Rating (GVWR) 2199 lbs. (997 kg)
Gross Axle Weight Rating (GAWR) Front Axle: 1321 lbs. (599 kg)
Rear Axle: 878 lbs. (398 kg)
Capacities
Seating Two (2) Occupants
Engine Oil 5 qts. (4.75 l) with approximately 4.5 qts. (4.25 l) at oil change
Fuel 9.8 gallons (37.1 l)
Fuel Remaining at "Empty" on Gauge Approximately 1.0 gallon (3.8 l)
Engine
Engine Type GM Ecotec LE9 4-stroke
Configuration Inline 4-cylinder
Displacement 146 cubic inch (2384 cc)
Compression Ratio 10.4:1
Valve Train DOHC, VVT
Bore & Stroke 88 x 98 mm
Throttle Body Bore 65.6 mm
Electronic Fuel Injection System GM MEFI6
Spark Plug Type / Gap AC Delco 41-103 or equivalent / .043 in. (1.1 mm)
Exhaust Control System Closed-Loop, Single O2 Sensor
Exhaust System 3-Chamber Muffler
Cooling System POLARIS SLINGSHOT 50/50 Antifreeze or another DEX-COOL®-approved 50/50 premix
Lubrication System Wet Sump
  SLINGSHOT S / SLINGSHOT SL / SLINGSHOT GRAND TOURING SLINGSHOT SLR
Chassis
Front Suspension Type / Travel Dual A-Arm / 4.43 in. (112.6 mm) Dual A-Arm / 4.43 in. (112.6 mm)
Rear Suspension Type / Travel Swingarm / 5.23 in. (132.8 mm) Swingarm / 5.23 in. (132.8 mm)
Front Brakes Disc / Single Rotor / 2 Piston Calipers Disc / Dual-Rotor / 2 Piston Calipers
Rear Brakes Disc / Single Rotor / IPB Disc / Dual-Rotor / IPB
  SLINGSHOT S SLINGSHOT SL /
SLINGSHOT GRAND TOURING
SLINGSHOT SLR
Wheels And Tires
Front Tire Type KENDA KR20X KENDA KR20X KENDA KR20X
Front Tire Size 205/50 R17 225/45 R18 225/45 R18
Front Tire Pressure 28 PSI (193 kPa) 28 PSI (193 kPa) 28 PSI (193 kPa)
Front Tire Rims 17" x 7.0" 18" x 7.5" 18" x 7.5"
Rear Tire Type KENDA KR20X KENDA KR20X KENDA KR20B
Rear Tire Size 265/35 R18 255/35 R20 305/30 R20
Rear Tire Pressure 32 PSI (221 kPa) 32 PSI (221 kPa) 32 PSI (221 kPa)
Rear Tire Rims 18" x 9.5" 20" x 9.0" 20" x 11"
  SLINGSHOT S / SLINGSHOT SL / SLINGSHOT SLR / SLINGSHOT GRAND TOURING
Drive System
Final Drive Type Right Angle Drive (37/16)Carbon Fiber Reinforced Belt (62:39)
Transmission Type 5 Speed with Overdrive
Gear Shift Pattern 5-Speed H-Gate Pattern with Reverse Down-Right
1st 3.753:1
2nd 2.258:1
3rd 1.512:1
4th 1.000:1
5th 0.729:1
Right Angle Drive Ratio 2.313:1
Final Drive Ratio 1.590:1
Clutch Type Single Plate, Diaphragm Spring, Dry
Electrical
Alternator 100 Amp Maximum Output
Battery 12 Volt / 30 Amp Hour / 400 CCA
Lights
Center Headlights (USA) High/Low H9 65W
Auxiliary Outer Lights (USA) H3 55W
Headlights (Canada) High/Low H3 55W
Turn Signals / Taillight / Brake Light Non-Serviceable LED
License Plate Light Non-Serviceable LED
Speedometer / Indicator Lights Non-Serviceable LED
Fuses / Circuit Breakers
Ignition 10A Breaker
Headlight 30A Breaker
Auxiliary Lights 20A
Gauges 5A
Radio 25A
Turn Signal / Horn 20A
Fuel Pump 10A
ECM 10A Breaker
Powertrain 20A Breaker
Fan 20A Breaker
Accessory 25A
ABS 25A
EPAS 30A
Chassis Main Fuse 50A
Engine Main Fuse 40A
ABS Motor Fuse 40A

Chapter 11: Recommended Service Products

11.11.1: Lubricants and Coolant

Part Number Description
Engine Lubricant
2879409 SLINGSHOT Premium 5W-30 Engine Oil (qt./.95 l)
2879410 SLINGSHOT Premium 5W-30 Engine Oil (gal./3.8 l)
Gearcase / Transmission Lubricants
2879440 SLINGSHOT Transmission Fluid (qt./.95 l)
2879412 SLINGSHOT Angle Drive Fluid (qt./.95 l)
Coolant
2879411 SLINGSHOT 50/50 Antifreeze Premix (gal./3.8 l)

11.11.2: Service Manual Availability

Some procedures are beyond the scope of this manual. See your dealer to purchase the Service Manual for your vehicle. Service manuals can also be purchased online at https://www.polaris.com/en-us/.

Some procedures provided in the Service Manual require specialized knowledge, equipment, and training. Be sure you have the required technical skills and tools that are needed before you attempt ANY service on your vehicle. Please contact your dealer before attempting any service work that is beyond your level of technical knowledge or experience, or if the work requires specialized equipment.

Chapter 12: Warranty

12.12.1: Limited Warranty

POLARIS Industries Inc., 2100 Highway 55, Medina, MN 55340 (POLARIS) gives a TWO YEAR LIMITED WARRANTY on all components of your POLARIS vehicle against defects in material or workmanship. This warranty covers parts and labor charges for repair or replacement of defective parts and begins on the date of purchase by the original retail purchaser. This warranty is transferable to another owner during the warranty period through an authorized POLARIS dealer, but any such transfer will not extend the original term of the warranty. The duration of this warranty may vary by international region based upon local laws and regulations.

12.12.2: Registration

At the time of sale, the Warranty Registration Form must be completed by your dealer and submitted to POLARIS within ten days of purchase. Upon receipt of this registration, POLARIS will record the registration for warranty. No verification of registration will be sent to the purchaser as the copy of the Warranty Registration Form will be your proof of warranty coverage. If you have not signed the original registration and received the customer copy, please contact your dealer immediately. NO WARRANTY COVERAGE WILL BE ALLOWED UNLESS YOUR VEHICLE IS REGISTERED WITH POLARIS. Initial dealer preparation and set-up of your vehicle is very important in ensuring trouble-free operation. Purchasing a vehicle in the crate or without proper dealer set-up will void your warranty coverage.

12.12.3: Warranty Coverage And Exclusions

12.12.3.1: Limitations Of Warranties And Remedies

This POLARIS limited warranty excludes any failures that are not caused by a defect in material or workmanship. THIS WARRANTY DOES NOT COVER CLAIMS OF DEFECTIVE DESIGN. This warranty also does not cover acts of God, accidental damage, normal wear and tear, abuse or improper handling. This warranty also does not cover any vehicle, component, or part that has been altered structurally, modified, neglected, improperly maintained or used for racing, competition or purposes other than for which it was designed.

This warranty excludes damages or failures resulting from: improper lubrication; improper engine timing; improper fuel; surface imperfections caused by external stress, heat, cold or contamination; operator error or abuse; improper component alignment, tension, adjustment or altitude compensation; snow, water, dirt or other foreign substance ingestion/contamination; improper maintenance; modified components; use of aftermarket or unapproved components, accessories, or attachments; unauthorized repairs; or repairs made after the warranty period expires or by an unauthorized repair center.

This warranty excludes damages or failures caused by abuse, accident, fire, or any other cause other than a defect in materials or workmanship and provides no coverage for consumable components, general wear items, or any parts exposed to friction surfaces, stresses, environmental conditions and/or contamination for which they were not designed or not intended, including but not limited to the following items:

  • Wheels and tires

  • Suspension components

  • Brake components

  • Seat components

  • Clutches and components

  • Steering components

  • Batteries

  • Light bulbs/Sealed beam lamps

  • Filters

  • Lubricants

  • Bushings

  • Coolant Hoses

  • Finished and unfinished surfaces

  • Fuel Injectors/Throttle body components

  • Engine components

  • Drive belts

  • Hydraulic components and fluids

  • Circuit breakers/Fuses

  • Electronic components

  • Spark plugs

  • Sealants

  • Coolants

  • Bearings

Lubricants and Fluids
  1. Mixing oil brands or using non-recommended oil may cause engine damage. We recommend the use of POLARIS engine oil.

  2. Damage or failure resulting from the use of non-recommended lubricants or fluids is not covered by this warranty.

This warranty provides no coverage for personal loss or expense, including mileage, transportation costs, hotels, meals, shipping or handling fees, vehicle pick-up or delivery, replacement rentals, loss of vehicle use, loss of profits or loss of vacation or personal time.

THE EXCLUSIVE REMEDY FOR BREACH OF THIS WARRANTY SHALL BE, AT POLARIS' OPTION, REPAIR OR REPLACEMENT OF ANY DEFECTIVE MATERIALS, COMPONENTS, OR PRODUCTS. THE REMEDIES SET FORTH IN THIS WARRANTY ARE THE ONLY REMEDIES AVAILABLE TO ANY PERSON FOR BREACH OF THIS WARRANTY. POLARIS SHALL HAVE NO LIABILITY TO ANY PERSON FOR INCIDENTAL, CONSEQUENTIAL OR SPECIAL DAMAGES OF ANY DESCRIPTION, WHETHER ARISING OUT OF EXPRESS OR IMPLIED WARRANTY OR ANY OTHER CONTRACT, NEGLIGENCE, OR OTHER TORT OR OTHERWISE. THIS EXCLUSION OF CONSEQUENTIAL, INCIDENTAL, AND SPECIAL DAMAGES IS INDEPENDENT FROM AND SHALL SURVIVE ANY FINDING THAT THE EXCLUSIVE REMEDY FAILED OF ITS ESSENTIAL PURPOSE.

THE IMPLIED WARRANTY OF FITNESS FOR A PARTICULAR PURPOSE IS EXCLUDED FROM THIS LIMITED WARRANTY. ALL OTHER IMPLIED WARRANTIES (INCLUDING BUT NOT LIMITED TO THE IMPLIED WARRANTY OF MERCHANTABILITY) ARE LIMITED IN DURATION TO THE ABOVE 12 MONTH WARRANTY PERIOD. POLARIS DISCLAIMS ALL EXPRESS WARRANTIES NOT STATED IN THIS WARRANTY. SOME STATES DO NOT PERMIT THE EXCLUSION OR LIMITATION OF INCIDENTAL OR CONSEQUENTIAL DAMAGES OR ALLOW LIMITATIONS ON THE DURATION OF IMPLIED WARRANTIES, SO THE ABOVE LIMITATIONS MAY NOT APPLY TO YOU IF INCONSISTENT WITH CONTROLLING STATE LAW.

12.12.4: How to Obtain Warranty Service

If your vehicle requires warranty service, you must take it to a POLARIS Servicing Dealer. When requesting warranty service you must present your copy of the Warranty Registration Form to the dealer. (THE COST OF TRANSPORTATION TO AND FROM THE DEALER IS YOUR RESPONSIBILITY.) POLARIS suggests that you use your original selling dealer; however, you may use any POLARIS Servicing Dealer to perform warranty service.

12.12.4.1: In the country where your product was purchased:

Warranty or service bulletin repairs must be done by an authorized POLARIS dealer. If you move or are traveling within the country where your product was purchased, warranty and service bulletin repairs may be requested from any authorized POLARIS dealer that sells the same line as your product.

12.12.4.2: Outside the country where your product was purchased:

If you are traveling temporarily outside the country where your product was purchased, you should take your product to an authorized POLARIS dealer. You must show the dealer photo identification from the country of the selling dealer’s authorized location as proof of residence. Upon residence verification, the servicing dealer will be authorized to perform the warranty repair.

12.12.4.3: If you move:

If you move to another country, be sure to contact POLARIS Customer Assistance and the customs department of the destination country before you move. Product importation rules vary considerably from country to country. You may be required to present documentation of your move to POLARIS in order to continue your warranty coverage. You may also be required to obtain documentation from POLARIS in order to register your product in your new country. You should warranty register your product at a local POLARIS dealer in your new country immediately after you move to continue your warranty coverage and to ensure that you receive information and notices regarding your vehicle.

12.12.4.4: If you purchase from a private party:

If you purchase a POLARIS product from a private party, to be kept and used outside of the country in which the product was originally purchased, all warranty coverage will be denied. You must nonetheless register your product under your name and address with a local POLARIS dealer in your country to ensure that you receive safety information and notices regarding your product.

12.12.5: Exported Products

EXCEPT WHERE SPECIFICALLY REQUIRED BY LAW, THERE IS NO WARRANTY OR SERVICE BULLETIN COVERAGE ON THIS VEHICLE IF IT IS SOLD OUTSIDE THE COUNTRY OF THE SELLING DEALER’S AUTHORIZED LOCATION. This policy does not apply to vehicles that have received authorization for export from POLARIS. Dealers may not give authorization for export. You should consult an authorized dealer to determine this vehicle’s warranty or service coverage if you have any questions. This policy does not apply to vehicles registered to government officials or military personnel on assignment outside the country of the selling dealer’s authorized location. This policy does not apply to Safety Bulletins.

12.12.6: Notice

If your vehicle is registered outside of the country where it was purchased and you have not followed the procedure set above, your vehicle will no longer be eligible for warranty or service bulletin coverage of any kind, other than safety bulletins. Vehicles registered to government officials or military personnel on assignment outside of the country where the vehicle was purchased will continue to be covered by the Limited Warranty.

Please work with your dealer to resolve any warranty issues. Should your dealer require any additional assistance, they will contact the appropriate person at POLARIS.

This warranty gives you specific legal rights, and you may also have other rights which vary from state to state or in different countries. If any of the above terms are void because of federal, state or local law, all other warranty terms will remain in effect.

For questions call POLARIS Customer Assistance:

United States & Canada: 1-800-POLARIS (1-800-765-2747)

French: 1-800-268-6334

12.12.7: Vehicle Noise Regulation

Tampering with noise control systems is prohibited. Federal law prohibits the following acts or causing thereof:

  • The removal or rendering inoperative by any person, other than for the purposes of maintenance, repair or replacement of any device or element of design incorporated into any new vehicle for the purpose of noise control prior to its sale or delivery to the ultimate purchaser or while it is in use, or

  • The use of the vehicle after such device or element of design has been removed or rendered inoperative by any person.

Among those acts presumed to constitute tampering are:

  • Removal or puncturing of the muffler, baffles, header pipes or any other component which conducts exhaust gasses.

  • Removal or puncturing of any part of the intake system.

  • Lack of proper maintenance.

  • Replacing any moving part of the vehicle, or parts of the exhaust system or intake system, with parts other than those specified by the manufacturer.

This product should be checked for repair or replacement if the vehicle noise has increased significantly through use. Otherwise, the owner may become subject to penalties under state and local ordinances.

12.12.8: Noise Emission Warranty

POLARIS warrants that this exhaust system, at the time of sale, meets all applicable U.S. EPA Federal noise standards. This warranty extends to the first person who buys this exhaust system for purposes other than resale,

and to all subsequent buyers.

Warranty claims should be directed to:

  • An authorized POLARIS dealer, or

  • POLARIS Industries Inc., 2100 Highway 55, Medina, MN 55340

12.12.9: Federal Emissions Control System Warranty

This Federal Emissions Control System Warranty Statement applies to your SLINGSHOT vehicle, which is certified to meet U.S. EPA emission standards. This same emissions warranty coverage applies to SLINGSHOT vehicles sold in Canada.

12.12.9.1: Your Warranty Rights and Obligations

In the United States, new motor vehicles must be designed, built and equipped to meet applicable emission standards set forth in the Clean Air Act and in U.S. EPA regulations. POLARIS Industries Inc. (hereinafter POLARIS) must warrant the emission control system on your vehicle for the periods of time listed below provided there has been no abuse, neglect or improper maintenance of your vehicle.

Your emission control system may include parts such as the fuel-injection system, ignition system, catalytic converter and engine computer. Also included may be hoses, belts, connectors and other emission-related assemblies. Where a warrantable condition exists, POLARIS will repair your vehicle at no cost to you, including diagnosis, parts and labor.

12.12.9.2: Manufacturer’s Warranty Coverage

The emissions warranty coverage for this vehicle is for a period of use of five (5) years or 30,000 kilometers (18,641 miles), whichever first occurs first. If an emission-related part on your vehicle is defective, the part will be repaired or replaced by POLARIS. This is your emission control system DEFECTS WARRANTY.

12.12.9.3: Owner’s Warranty Responsibilities

As the vehicle owner, you are responsible for the performance of the required maintenance listed in your owner’s manual. POLARIS recommends that you retain all receipts covering maintenance on your vehicle, but POLARIS cannot deny warranty solely for the lack of receipts or for your failure to ensure the performance of all scheduled maintenance. You are responsible for presenting your vehicle to a POLARIS dealer as soon as a problem exists. The warranty repairs should be completed in a reasonable amount of time, not to exceed 30 days. As the vehicle owner, you should be aware that POLARIS may deny your warranty coverage if your vehicle or part has failed due to abuse, neglect, improper maintenance or unapproved modifications.

If you have any questions regarding your federal emissions warranty rights and responsibilities, you should contact:

  • An authorized POLARIS dealer, or

  • POLARIS Industries Inc., 2100 Highway 55, Medina, MN 55340 or call 1-800-POLARIS (1-800-765-2747)

12.12.9.4: Federal Emissions Control System
Warranty Provisions

POLARIS Industries Inc. (hereinafter POLARIS) warrants this vehicle includes as standard equipment a headlight, taillight and stoplight, and is street legal:

A. It is designed, built and equipped so as to conform at the time of initial retail purchases with all applicable regulations of the United States Environmental Protection Agency; and

B. It is free from defects in material and workmanship which cause such vehicle to fail to conform with applicable regulations of the United States Environmental Protection Agency for a period of use of 30,000 kilometers (18,641 miles) or five (5) years from the date of initial retail delivery, whichever occurs first.

I. Coverage

Warranty defects shall be remedied during customary business hours at any authorized POLARIS dealer located within the United States of America in compliance with the Clean Air Act and applicable regulations of the United States Environmental Protection Agency. Any part or parts replaced under this warranty shall become the property of POLARIS.

II. Limitations

The Emission Control System Warranty shall not cover any of the following:

A. Repair or replacement required as a result of:

  • Accident

  • Misuse

  • Repairs improperly performed or replacements improperly installed

  • Use of replacement parts or accessories not conforming to POLARIS’ specifications which adversely affect performance and/or

  • Use in competitive racing or related events.

B. Inspections, replacement of parts and other services and adjustments necessary for required maintenance.

C. Any vehicle on which the odometer mileage has been changed so that actual mileage cannot be readily determined.

III. Limited Liability

A. The liability of POLARIS under this Emission Control System Warranty is limited solely to the remedying of defects in material or workmanship by an authorized POLARIS dealer at its place of business during customary business hours. This warranty does not cover inconvenience or loss of use of the vehicle or transportation of the vehicle to or from the POLARIS dealer. POLARIS SHALL NOT BE LIABLE FOR ANY OTHER EXPENSES, LOSS OR DAMAGE, WHETHER DIRECT, INCIDENTAL, CONSEQUENTIAL OR EXEMPLARY, ARISING IN CONNECTION WITH THE SALE OR USE OF OR INABILITY TO USE THE POLARIS VEHICLE FOR ANY PURPOSE. SOME STATES DO NOT ALLOW THE EXCLUSION OR LIMITATION OF ANY INCIDENTAL OR CONSEQUENTIAL DAMAGES, SO THE ABOVE LIMITATIONS MAY NOT APPLY TO YOU.

B. NO EXPRESS EMISSION CONTROL SYSTEM WARRANTY IS GIVEN BY POLARIS EXCEPT AS SPECIFICALLY SET FORTH HEREIN. ANY EMISSION CONTROL SYSTEM WARRANTY IMPLIED BY LAW, INCLUDING ANY WARRANTY OF MERCHANTABILITY OR FITNESS FOR A PARTICULAR PURPOSE, IS LIMITED TO THE EXPRESS EMISSION CONTROL SYSTEM WARRANTY TERMS STATED IN THIS WARRANTY. THE FOREGOING STATEMENTS OF WARRANTY ARE EXCLUSIVE AND IN LIEU OF ALL OTHER REMEDIES. SOME STATES DO NOT ALLOW LIMITATIONS ON HOW LONG AN IMPLIED WARRANTY LASTS, SO THE ABOVE LIMITATIONS MAY NOT APPLY TO YOU.

C. No dealer is authorized to modify this POLARIS Limited Emission Control System Warranty.

IV. Legal Rights

THIS WARRANTY GIVES YOU SPECIFIC LEGAL RIGHTS, AND YOU MAY ALSO HAVE OTHER RIGHTS WHICH VARY FROM STATE TO STATE.

V. This warranty is in addition to the POLARIS Limited Vehicle Warranty
VI. Additional Information

Any replacement part that is equivalent in performance and durability may be used in the performance of any maintenance or repairs. However, POLARIS is not liable for these parts. The owner is responsible for the performance of all required maintenance. Such maintenance may be performed at a service establishment or by any individual. The warranty period begins on the date the vehicle is delivered to an ultimate purchaser.

Polaris Industries Inc.

2100 Highway 55

Medina, MN 55340

1-800-POLARIS (1-800-765-2747)

12.12.10: California Emissions Control System Warranty

This California Emissions Control System Warranty Statement applies to your SLINGSHOT vehicle, if it is certified to meet California Air Resources Board and US EPA emission control standards.

12.12.10.1: Your Warranty Rights and Obligations

The California Air Resources Board and POLARIS Industries Inc. (hereinafter POLARIS) are pleased to explain the emission control system warranty on your SLINGSHOT vehicle. In California, new motor vehicles must be designed, built and equipped to meet the state’s stringent anti-smog standards. POLARIS must warrant the emission control system on your vehicle for the periods of time listed below provided there has been no abuse, neglect or improper maintenance of your vehicle. Your emission control system may include parts such as the fuel-injection system, ignition system, catalytic converter and engine computer. Also included may be hoses, belts, connectors and other emission-related assemblies. Where a warrantable condition exists, POLARIS will repair your vehicle at no cost to you, including diagnosis, parts and labor.

12.12.10.2: Manufacturer’s Warranty Coverage

The emissions warranty coverage for this vehicle is for a period of use of five (5) years or 30,000 kilometers (18,641 miles), whichever first occurs first. If an emission-related part on your vehicle is defective, the part will be repaired or replaced by POLARIS. This is your emission control system DEFECTS WARRANTY.

12.12.10.3: Owner’s Warranty Responsibilities

As the vehicle owner, you are responsible for the performance of the required maintenance listed in your owner’s manual. POLARIS recommends that you retain all receipts covering maintenance on your vehicle, but POLARIS cannot deny warranty solely for the lack of receipts or for your failure to ensure the performance of all scheduled maintenance. You are responsible for presenting your vehicle to a POLARIS dealer as soon as a problem exists. The warranty repairs should be completed in a reasonable amount of time, not to exceed 30 days. As the vehicle owner, you should be aware that POLARIS may deny your warranty coverage if your vehicle or part has failed due to abuse, neglect, improper maintenance or unapproved modifications.

If you have any questions regarding your warranty rights and responsibilities, you should contact:

  • An authorized POLARIS dealer, or

  • POLARIS Industries Inc., 2100 Highway 55, Medina, MN 55340 or call 1-800-POLARIS (1-800-765-2747), or

  • California Air Resources Board, P.O. Box 8001, 9528 Telstar Avenue, El Monte, CA 91731

12.12.10.4: California Emission Control System
Warranty Provisions

POLARIS Industries Inc. (hereinafter POLARIS) warrants this vehicle includes as standard equipment a headlight, taillight and stoplight, and is street legal:

A. It is designed, built and equipped so as to conform at the time of initial retail purchases with all applicable regulations of the United States Environmental Protection Agency and the California Air Resources Board; and

B. It is free from defects in material and workmanship which cause such vehicle to fail to conform with applicable regulations of the United States Environmental Protection Agency or the California Air Resources Board for a period of use of 30,000 kilometers (18,641 miles) or five (5) years from the date of initial retail delivery, whichever occurs first.

I. Coverage

Warranty defects shall be remedied during customary business hours at any authorized POLARIS dealer located within the United States of America in compliance with the Clean Air Act and applicable regulations of the United States Environmental Protection Agency and the California Air Resources Board. Any part or parts replaced under this warranty shall become the property of POLARIS.

In the state of California only, emission-related warranted parts are specifically defined by the state’s Emission Warranty Parts List. These warranted parts are: carburetor and internal parts; intake manifold; fuel tank; fuel injection system; spark advance mechanism; crankcase breather; air cutoff valves; fuel tank cap for evaporative emission controlled vehicles; oil filler cap; pressure control valve; fuel/vapor separator; canister; igniters; breaker governors; ignition coils; ignition wires; ignition points; condensers and spark plugs if failure occurs prior to the first scheduled replacement; and hoses, clamps, fittings and tubing used directly in these parts. Since emission-related parts may vary from model to model, certain models may not contain all of these parts and certain models may contain functionally equivalent parts.

In the state of California only, Emission Control System emergency repairs, as provided for in the California Administrative Code, may be performed by other than an authorized a POLARIS dealer. An emergency situation occurs when an authorized POLARIS dealer is not reasonably available, a part is not available within 30 days or a repair is not complete within 30 days. Any replacement part can be used in an emergency repair. POLARIS will reimburse the owner for expenses, including diagnosis, not to exceed POLARIS’ suggested retail price for all warranted parts replaced, and labor charges based on POLARIS’ recommended time allowance for the warranty repair and the geographically appropriate hourly labor rate. The owner may be required to keep receipts and failed parts in order to receive compensation.

II. Limitations

The Emission Control System Warranty shall not cover any of the following:

A. Repair or replacement required as a result of:

  • Accident

  • Misuse

  • Repairs improperly performed or replacements improperly installed

  • Use of replacement parts or accessories not conforming to POLARIS’ specifications which adversely affect performance and/or

  • Use in competitive racing or related events.

B. Inspections, replacement of parts and other services and adjustments necessary for required maintenance.

C. Any vehicle on which the odometer mileage has been changed so that actual mileage cannot be readily determined.

III. Limited Liability

A. The liability of POLARIS under this Emission Control System Warranty is limited solely to the remedying of defects in material or workmanship by an authorized POLARIS dealer at its place of business during customary business hours. This warranty does not cover inconvenience or loss of use of the vehicle or transportation of the vehicle to or from the POLARIS dealer. POLARIS SHALL NOT BE LIABLE FOR ANY OTHER EXPENSES, LOSS OR DAMAGE, WHETHER DIRECT, INCIDENTAL, CONSEQUENTIAL OR EXEMPLARY, ARISING IN CONNECTION WITH THE SALE OR USE OF OR INABILITY TO USE THE POLARIS VEHICLE FOR ANY PURPOSE. SOME STATES DO NOT ALLOW THE EXCLUSION OR LIMITATION OF ANY INCIDENTAL OR CONSEQUENTIAL DAMAGES, SO THE ABOVE LIMITATIONS MAY NOT APPLY TO YOU.

B. NO EXPRESS EMISSION CONTROL SYSTEM WARRANTY IS GIVEN BY POLARIS EXCEPT AS SPECIFICALLY SET FORTH HEREIN. ANY EMISSION CONTROL SYSTEM WARRANTY IMPLIED BY LAW, INCLUDING ANY WARRANTY OF MERCHANTABILITY OR FITNESS FOR A PARTICULAR PURPOSE, IS LIMITED TO THE EXPRESS EMISSION CONTROL SYSTEM WARRANTY TERMS STATED IN THIS WARRANTY. THE FOREGOING STATEMENTS OF WARRANTY ARE EXCLUSIVE AND IN LIEU OF ALL OTHER REMEDIES. SOME STATES DO NOT ALLOW LIMITATIONS ON HOW LONG AN IMPLIED WARRANTY LASTS, SO THE ABOVE LIMITATIONS MAY NOT APPLY TO YOU.

C. No dealer is authorized to modify this POLARIS Limited Emission Control System Warranty.

IV. Legal Rights

THIS WARRANTY GIVES YOU SPECIFIC LEGAL RIGHTS, AND YOU MAY ALSO HAVE OTHER RIGHTS WHICH VARY FROM STATE TO STATE.

V. This warranty is in addition to the POLARIS Limited Vehicle Warranty
VI. Additional Information

Any replacement part that is equivalent in performance and durability may be used in the performance of any maintenance or repairs. However, POLARIS is not liable for these parts. The owner is responsible for the performance of all required maintenance. Such maintenance may be performed at a service establishment or by any individual. The warranty period begins on the date the vehicle is delivered to an ultimate purchaser.

POLARIS Industries Inc.

2100 Highway 55

Medina, MN 55340

1-800-POLARIS (1-800-765-2747)

12.12.11: California Consumer Notice / Notificación para los clientes de California

Notification requirements in California. SLINGSHOT and your SLINGSHOT dealer place a high priority on your satisfaction with our performance. If you are not satisfied with our resolution of a warranty concern and you would like to seek a civil penalty from SLINGSHOT, you must follow these steps under California law (Cal. Code Civ. Proc., §871.24(a)-(d)):

At least 30 days before filing a lawsuit seeking civil penalties (Civ. Code § 1794(c)), you must:

  1. Notify SLINGSHOT of your name and the name(s) of any other vehicle owner(s), the accurate Vehicle Identification Number (“VIN”) of your vehicle, and a brief summary of the repair history and problems with your vehicle, and

  2. Demand that SLINGSHOT repurchase or replace your vehicle.

When you submit the notice to SLINGSHOT, you must have possession of your vehicle.

Your notice to SLINGSHOT must be in writing and must be sent either by email to calnotice@polaris.com or by certified or registered mail, return receipt requested, to:

Polaris Industries Inc.

ATTN: California Written Notice

2100 Highway 55

Medina, MN 55340

Requisitos para la notificación en California. SLINGSHOT y su distribuidor SLINGSHOT dan alta prioridad a su satisfacción con nuestro desempeño. Si no está satisfecho con nuestra resolución de cualquier problema de garantía y desea exigir sanciones civiles para SLINGSHOT, debe seguir estos pasos establecidos por la ley de California (Código de procedimiento civil de California §871.24(a)-(d)):

Al menos con 30 días de antelación a la presentación de una demanda exigiendo sanciones civiles (Código civil § 1794(c)), debe:

  1. Notificar a SLINGSHOT su nombre y el nombre o los nombres de cualquier otro propietario o propietarios del vehículo, el número preciso de identificación del vehículo (“VIN”) de su vehículo y un breve resumen del historial de reparaciones y problemas con su vehículo, y

  2. Exigir que SLINGSHOT recompre o reemplace su vehículo.

Cuando presente la notificación a SLINGSHOT, debe tener posesión de su vehículo.

Su notificación a SLINGSHOT debe ser por escrito y debe enviarse o por correo electrónico a calnotice@polaris.com o mediante correo certificado o registrado, con solicitud de acuse de recibo, a:

Polaris Industries Inc.

ATTN: California Written Notice

2100 Highway 55

Medina, MN 55340 EE. UU.

Chapter 13: Notes

13.13.1: Maintenance Log

Maintenance Performed Miles / Km Notes Performed by


Index