Rear Assembly
|
SWING ARM SPACER APPLICATION |
||||
|---|---|---|---|---|
|
Left Side |
Right side |
|||
|
Spacer Spec. |
Part # |
Spacer Spec. |
Part # |
|
|
Honda® |
0.80 mm |
5141218 |
6.87 mm |
5141219 |
|
Kawasaki® |
N/A |
N/A |
N/A |
N/A |
|
Yamaha® |
N/A |
N/A |
15 mm |
5141220 |
|
*Left and Right referenced from the position of a rider sitting on the bike |
||||
-
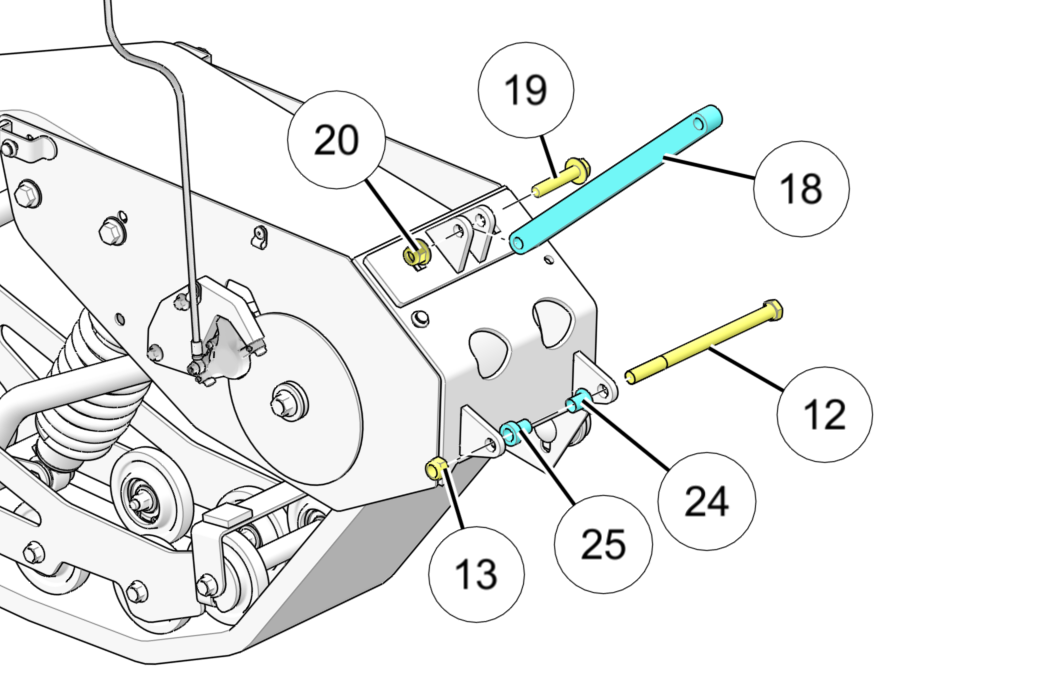
Position the Timbersled Ripper rear track assembly up to the rear swing arm bolt location on the bike. Some fit kits will require spacers 24/25 on one or either side of the frame, located between the Timbersled Ripper frame mount brackets and the bike’s swing-arm bolt bracket location. See the Swing Arm Spacer Application table at the beginning of this section for specific bike model spacers and locations.
NOTICEKawasaki® KLX models do not require any spacers. Honda® CRF models require left and right swing arm bolt spacers/reducers. Yamaha® TTR models require a single spacer positioned on the right side of the bike frame.
-
Slide provided 7/16 in x 6-1/2 in swing arm bolt 12 in from the left hand side of the motorcycle and tighten lock nut 13 to listed torque specification.
TORQUELock Nut
40 ft-lbs (54 N·m)
-
Move on to complete the Strut Rod Installation instructions.
NOTICERead carefully to ensure you complete the proper Strut Rod Installation steps for your specific motorcycle brand.
HONDA® & YAMAHA® MODELS: Strut Rod Installation
-
See note below before continuing.
NOTICEBolt the lower portion of the strut rod 18 to the rear Timbersled Ripper assembly using the provided bolt 19 and locknut 20. DO NOT TIGHTEN the lower portion of the strut rod until the upper portion has been bolted in place.The following instructions are for HONDA® and YAMAHA® MODELS ONLY.
-
Bolt the upper portion of the strut rod 18 into the motorcycle’s upper shock bracket using the bike’s upper shock mount bolt or pin. For motorcycles using a bolt, torque to your specific motorcycle manufacturer’s specifications.
-
Once you have the upper portion of the strut rod in place, torque the lower portion of the strut rod to the following specification.
TORQUEStrut Rod
44 ft-lbs (60 N·m)
-
Move on to complete the Brake Line Assembly and Routing instructions.
NOTICERead carefully to ensure you complete the proper Brake Line Assembly and Routing steps for your specific motorcycle brand.
KAWASAKI® MODELS: Strut Rod Installation
-
See note below before continuing.
NOTICEBolt the lower portion of the strut rod 18 to the rear Timbersled Ripper assembly using the provided bolt 19 and locknut 20. DO NOT TIGHTEN the lower portion of the strut rod until the upper portion has been bolted in place.The following instructions are for KAWASAKI® MODELS ONLY.
-
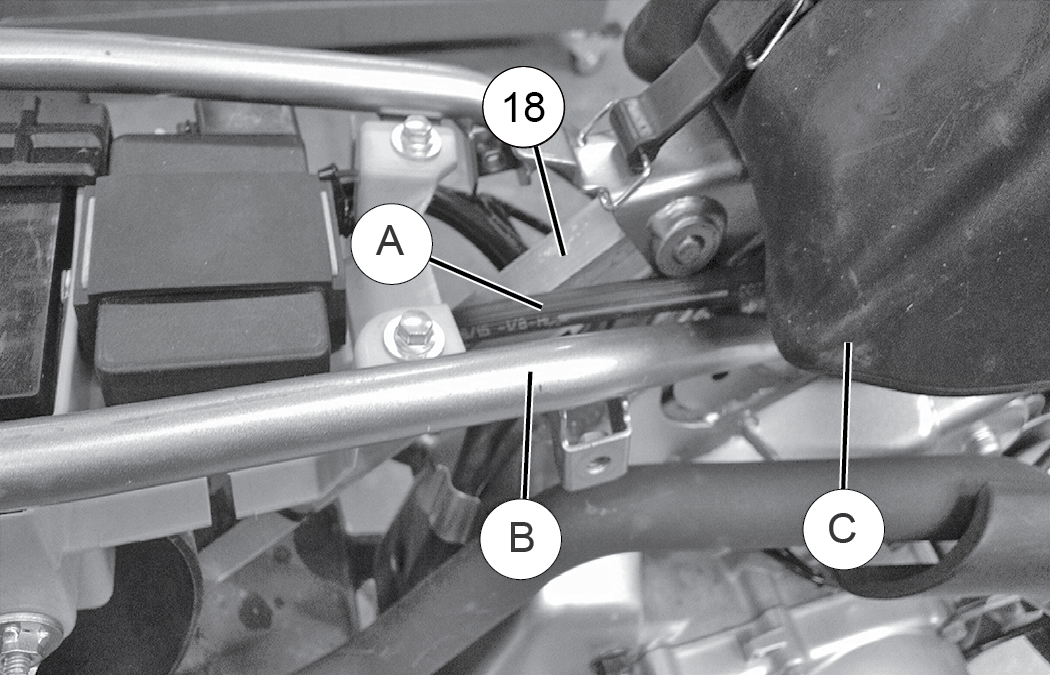
Before you fasten the upper strut rod bolt, move the strut rod 18 up to provide enough clearance to feed the brake line A and master cylinder over the top of the rear right sub-frame tubing B of the motorcycle and under the gas tank C as seen in the image below.
-
Move the top of the strut rod 18 back down into position, lining up the mounting holes. Bolt the top of the strut rod in place using the original upper strut rod bolt or pin and torque to your specific motorcycle manufacturer’s specifications.
-
Once you have the upper portion of the strut rod in place, torque the lower portion of the strut rod to the specification listed below.
TORQUEStrut Rod
44 ft-lbs (60 N·m)
-
Move on to complete the Brake Line Assembly and Routing instructions.
NOTERead carefully to ensure you complete the proper Brake Line Assembly and Routing steps for your specific motorcycle brand.